11 Tricks For Sound Design in MASSIVE

I wrote this guide to help people get a better grasp on Massive sound design.
These tips are not to be taken as 100% applicable to every sound you make.
Rather, they are meant to help guide you when you are lost on what to try next on a sound you’re stuck on, or as inspiration for new sounds.
I have noticed a lot of my producer friends don’t use the Dimension Expander in the most optimal way when designing basses.
Many people turn the size up and the dry/wet down.
This can cause the bass to be muffled, the song mix to become muddy, and even cause phase issues.
Instead of doing that, turn the dry/wet up and the size down, as seen in the example below.
This will give the bass (or any other sound) a good, clean, wet sound as well as better stereo.
This is usually the starting point of how I apply the Dimension Expander to basses, but remember to always experiment because different techniques work for different sounds.

Using Massive’s EQ as an extra filter can be a crucial part in getting that final sweeping/vocally sound on your basses - in fact this is one of my favorite Massive sound design tricks!
You can somewhat replicate the following filters very easily:
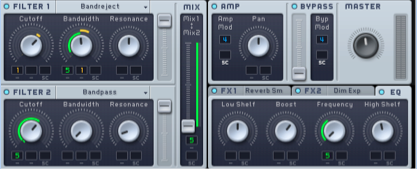
Obviously using Massive’s relatively limited EQ in this manner will not have the same effect as an actual filter, but it is a great “final touch” technique.
Turning on Restart via Gate is one of the single most important things to do when designing complicated basses in Massive.
In a nutshell, all wavetables (the original audio source for Massive sounds) have cycles that they play through.
For example, the “Carbon” wavetable (used in the example sound) has a cycle time of about 7 seconds when played in iTunes.
Massive breaks these cycles up into 360 “phase positions”.
By default, when a patch has multiple wavetables or uses the modulation oscillator, these cycles will start at random times which causes the sound to slightly change each time.
This is incredibly destructive to the bass design process, as you will hear a different sound every time you play your patch, as well as get phase issues.
These issues can cause your sound to be thin and raspy, instead of thick and heavy.
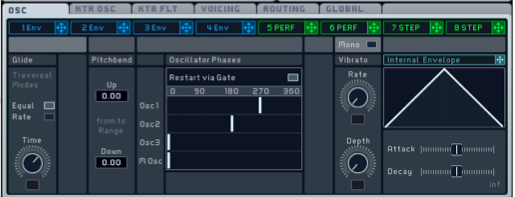
The solution to this is turning on “Restart via Gate” (seen in picture below).
This will force the wavetables and modulation oscillator to start in the same phase position every time, which will allow you to hear the same sound every time you play your patch.
Try moving the phase positions around a little bit and listen for sweet spots. This is a great way to drastically change your sound with minimal effort.
There is one main downside to using Restart Via Gate (see tip #3): it typically causes your sound to become more “mono” than it would with Restart Via Gate off.
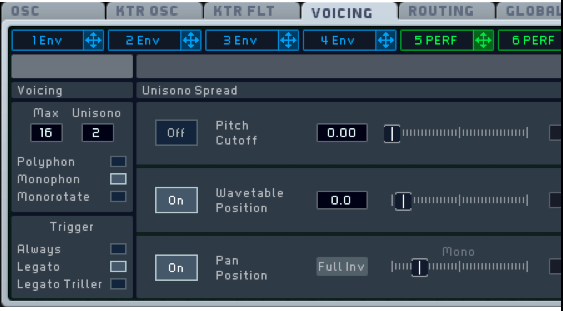
To fix this issue, you can use the WT Position and Pan Position sliders in the Voicing tab to add more stereo, as well as make your sounds more “in people’s faces”.
First turn the voices up by dragging the unison number up.
I typically use 2-3 on basses (see example sound).
Next, turn on the Wavetable Position and Pan Position in the Voicing Tab.
Move the slider up slightly on the Wavetable Position and listen to how it affects the stereo of your sound.
Experiment with moving the Pan Position slider, Unison Number, and even try the Pitch Cutoff (although it usually doesn’t sound good with Restart Via Gate on).
This, coupled with the Dimension Expander and Small Reverb, is a great way to add more stereo to your basses and other sounds.
Using Pitch Glide on rhythmic bass patterns has become extremely popular lately.
This is a simple trick. In the Voicing Tab, Turn on “Monophon” and keep the trigger on “Always”.
This will make the notes glide even when they are not legato. Now go to the Osc Tab and put the mode on “Equal” (to make the note glide time consistent) and play with the “Time” knob.
This one is an easy one, but I wanted to include it for anyone who may not be familiar with it.
Despite being a very basic concept, many people do not understand the wavetable warp modes in Massive (as well as XFER Serum).
Although it is basic, it is crucial to fully understand if you want to make complex basses.
With bend modes you can raise and lower the wavetables readout speed, either at the beginning or end of the wavetable, which “warps” the wavetable similar to warping a sound in Ableton.
This changes the tone of the bass without affecting the pitch. This is a very useful tool for sculpting vocally basses, as well as many other things.
The important thing to understand is HOW the Intensity knob functions in different warp modes:
Spectrum
Bend- and Bend+
Bend-/+
A common misperception is that the 3 bend modes are 3 entirely different things from spectrum, when this isn’t actually the case.
The only reason the Bend-/+ mode is available is to make it possible to modulate between the Bend- and Bend+ modes, which isn’t possible without it.
Understanding the bend modes and what you can do with them is crucial to complex bass design.
I have seen so many people try to use EVERY modulation source (ALL 8 of the envelopes, LFO’s, etc), and I don’t think it is a good idea for many reasons.
First, it causes basses to sound sloppy, loose and thin.
This is because the modulation is happening differently on many different parameters, so it won’t sound “together”.
Second, it can cause you to not know why something in your sound is happening or sounding the way it does.
The only way to master complex bass design is to know what EVERYTHING in Massive does, including what all the modulation is doing to affect your sound.
Finally, you can’t focus on making the modulation as good as possible if there are many sources.
I typically use one main LFO or performer to control 90-100% of my sound (see/listen to example sound).
This was one of the first things I figured out early that helped me get better at bass design at an extremely fast rate.
Spend A LOT of time on the modulation source you use, and really dive into all the options in it.
Modulation is basically the most important thing in complex bass design, so why not keep it simple?
Use just one modulation source and your sound design will become a lot less complicated, even when you are making complicated sounds!

EVERYONE uses LFOs almost all of the time. I only have one producer friend who uses performers as much as I do, and he is the best sound designer I personally know.
Try using the performer for a change. There are so many reasons for this, I could probably list them all day, but here’s a few:
There are endless possibilities when using Massive’s frequency shifter.
The best advice I can give you is to dive right into it and starting testing different things (there are only two knobs!)
It takes a lot of time and practice to get modulation to sound good on the Frequency Shifter, but a good thing to try is using the stepper.
Try putting the first position of the stepper all the way to the top, and the rest all the way down (see example sound).
Play with the rate. I also use this trick on pitch modulation on the modulation oscillator, usually coupled with sidechain modulation from another stepper or envelope (see example sound/tip #11).
The Frequency Shifter, especially used with modulation, can give you that thick, detuned sound, similar to basses in songs such as

Modulating between the two filters can lead to a cleaner sound, or change your sound entirely.
You can do this in many ways, but I typically will use the same modulation source and use a bandpass filter set to replicate the effect of an amp/volume knob when my bass is not in its “climax” (see example sound).
This, coupled with using the same modulation on the actual oscillator amps, will drastically clean up your basses!

This trick is a lot more advanced than the others in this article, but can give you some of the heaviest basses you can imagine.
Using an LFO or envelope for pitch modulation on the Mod Osc is almost impossible, but using steppers (or performers) can be an incredible tool.
If done right, this trick with give a quick, sharp, bite to your bass, as well as completely morph the sound. Experiment heavily with this concept because it goes much deeper than I explained (We will be doing a tutorial video on this in the future).
Thanks for reading this guide! I hope it helped you understand some of the important concepts involved in complex bass design in Massive.
Don’t forget, the best thing you can do to get better at sound design is to actually WORK on Massive sound design.
These tips are not to be taken as 100% applicable to every sound you make.
Rather, they are meant to help guide you when you are lost on what to try next on a sound you’re stuck on, or as inspiration for new sounds.
Trick 1: Using the Dimension Expander correctly
I have noticed a lot of my producer friends don’t use the Dimension Expander in the most optimal way when designing basses.
Many people turn the size up and the dry/wet down.
This can cause the bass to be muffled, the song mix to become muddy, and even cause phase issues.
Instead of doing that, turn the dry/wet up and the size down, as seen in the example below.
This will give the bass (or any other sound) a good, clean, wet sound as well as better stereo.
This is usually the starting point of how I apply the Dimension Expander to basses, but remember to always experiment because different techniques work for different sounds.

Trick 2: Use the built EQ as an extra filter
Using Massive’s EQ as an extra filter can be a crucial part in getting that final sweeping/vocally sound on your basses - in fact this is one of my favorite Massive sound design tricks!
You can somewhat replicate the following filters very easily:
- Lowpass/Sweep – modulate the High Shelf.
- Highpass/Sweep – modulate the Low Shelf.
- Bandpass/Bandreject (as seen in picture below) – First, turn the Low Shelf and High Shelf down a bit. The boost will be used in a similar way the bandwidth/resonance is used as a typical bandpass or bandreject filter. You can modulate the frequency for an extra sweeping/vocally sound.

Obviously using Massive’s relatively limited EQ in this manner will not have the same effect as an actual filter, but it is a great “final touch” technique.
Trick 3: Restart Via Gate
Turning on Restart via Gate is one of the single most important things to do when designing complicated basses in Massive.
In a nutshell, all wavetables (the original audio source for Massive sounds) have cycles that they play through.
For example, the “Carbon” wavetable (used in the example sound) has a cycle time of about 7 seconds when played in iTunes.
Massive breaks these cycles up into 360 “phase positions”.
By default, when a patch has multiple wavetables or uses the modulation oscillator, these cycles will start at random times which causes the sound to slightly change each time.
This is incredibly destructive to the bass design process, as you will hear a different sound every time you play your patch, as well as get phase issues.
These issues can cause your sound to be thin and raspy, instead of thick and heavy.
The solution to this is turning on “Restart via Gate” (seen in picture below).
This will force the wavetables and modulation oscillator to start in the same phase position every time, which will allow you to hear the same sound every time you play your patch.
Try moving the phase positions around a little bit and listen for sweet spots. This is a great way to drastically change your sound with minimal effort.

Trick 4: Using WT Position/Pan Position to add stereo
There is one main downside to using Restart Via Gate (see tip #3): it typically causes your sound to become more “mono” than it would with Restart Via Gate off.
To fix this issue, you can use the WT Position and Pan Position sliders in the Voicing tab to add more stereo, as well as make your sounds more “in people’s faces”.
First turn the voices up by dragging the unison number up.
I typically use 2-3 on basses (see example sound).
Next, turn on the Wavetable Position and Pan Position in the Voicing Tab.
Move the slider up slightly on the Wavetable Position and listen to how it affects the stereo of your sound.
Experiment with moving the Pan Position slider, Unison Number, and even try the Pitch Cutoff (although it usually doesn’t sound good with Restart Via Gate on).
This, coupled with the Dimension Expander and Small Reverb, is a great way to add more stereo to your basses and other sounds.

Trick 5: Pitch Glide
Using Pitch Glide on rhythmic bass patterns has become extremely popular lately.
This is a simple trick. In the Voicing Tab, Turn on “Monophon” and keep the trigger on “Always”.
This will make the notes glide even when they are not legato. Now go to the Osc Tab and put the mode on “Equal” (to make the note glide time consistent) and play with the “Time” knob.
This one is an easy one, but I wanted to include it for anyone who may not be familiar with it.
Trick 6: Wavetable Warp Modes (Bend-/+)
Despite being a very basic concept, many people do not understand the wavetable warp modes in Massive (as well as XFER Serum).
Although it is basic, it is crucial to fully understand if you want to make complex basses.
With bend modes you can raise and lower the wavetables readout speed, either at the beginning or end of the wavetable, which “warps” the wavetable similar to warping a sound in Ableton.
This changes the tone of the bass without affecting the pitch. This is a very useful tool for sculpting vocally basses, as well as many other things.
The important thing to understand is HOW the Intensity knob functions in different warp modes:
Spectrum
- With the intensity turned all the way up, Spectrum mode keeps the wavetable as it sounds by default (how it would sound played in iTunes)
- Turning the intensity down will cause the sound to morph into a sine wave, regardless of the wavetable. Modulating the intensity on Spectrum mode has similar effect to a low pass filter.
Bend- and Bend+
- With the intensity turned all the way down, the Bend- and Bend+ modes keep the wavetable as it sounds by default (how it would sound played in iTunes) This means with the intensity down in these modes, the oscillator is basically in spectrum mode.
- Turning the intensity up will cause the sound to morph into the Bend- or Bend+ mode (whichever one it is set on)
Bend-/+
- In this mode, turning the intensity knob all the way to the left puts the oscillator in Bend- mode, turning it all the way to the right puts it in Bend+ mode, and all the way to the middle is basically spectrum mode.
A common misperception is that the 3 bend modes are 3 entirely different things from spectrum, when this isn’t actually the case.
The only reason the Bend-/+ mode is available is to make it possible to modulate between the Bend- and Bend+ modes, which isn’t possible without it.
Understanding the bend modes and what you can do with them is crucial to complex bass design.
Trick 7: Use one modulation source on most (if not all) parameters that have modulation
I have seen so many people try to use EVERY modulation source (ALL 8 of the envelopes, LFO’s, etc), and I don’t think it is a good idea for many reasons.
First, it causes basses to sound sloppy, loose and thin.
This is because the modulation is happening differently on many different parameters, so it won’t sound “together”.
Second, it can cause you to not know why something in your sound is happening or sounding the way it does.
The only way to master complex bass design is to know what EVERYTHING in Massive does, including what all the modulation is doing to affect your sound.
Finally, you can’t focus on making the modulation as good as possible if there are many sources.
I typically use one main LFO or performer to control 90-100% of my sound (see/listen to example sound).
This was one of the first things I figured out early that helped me get better at bass design at an extremely fast rate.
Spend A LOT of time on the modulation source you use, and really dive into all the options in it.
Modulation is basically the most important thing in complex bass design, so why not keep it simple?
Use just one modulation source and your sound design will become a lot less complicated, even when you are making complicated sounds!

Trick 8: Try using a performer instead of an LFO
EVERYONE uses LFOs almost all of the time. I only have one producer friend who uses performers as much as I do, and he is the best sound designer I personally know.
Try using the performer for a change. There are so many reasons for this, I could probably list them all day, but here’s a few:
- Using performers makes setting the modulation range a lot easier (especially for beginners), because performers are “unipolar” instead of “bipolar”, like Massive’s LFO’s are. This means the modulation visual will only move in one direction, like an envelope in Massive, making setting the start and end point much easier.
- You can customize the shapes. With LFO’s you are somewhat limited to what shapes you can create. In bass design, you may sometimes want a more vocally sound than what an LFO shape will offer, and performers are the solution to this!
- You can make patterns/rhythms with performers. I have made entire drop rhythms for songs in Massive’s performer. You are not limited to a short modulation cycle like you are with LFO’s. Save your favorite performer patterns and you can use them on new sounds, which saves a ton of time and leads to consistency.
Trick 9: Frequency Shifter
There are endless possibilities when using Massive’s frequency shifter.
The best advice I can give you is to dive right into it and starting testing different things (there are only two knobs!)
It takes a lot of time and practice to get modulation to sound good on the Frequency Shifter, but a good thing to try is using the stepper.
Try putting the first position of the stepper all the way to the top, and the rest all the way down (see example sound).
Play with the rate. I also use this trick on pitch modulation on the modulation oscillator, usually coupled with sidechain modulation from another stepper or envelope (see example sound/tip #11).
The Frequency Shifter, especially used with modulation, can give you that thick, detuned sound, similar to basses in songs such as

Trick 10: Modulate between the two filters
Modulating between the two filters can lead to a cleaner sound, or change your sound entirely.
You can do this in many ways, but I typically will use the same modulation source and use a bandpass filter set to replicate the effect of an amp/volume knob when my bass is not in its “climax” (see example sound).
This, coupled with using the same modulation on the actual oscillator amps, will drastically clean up your basses!

Trick 11: Pitch modulation on the Modulation Oscillator
This trick is a lot more advanced than the others in this article, but can give you some of the heaviest basses you can imagine.
Using an LFO or envelope for pitch modulation on the Mod Osc is almost impossible, but using steppers (or performers) can be an incredible tool.
- First, set up a stepper the same way you did in tip #7 (see example sound as well).
- Then, assign it to the Mod Osc Pitch.
- Move the pitch modulation by however many octaves you want to (I usually do 1 or 2)
If done right, this trick with give a quick, sharp, bite to your bass, as well as completely morph the sound. Experiment heavily with this concept because it goes much deeper than I explained (We will be doing a tutorial video on this in the future).

Conclusion
Thanks for reading this guide! I hope it helped you understand some of the important concepts involved in complex bass design in Massive.
Don’t forget, the best thing you can do to get better at sound design is to actually WORK on Massive sound design.

