Sound Design Basics: FM Synthesis

It’s no secret that FM synthesizers, like FM8, can be intimidating to those who are unfamiliar with the concept of FM synthesis.
That’s because FM synthesis is a bit deeper than sound design methods like subtractive synthesis. It’s much more rooted in theory, and diving into an FM synthesizer without some understanding of that theory can be confusing.
Just like any form of synthesis, however, FM synthesis can easily be broken down into distinct parts. By understanding each part individually, it’s much easier to put the whole picture together and approach FM synthesis more purposefully.
And once you do, you might even find that learning FM synthesis can be quite rewarding. That’s because it’s able to generate sounds that would be difficult, if not impossible, to create using other methods. Adding this skill to your producer toolkit can be a great source of new inspiration and new ideas.
So, let’s first get into exactly what FM Synthesis is.
FM synthesis is short for frequency modulation synthesis.
Simply put, FM synthesis uses one signal called, the “modulator” to modulate the pitch of another signal, the “carrier”, that’s in the same or a similar audio range.
This creates brand new frequency information in the resulting sound, changing the timbre without the use of filters.
For clarity’s sake, “timbre” is the distinctive character of a sound. The timbre of a sound depends upon its frequency content.The frequencies present in a piano sound, for example, are different than those in a guitar sound, even at the same pitch and level. This is what makes them sound different.
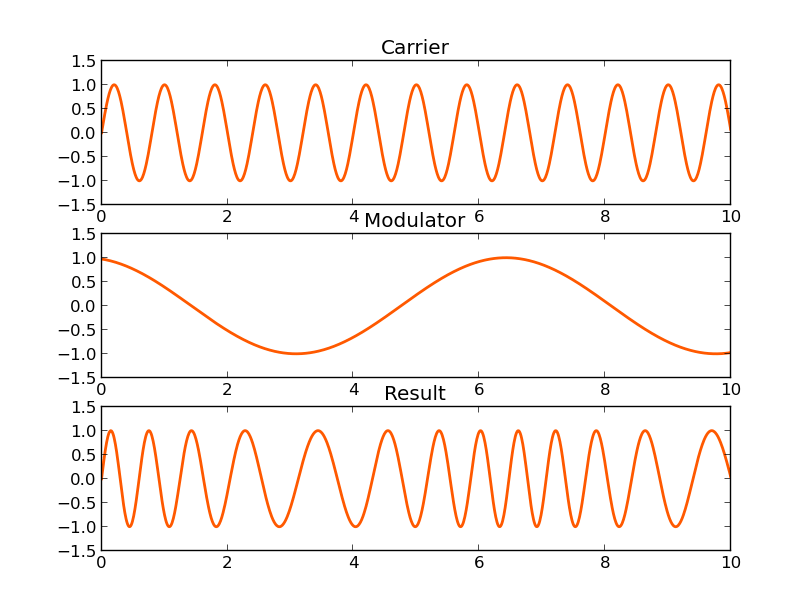
As you can see in the diagram below, a complex waveform is created using only two sine waves.
FM synthesis was discovered in the 1967 experiments of John Chowning at Stanford University. At first, Chowning was using complex waveforms to modulate the pitch of simple sine waves. This resulted in supersonic signals at frequencies over a million Hertz.
Chowning then began experimenting with modulating the sine waves with other sine waves and saw the introduction of new harmonics on either side of the modulated sine wave.
These harmonics would change depending on the frequency of the modulating signal, producing rich sounds with only the use of two sine waves.
Yamaha licensed Chowning’s discovery and created the first FM synthesizer, the massively popular DX7. And thus, FM synthesis was born.
With this brief history in mind, let’s look at how exactly FM synthesis works, and why you may want to use it when designing new sounds.
The most important concept to understand when diving into FM synthesis is the idea of operators. An operator is a group of components that interact with each other, making one building block of the FM synthesis setup.
Furthermore, these operator groups then interact amongst each other. Each operator is generally set up the same way, and the arrangement of the operators helps determine the final output of the synthesizer. Let’s look at how an individual operator is constructed:

A basic operator is comprised of the following parts:
The oscillator’s pitch can be controlled with a MIDI input (but doesn’t have to be - we’ll get to that), and the amplifier can be controlled with an envelope generator to shape the sound over time.
An operator’s input feeds into the oscillator’s pitch. For now, we can ignore the input, as we’re only dealing with one operator.
We spoke a bit about oscillators in Sound Design Basics: Subtractive Synthesis. As a refresher, an oscillator generates and outputs a repeating waveform. This waveform will generally have an adjustable frequency / pitch and an adjustable waveshape (e.g. sine, sawtooth, etc.).
As with most synthesizers, the frequency / pitch of the oscillator can be controlled using a MIDI input from a MIDI controller.
In FM synthesis however, this is not always ideal. Because of this, we can detach the MIDI input from the oscillator, causing it to output the same pitch regardless of what note is played.
The amplifier controls the level of signal coming from the oscillator. An envelope generator can be used to sculpt the level of the signal over time, creating everything from short, percussive sounds to swelling pad sounds.
For more information about how these envelopes work, feel free to refer to the other article.
Now that we understand how an individual operator works, let’s look at how multiple operators interact with each other. This is the most important element of FM synthesis and allows us to create complex timbres with minimal effort.

The output of one operator can be fed into the input of another. This will modulate the pitch of the second operator with the signal output from the first. In the diagram above, we would refer to Operator A as the “modulator” and Operator B as the “carrier”.
Note that we would not be able to hear the output of Operator A in this setup. Its sole purpose is to create a signal to modulate the pitch of Operator B’s oscillator. The final sound that we hear comes from Operator B’s output.
If this sounds complicated, let’s momentarily replace Operator A with an LFO. The pitch of the oscillator in Operator B would be automated up and down according to this LFO.
Because an LFO is literally a low-frequency oscillator, we would quite clearly hear the pitch of Operator B’s oscillator going up and down repeatedly.
An LFO generally has frequency of less than 20 Hz, the lower boundary of human hearing. We refer to a signal above 20 Hz (and under 20 kHz) as being at “audio rate”, audible to the human ear as a distinct pitch.
Operator A in the diagram is outputting a signal at audio rate. Thus, it’s very rapidly moving the pitch of Operator B’s oscillator up and down. This can be done at any frequency to which we set Operator A’s oscillator.
As you could imagine, we’re no longer able to hear Operator B’s output signal distinctly moving up and down. Instead, the timbre of the signal exiting Operator B appears to change, creating new frequencies in the overall output of the synthesizer.
You can see this represented in the screenshots below. We’re using Native Instrument’s FM8 software synthesizer, as it neatly displays the final waveform and frequency spectrum of the synth in the “Spect” tab.
Operator B is a simple sine wave, being fed into the output of the synthesizer at 100% volume. The resulting waveform is naturally a pure sine wave, and only contains one harmonic, the fundamental frequency, represented in the Spectrum graph.
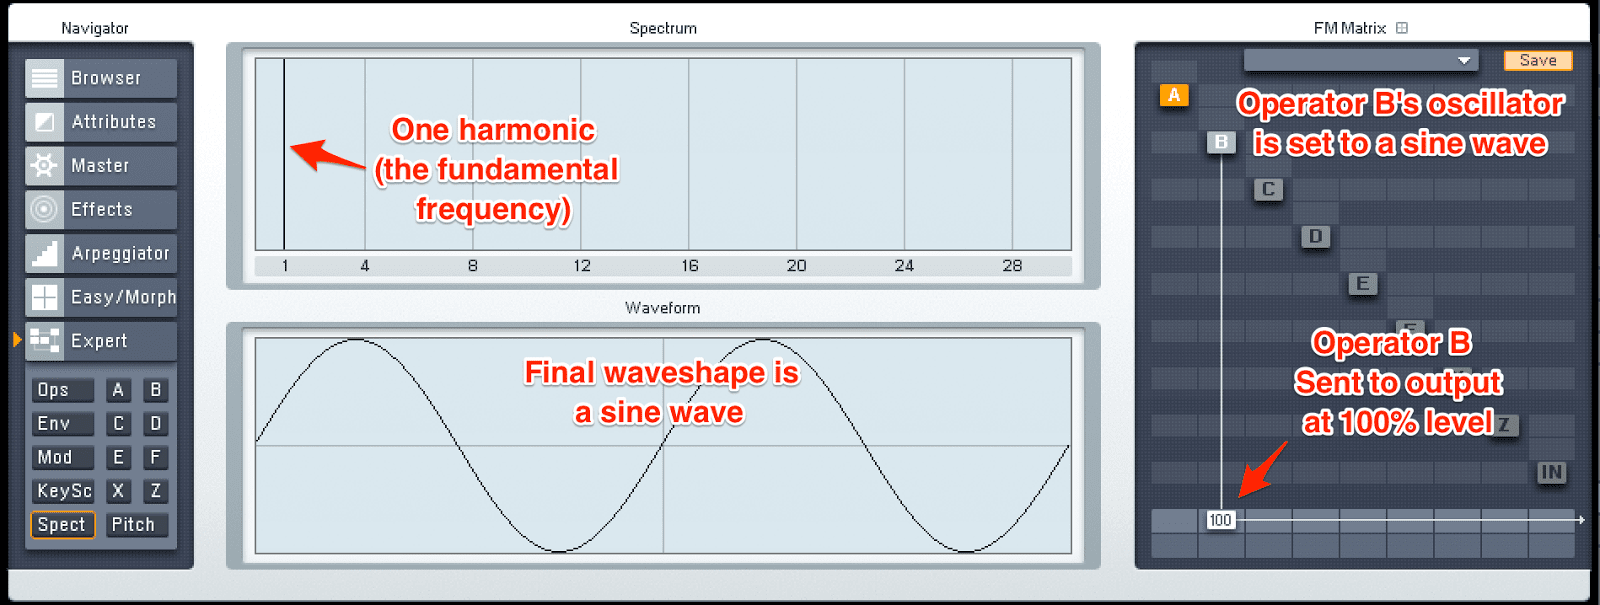
Now, let’s feed Operator A (also a pure sine wave) into the pitch of Operator B. As you can see, the more we feed this signal into Operator B, the more the waveform changes and the newer harmonics (frequencies) are introduced.
With only two sine waves, we’ve created a complex sound with a much richer frequency content than a basic sine wave.


Congratulations! You’re now using FM synthesis!
Most FM synthesizers have at least four available operators. While synths may vary in their functionality, most will allow various ways to arrange these operators.
The way that these operators are arranged is called the algorithm. Some have preset algorithms, while others can create custom ones.
But at the end of the day, the order in which these operators interact with each other is as important as the signal leaving each one. Let’s look at how we can arrange these operators in two of the most widely-used FM synths, Ableton’s “Operator” and Native Instrument’s “FM8”.
Ableton comes with a native FM synthesizer called “Operator”. This name can make discussing the synth a bit confusing, so for future reference “Operator” will refer to the synthesizer and “operator” will refer to the building block of FM synthesis that we’ve discussed already.

Operator has four available operators, named A, B, C, and D from bottom to top.
Each operator has an associated oscillator. This can be accessed by selecting one of the four operators, and looking in “The Operator Display”, the screen in the middle of the soft synth. Two knobs control the oscillator’s pitch (relative to the MIDI input controlling the synth).
The Coarse knob ranges from 0.5 to 48. A setting of 1 causes the operator to play the note input via a MIDI controller, and 2-48 sets the pitch to the next note up the harmonic series. A coarse setting of 0.5 plays an octave below the note played.
The Fine knob ranges from 0 to 1000. At 0, the operator will output the note played, and at 1000 the operator will output an octave up from the note played.
This allows a smooth gradient over the course of an octave and the ability to have the operator play pitches between the notes on a keyboard.
Each operator also has a built-in amplifier, controlled with the Level knob. By clicking on an operator, we have access to an ADSR envelope generator to control the operator’s level over time.
Lastly, each operator has a toggleable button labeled Fixed. Remember that sometimes we may want to detach an operator’s pitch from the MIDI input. This is how that’s done.

By clicking this box, the Coarse knob changes to Frequency and the Fine knob changes to Multiplier. Frequency sets the pitch of the operator, which will not change regardless of the note played. The synth offers a range of 10-2000 Hz for the fixed frequency.
Multiplier multiplies the number set by the Frequency knob to determine the final pitch of the operator’s output. This knob can be set to 0, 0.001, 0.01, 0.1, 1, and 10. With the combination of these two knobs, we’re able to set the output of an operator to anywhere between 0.01 Hz and 20 kHz.

To customize Operator’s algorithm, click the bottom-right tab, the “Global Shell”. This will bring up various options in “The Operator Display”.
At the top of the display are 11 possible arrangements of the operators, with the yellow, green, teal, and orange boxes representing operators A-D respectively.
Signal travels from top to bottom in all of these algorithm diagrams. As you can see, the various algorithms place operators in series and/or in parallel with each other. This offers the ability to customize modulator signals and their destinations at different carriers.
Some algorithms end with operators separately hitting the output in parallel, similarly to how oscillators combine in standard subtractive and additive synthesizers.
This allows for a whole host of sounds, making Operator quite a powerful synth compared to many native synths that come with DAWs.
FM8 is one of the more popular and more powerful FM synthesizers out there. We’ve already done a full plugin overview on FM8; if you’re interested feel free to check it out here.
Native Instrument’s flagship FM synthesizer offers a much higher level of customization than Ableton’s Operator, and is controlled mostly through the FM Matrix on the right-hand side.

As you can see, FM8 has eight separate operators; six oscillator-based ones, a noise-based operator, and a filter-based operator.
In FM8, operators are routed to other destinations by dragging up or down in the various boxes of the matrix. Operators are sent on a 0-100 scale, with 0 being not sent at all and 100 being sent at maximum level.
Operators can be sent directly to the output in the second row from the bottom.
FM8 allows the user to create a nearly infinite number of different algorithms. Dragging up on the box above or below an operator will route it into the input of the operator on that row.
Dragging up on the box directly above an operator will actually route it back into itself, generating different outcomes than routing another operator into it.

For example, if both Operator A and B are a simple sine wave at the same frequency, routing A into B will have a different outcome than routing B into itself. Check out the frequency content and waveforms below.

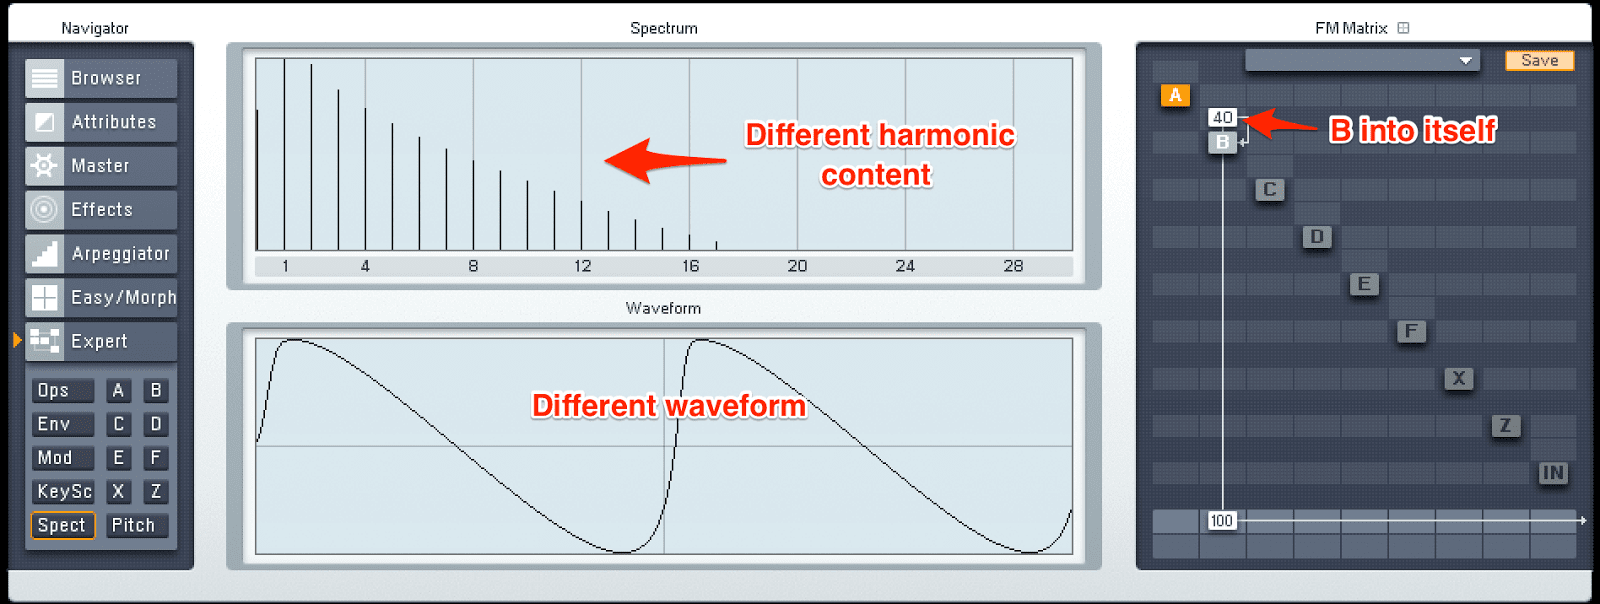
Note that you’re playing with feedback here, which can get out of hand and cause harsh sounds very quickly. Check out what happens if we route B into itself at 100%; this crazy waveform distorts so much that it sounds like noise.

Because FM synthesis is essentially pitch automation at high rates, things can get hectic quickly. Therefore, it’s a good idea to use simple waveforms like sine waves as modulators.
If a modulator signal has a lot of frequency content, the final sound can become very harsh. This is the reason FM8’s oscillators offer a variety of simple waveshapes.
A common technique in FM synthesis is simply using sine waves to FM each other, like Chowning did at Standford. This can be done with three or more operators, allowing the creation of highly complex waveforms while still offering the control of using simple waveforms.
Try various algorithms and find what works for you. It’s also a good idea to load up a preset in one of these synthesizers and dissect it to discover how it works. By breaking things down, FM synthesis will seem much easier and allow you to start making your own killer patches.
We hope you enjoyed this overview of FM synthesis. These techniques allow the creation of highly complex sounds, and the possibilities available in FM synthesis are endless.
Many of the world’s most talented sound designers and producers employ FM synthesis in a lot of their work, making everything from searing synths to atonal percussion sounds. Have fun exploring, experimenting, and discovering sounds that you never thought possible.
Have any questions? Have any tips for using FM synthesis? Feel free to leave a comment below!
That’s because FM synthesis is a bit deeper than sound design methods like subtractive synthesis. It’s much more rooted in theory, and diving into an FM synthesizer without some understanding of that theory can be confusing.
Just like any form of synthesis, however, FM synthesis can easily be broken down into distinct parts. By understanding each part individually, it’s much easier to put the whole picture together and approach FM synthesis more purposefully.
And once you do, you might even find that learning FM synthesis can be quite rewarding. That’s because it’s able to generate sounds that would be difficult, if not impossible, to create using other methods. Adding this skill to your producer toolkit can be a great source of new inspiration and new ideas.
So, let’s first get into exactly what FM Synthesis is.
What Is FM Synthesis?
FM synthesis is short for frequency modulation synthesis.
Simply put, FM synthesis uses one signal called, the “modulator” to modulate the pitch of another signal, the “carrier”, that’s in the same or a similar audio range.
This creates brand new frequency information in the resulting sound, changing the timbre without the use of filters.
For clarity’s sake, “timbre” is the distinctive character of a sound. The timbre of a sound depends upon its frequency content.The frequencies present in a piano sound, for example, are different than those in a guitar sound, even at the same pitch and level. This is what makes them sound different.
As you can see in the diagram below, a complex waveform is created using only two sine waves.

A History Of FM Synthesis
FM synthesis was discovered in the 1967 experiments of John Chowning at Stanford University. At first, Chowning was using complex waveforms to modulate the pitch of simple sine waves. This resulted in supersonic signals at frequencies over a million Hertz.
Chowning then began experimenting with modulating the sine waves with other sine waves and saw the introduction of new harmonics on either side of the modulated sine wave.
These harmonics would change depending on the frequency of the modulating signal, producing rich sounds with only the use of two sine waves.
Yamaha licensed Chowning’s discovery and created the first FM synthesizer, the massively popular DX7. And thus, FM synthesis was born.
With this brief history in mind, let’s look at how exactly FM synthesis works, and why you may want to use it when designing new sounds.
Operators
The most important concept to understand when diving into FM synthesis is the idea of operators. An operator is a group of components that interact with each other, making one building block of the FM synthesis setup.
Furthermore, these operator groups then interact amongst each other. Each operator is generally set up the same way, and the arrangement of the operators helps determine the final output of the synthesizer. Let’s look at how an individual operator is constructed:

A basic operator is comprised of the following parts:
- input
- oscillator
- amplifier
- output
The oscillator’s pitch can be controlled with a MIDI input (but doesn’t have to be - we’ll get to that), and the amplifier can be controlled with an envelope generator to shape the sound over time.
Input
An operator’s input feeds into the oscillator’s pitch. For now, we can ignore the input, as we’re only dealing with one operator.
Oscillator
We spoke a bit about oscillators in Sound Design Basics: Subtractive Synthesis. As a refresher, an oscillator generates and outputs a repeating waveform. This waveform will generally have an adjustable frequency / pitch and an adjustable waveshape (e.g. sine, sawtooth, etc.).
As with most synthesizers, the frequency / pitch of the oscillator can be controlled using a MIDI input from a MIDI controller.
In FM synthesis however, this is not always ideal. Because of this, we can detach the MIDI input from the oscillator, causing it to output the same pitch regardless of what note is played.
Amplifier
The amplifier controls the level of signal coming from the oscillator. An envelope generator can be used to sculpt the level of the signal over time, creating everything from short, percussive sounds to swelling pad sounds.
For more information about how these envelopes work, feel free to refer to the other article.
Modulators & Carriers
Now that we understand how an individual operator works, let’s look at how multiple operators interact with each other. This is the most important element of FM synthesis and allows us to create complex timbres with minimal effort.

The output of one operator can be fed into the input of another. This will modulate the pitch of the second operator with the signal output from the first. In the diagram above, we would refer to Operator A as the “modulator” and Operator B as the “carrier”.
Note that we would not be able to hear the output of Operator A in this setup. Its sole purpose is to create a signal to modulate the pitch of Operator B’s oscillator. The final sound that we hear comes from Operator B’s output.
If this sounds complicated, let’s momentarily replace Operator A with an LFO. The pitch of the oscillator in Operator B would be automated up and down according to this LFO.
Because an LFO is literally a low-frequency oscillator, we would quite clearly hear the pitch of Operator B’s oscillator going up and down repeatedly.
An LFO generally has frequency of less than 20 Hz, the lower boundary of human hearing. We refer to a signal above 20 Hz (and under 20 kHz) as being at “audio rate”, audible to the human ear as a distinct pitch.
Operator A in the diagram is outputting a signal at audio rate. Thus, it’s very rapidly moving the pitch of Operator B’s oscillator up and down. This can be done at any frequency to which we set Operator A’s oscillator.
As you could imagine, we’re no longer able to hear Operator B’s output signal distinctly moving up and down. Instead, the timbre of the signal exiting Operator B appears to change, creating new frequencies in the overall output of the synthesizer.
You can see this represented in the screenshots below. We’re using Native Instrument’s FM8 software synthesizer, as it neatly displays the final waveform and frequency spectrum of the synth in the “Spect” tab.
Operator B is a simple sine wave, being fed into the output of the synthesizer at 100% volume. The resulting waveform is naturally a pure sine wave, and only contains one harmonic, the fundamental frequency, represented in the Spectrum graph.

Now, let’s feed Operator A (also a pure sine wave) into the pitch of Operator B. As you can see, the more we feed this signal into Operator B, the more the waveform changes and the newer harmonics (frequencies) are introduced.
With only two sine waves, we’ve created a complex sound with a much richer frequency content than a basic sine wave.


Congratulations! You’re now using FM synthesis!
Arranging The Operators
Most FM synthesizers have at least four available operators. While synths may vary in their functionality, most will allow various ways to arrange these operators.
The way that these operators are arranged is called the algorithm. Some have preset algorithms, while others can create custom ones.
But at the end of the day, the order in which these operators interact with each other is as important as the signal leaving each one. Let’s look at how we can arrange these operators in two of the most widely-used FM synths, Ableton’s “Operator” and Native Instrument’s “FM8”.
Ableton’s “Operator”
Ableton comes with a native FM synthesizer called “Operator”. This name can make discussing the synth a bit confusing, so for future reference “Operator” will refer to the synthesizer and “operator” will refer to the building block of FM synthesis that we’ve discussed already.

Operator has four available operators, named A, B, C, and D from bottom to top.
Each operator has an associated oscillator. This can be accessed by selecting one of the four operators, and looking in “The Operator Display”, the screen in the middle of the soft synth. Two knobs control the oscillator’s pitch (relative to the MIDI input controlling the synth).
The Coarse knob ranges from 0.5 to 48. A setting of 1 causes the operator to play the note input via a MIDI controller, and 2-48 sets the pitch to the next note up the harmonic series. A coarse setting of 0.5 plays an octave below the note played.
The Fine knob ranges from 0 to 1000. At 0, the operator will output the note played, and at 1000 the operator will output an octave up from the note played.
This allows a smooth gradient over the course of an octave and the ability to have the operator play pitches between the notes on a keyboard.
Each operator also has a built-in amplifier, controlled with the Level knob. By clicking on an operator, we have access to an ADSR envelope generator to control the operator’s level over time.
Lastly, each operator has a toggleable button labeled Fixed. Remember that sometimes we may want to detach an operator’s pitch from the MIDI input. This is how that’s done.

By clicking this box, the Coarse knob changes to Frequency and the Fine knob changes to Multiplier. Frequency sets the pitch of the operator, which will not change regardless of the note played. The synth offers a range of 10-2000 Hz for the fixed frequency.
Multiplier multiplies the number set by the Frequency knob to determine the final pitch of the operator’s output. This knob can be set to 0, 0.001, 0.01, 0.1, 1, and 10. With the combination of these two knobs, we’re able to set the output of an operator to anywhere between 0.01 Hz and 20 kHz.

To customize Operator’s algorithm, click the bottom-right tab, the “Global Shell”. This will bring up various options in “The Operator Display”.
At the top of the display are 11 possible arrangements of the operators, with the yellow, green, teal, and orange boxes representing operators A-D respectively.
Signal travels from top to bottom in all of these algorithm diagrams. As you can see, the various algorithms place operators in series and/or in parallel with each other. This offers the ability to customize modulator signals and their destinations at different carriers.
Some algorithms end with operators separately hitting the output in parallel, similarly to how oscillators combine in standard subtractive and additive synthesizers.
This allows for a whole host of sounds, making Operator quite a powerful synth compared to many native synths that come with DAWs.
Native Instrument’s FM8
FM8 is one of the more popular and more powerful FM synthesizers out there. We’ve already done a full plugin overview on FM8; if you’re interested feel free to check it out here.
Native Instrument’s flagship FM synthesizer offers a much higher level of customization than Ableton’s Operator, and is controlled mostly through the FM Matrix on the right-hand side.

As you can see, FM8 has eight separate operators; six oscillator-based ones, a noise-based operator, and a filter-based operator.
In FM8, operators are routed to other destinations by dragging up or down in the various boxes of the matrix. Operators are sent on a 0-100 scale, with 0 being not sent at all and 100 being sent at maximum level.
Operators can be sent directly to the output in the second row from the bottom.
FM8 allows the user to create a nearly infinite number of different algorithms. Dragging up on the box above or below an operator will route it into the input of the operator on that row.
Dragging up on the box directly above an operator will actually route it back into itself, generating different outcomes than routing another operator into it.

For example, if both Operator A and B are a simple sine wave at the same frequency, routing A into B will have a different outcome than routing B into itself. Check out the frequency content and waveforms below.


Note that you’re playing with feedback here, which can get out of hand and cause harsh sounds very quickly. Check out what happens if we route B into itself at 100%; this crazy waveform distorts so much that it sounds like noise.

Best practices & some tips
Because FM synthesis is essentially pitch automation at high rates, things can get hectic quickly. Therefore, it’s a good idea to use simple waveforms like sine waves as modulators.
If a modulator signal has a lot of frequency content, the final sound can become very harsh. This is the reason FM8’s oscillators offer a variety of simple waveshapes.
A common technique in FM synthesis is simply using sine waves to FM each other, like Chowning did at Standford. This can be done with three or more operators, allowing the creation of highly complex waveforms while still offering the control of using simple waveforms.
Try various algorithms and find what works for you. It’s also a good idea to load up a preset in one of these synthesizers and dissect it to discover how it works. By breaking things down, FM synthesis will seem much easier and allow you to start making your own killer patches.
Conclusion
We hope you enjoyed this overview of FM synthesis. These techniques allow the creation of highly complex sounds, and the possibilities available in FM synthesis are endless.
Many of the world’s most talented sound designers and producers employ FM synthesis in a lot of their work, making everything from searing synths to atonal percussion sounds. Have fun exploring, experimenting, and discovering sounds that you never thought possible.
Have any questions? Have any tips for using FM synthesis? Feel free to leave a comment below!
Do you want better Serum presets?
Download our free Ultimate Serum Library and improve your sound library today.
