
FL Studio Tutorial: What You Need To Know & Getting Started


If you're looking for an FL Studio tutorial to get started making music with this powerful DAW, then you're in the right place!
So where do we begin?
With what seems like a million buttons, getting started can seem intimidating.
But there’s no need to fear! This article will guide you through the menus and tools in FL Studio’s interface, so you can learn everything you need to get started without opening up the manual!
The menu bar contains many useful functions and panels. You will find yourself using these windows frequently, so be sure to become familiar with the features and their locations.
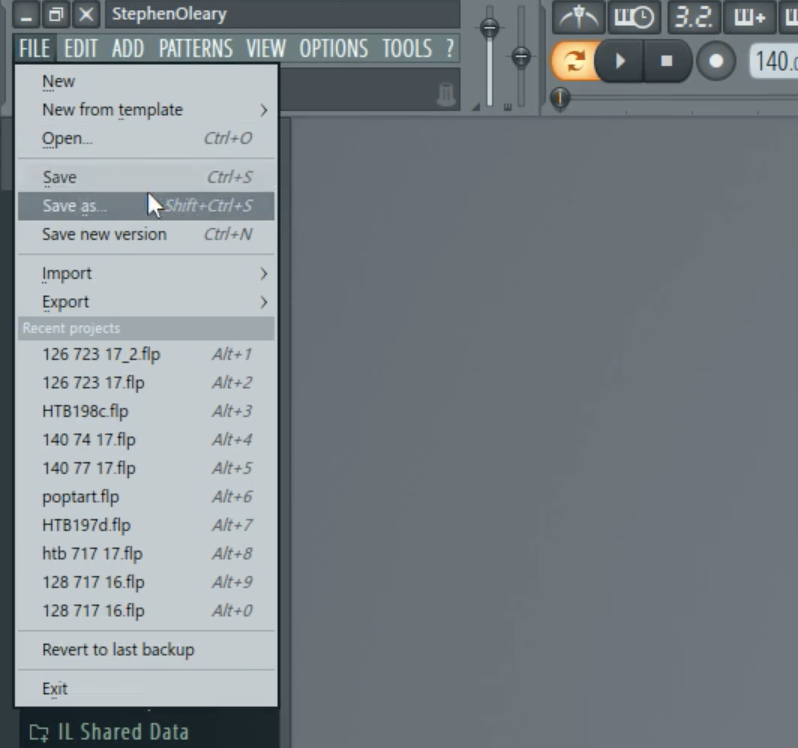
File is an important section in FL Studio. Like most programs, the File tab is where you can create a new project, open a project, save a project, import/export a project, and quickly access recent projects.
While all these operations are standard ones that are easy to use, there is one important button you should know more about.
The one we’re referring to is called “New from template”. Clicking this will open an additional window. In this additional window, you can open a blank project with specific pre-determined features.
These pre-determined features include a kick, clap, hi hat and snare and the type of master output you’d like. Each template includes a description, so you can read through the different templates and select the one that best suits your needs.

Since you’ll be using this feature and the others located in the File tab frequently, we’ve laid out some of the hotkeys below for you to memorize:
This way, you’ll be able to save time throughout the creation process. It might not seem like much time, but when you’re constantly using these keys, you’ll be thankful for these shortcuts.
Open = Ctrl + O
Save = Ctrl + S
Save as = Shift + Ctrl + S
Save new version = Ctrl + N
Recent Projects = Alt + 1
The Edit tab is relatively brief but does contain very important controls. Undo, cut, copy, and paste are all incredibly important tools to use in FL Studio.
Using undo will erase your most recent action, which comes in handy when you make a mistake.
Cutting a selected object ‘cuts’ it off of your screen so that you can paste it somewhere else. You’ll use this often when you feel as though a piece of your track, like a snare or vocal, sounds better in another part of the song. It takes a lot of tries to get your track sounding completely cohesive, so this will be done regularly.
Using the copy function will simply allow you to duplicate a selection. This is great for when you finally create a beat you like and want to spread it throughout the entire track. All you would need to do is simply copy the beat and paste it throughout your song.
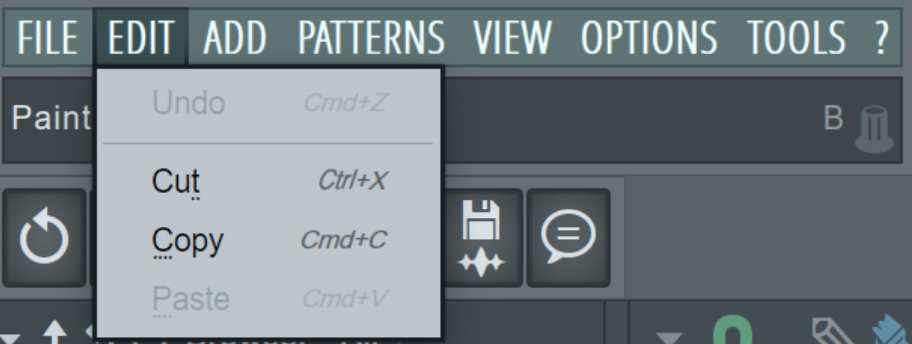
While using the Edit tab to implement these controls is acceptable, memorizing the hotkeys will be more favorable for your efficiency and workflow.
Undo = Ctrl + X
Cut =Ctrl + X
Copy = Ctrl + C
Paste = Ctrl + V
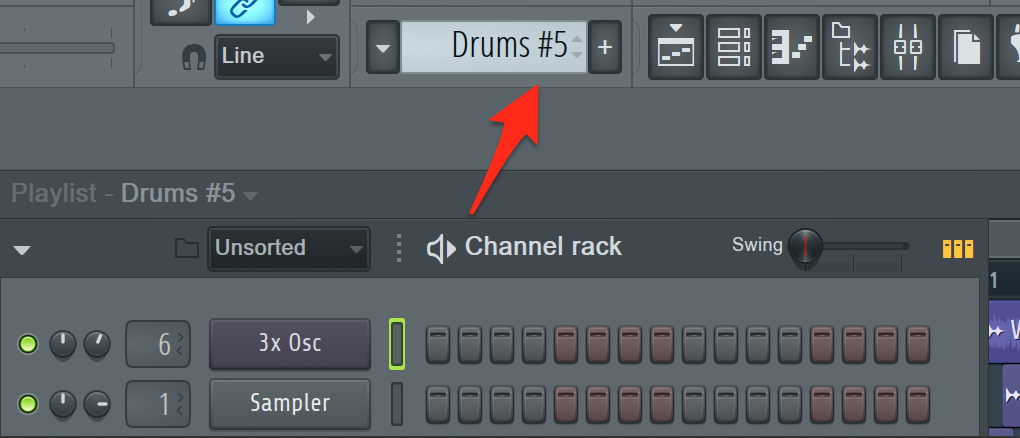
The add menu is very important, because it is where you can select VSTs to add to your composition. In other words, if you want to load a virtual instrument, this is one way you can load VSTs into your project.
Note that you’ll be able to do the same thing by clicking the “+” in the channel rack.

And to help you find the VSTs you’re looking for faster, toggle between categories, simple, and tree. This will change the way the VSTs are organized. Using the simple option keeps everything in alphabetical order, which is most helpful when hunting for a specific VST to select.
You can also click “More plugins...” to search for newly-downloaded VSTs.
The patterns section will allow you select different patterns that you create from the channel rack, which we will talk more about later in the article.
Alternatively, you can select patterns from the drop-down window above the playlist.
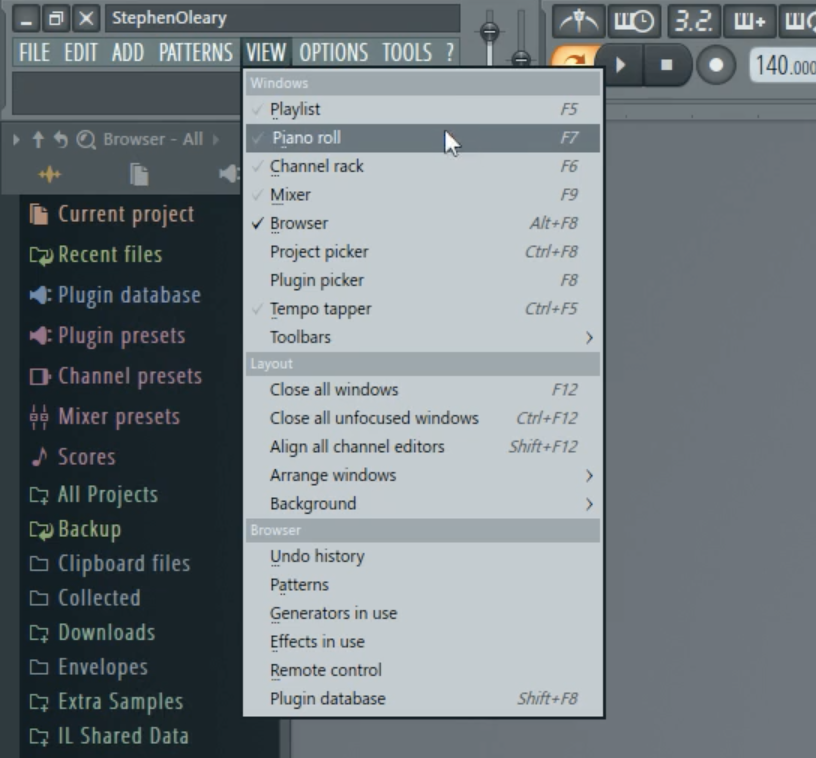
The View tab in FL’s menu bar will allow you to choose which windows are visible. This will help you keep things organized as you’re producing.
The first thing you need to know about this tab is that the windows that are currently open will have a black checkmark next to them.
You’ll also notice that there’s a toolbars section in the View tab. This will allow you to select which tools to include in the toolbar. This means you have the ability to remove certain sections from the toolbar should you want to make more room for other tools.
This will further help you stay organized, because you’ll be able to have your most used tools all in one place.
One of the most useful controls in the View section though, is the ability to close all windows. If your CPU starts to overload or things start to lag, simply click “Close all windows” to help things move steadily again!
The hotkey to close all windows is F12.
The options tab is where you can configure the settings within your DAW.
The MIDI settings can configure your MIDI devices and which ones are connected, while the Audio settings can control your inputs and outputs and so on.
Be sure to explore these settings to customize your production experience.
In the tools section, one of the most helpful options is the browser smart find.
Clicking this will allow you to search your browser for a specific sample. This is incredibly useful when you know you want a specific sample but can’t remember which folder it is located in.
From the tools section, you will also have the ability to quickly set up audio recordings or even create a random a riff melody for some instant inspiration.
The help section will provide you with miscellaneous resources to understand more about your DAW.
The help index will link you to a web page within Image-line’s reference manual, which will contain the answer to any questions you may have.
Additionally, this is where you can register FL Studio and find links to other various web resources!
Next to the menu bar, you will find other useful tools.
Clicking the button to the left of the play/pause button will allow you to switch between playing a playlist audio or the audio from a pattern.
The play button will play/pause your song, and the stop button will set your playhead to the beginning of the playlist. The record button will allow you to record various information, such as MIDI and audio into your DAW.
Just below the play button, the horizontal line will allow you to drag your playhead position to different periods of time in your playlist. This way, if you’re working on one specific portion of your track, you’ll be able to playback only that portion instead of listening to the whole track.
The BPM (beats per minute) can also be adjusted in this section. This will be useful when trying to create a specific genre, which requires a specific BPM.
Lastly, the song position box will tell you where the playhead is located in minutes/seconds, or by beats if you click in the window. You’ll use this more than you think if you have a lengthy track (like a full mix) and can’t remember where you last left the playhead at.
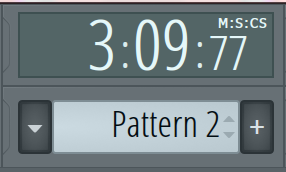
Just below it is your pattern picker, which we will explain in more depth later on in the article.
Here in the browser, you will find a multitude of important sections that are useful in creating your music. We will cover the most essential objects located in the browser section.
The current project section of the browser will show you the resources and history from the project that is currently open.
By clicking on history, you can see all of the recent changes made in your project. Clicking on one of these will revert the project to the selected history’s data. This way, if you end up liking your first version of the song better, you can just simply restore it.
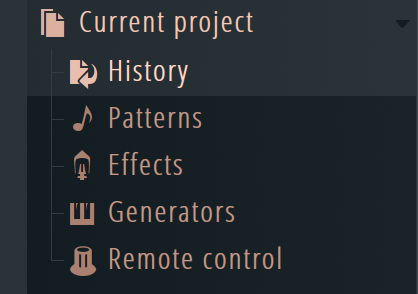
You also have the ability to select and view different patterns from here. Additionally, you can view the effect plugins, VSTi, and samples from your project in the current project section.
And finally, the remote control section is used for automation clips.
The plugin database will allow you to select and browse both effect plugins and VSTi. Clicking and dragging them to the mixer or channel rack respectively will open the selected plugin.
You can also add new plugins with this section by clicking “more plugins” in the add section in the menu bar. Newly-found VSTs will be placed in the “new” folder for ease of access.
The backup section is very useful as it contains autosaved versions of your project. Should you chose to load one of the auto-saved versions of your project, simply give it a double click!
The packs section of the browser is where all of your samples will be organized. This is an incredibly useful section of the browser because most, if not all, of your percussion sounds will be located in this section.
FL comes with some stock samples, mostly residing in the Legacy folder. However it is crucial that you expand your sample library to add diversity to your tracks. If you need more samples, check out these free downloads!
It is important to keep these folders organized for ease of access to your samples.
Now that you understand the fundamental tools and their locations in the FL, let’s dive a little deeper!
The Channel rack, previously known as the step sequencer, is where you can arrange drums and other sounds.
In its earlier versions, the main focus of FL was its step sequencer, which allowed the user to sequence sounds easily and intuitively.
Over the years, the sequencer has evolved into the channel rack, which is now much more advanced and versatile.
To sequence drums, try clicking on the grey and red buttons. Then play it back to hear what you create!
Each color change from grey to red represents each beat in the time signature. As you can see below, it has four beats. This is considered a 4/4 time signature.
The speaker icon next to “Channel rack” will play your pattern.
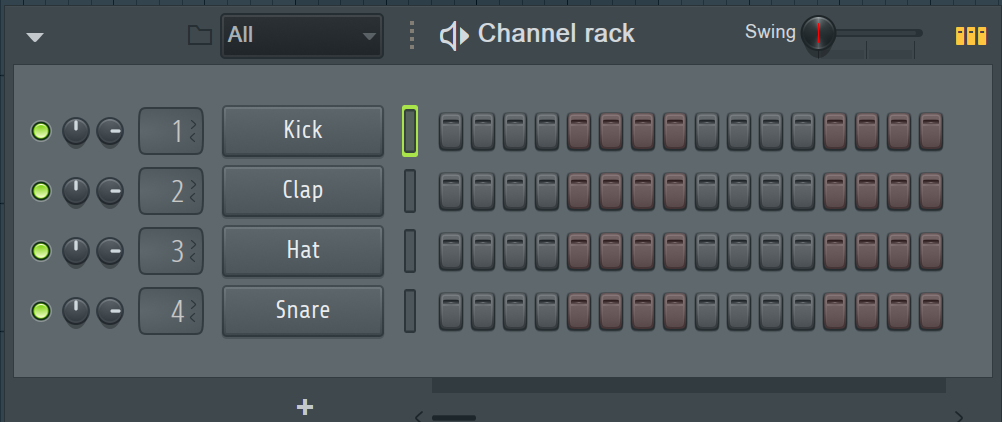
Just to its left, you will find a drop down menu containing folders. This allows you to organize samples and VSTs that you add by specific sections!
Even your automation clips will be categorized into their own folder! To create an automation clip, right click the parameter and adjust the anchor points of the generated clip to manipulate the automation.
The green ‘lights’ let you know that the corresponding channel is active. Clicking any green light will effectively mute the channel.
Similarly, holding ctrl while clicking on one of the green lights will solo the corresponding channel.
Next to the mute/solo lights, you will find the pan and volume knobs. More precise volume and pan controls can also be found in the mixer.
Clicking and dragging on the numbers to the right of the volume knobs will affect which mixer channel the elements are assigned to, which leads us into the next section.
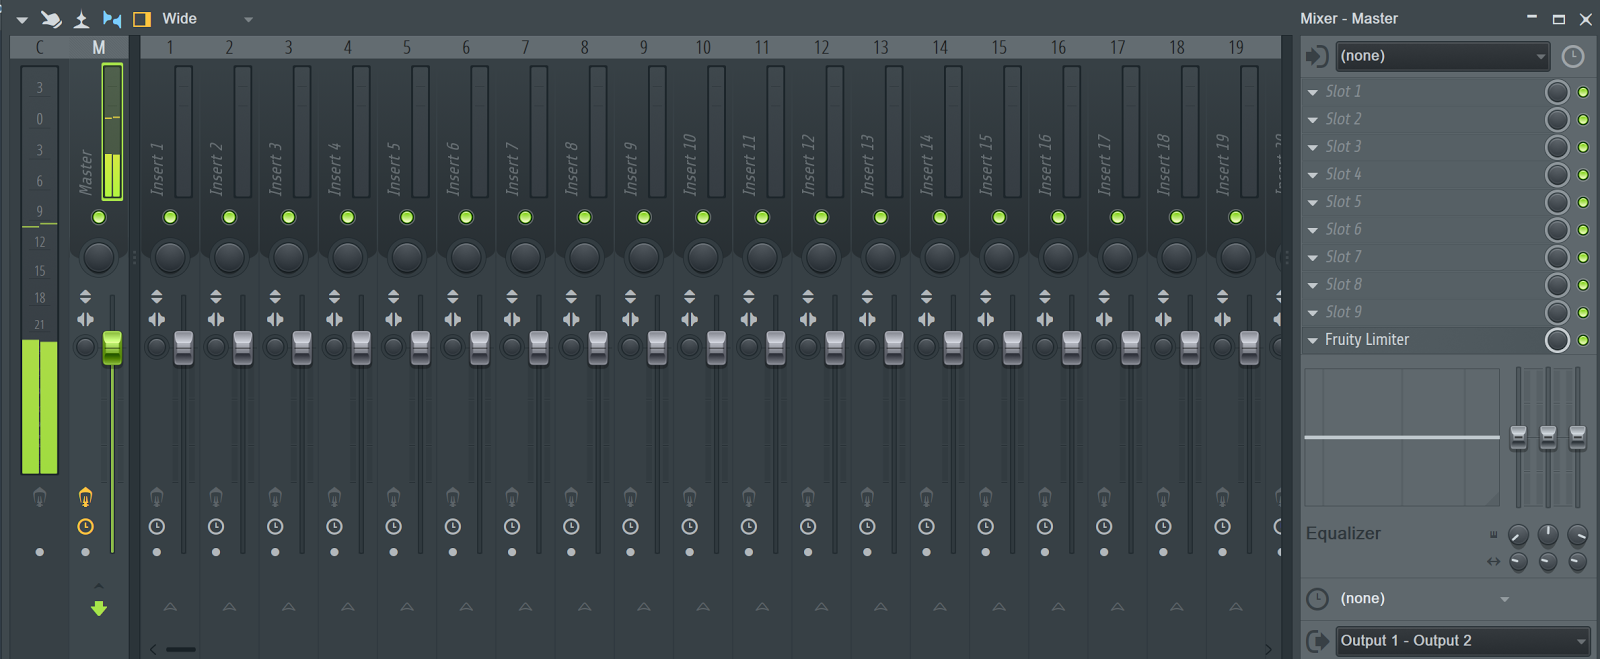
The mixer is what all of your audio will funnel into.
Starting on the right side, you will notice ten slots. These slots are where you can apply channel effects like a reverb on a single channel, or a limiter on the master channel as seen in this screenshot.
Below the effects slots you will find an EQ (Equalizer). This EQ is useful for very quick fixes, but using an EQ plugin in the effects slots will always give you more control and flexibility.
In the middle of the mixer, you will notice inserts 1-125. Remember those numbers we talked about earlier in the channel rack? They correspond with the numbers in the mixer’s inserts so that you can apply EQ, reverb, delay, and many more effects to specific sounds!
Just like the channel rack, clicking the green ‘lights’ can be used to mute or solo the insert. This way you have control over the elements that you want to focus on while creating your track. This is crucial during the mixing process.
Below the mute/solo buttons, you will find a pan knob. Below the pan you will find a volume fader. Levels are one of the most important things to control to achieve a clean mix, so using the faders in the mixer is very important.
And of course, all the way to the left you will find the master channel. You can also view your master db from this section.
You might have seen videos of old pianos that can play music on their own.
Those special pianos are fed note information that tell it what keys to play and when.

In today’s digital age, producers can create music in a similar fashion with what is known as a piano roll.
Piano rolls allow the user to sequence note information (known as MIDI). This is where you will write all of your melodies, chords, bass lines, etc.
To draw a note, simply click in the piano roll’s window.
Dragging the note up or down will change which key on the piano roll it plays, while clicking and dragging the end of the note left or right will make it shorter or longer.

Double-clicking a note will allow you to change its pan, volume, release, and even its numerical duration.
From the main menu drop-down menu, you can open MIDI files, export note information, create arps, generate ghost notes, and much more.
Take a look at the drop down menu and play around with the settings until they are configured to your liking!
To delete a note, simply give it a right click. Alternatively, you can select groups of notes with the select tool and hit your delete key to remove a large portion of notes at once.
The playlist is the last section that we will cover to help you get started with FL Studio.
In this section of the DAW, you will lay out all of the elements of your track.
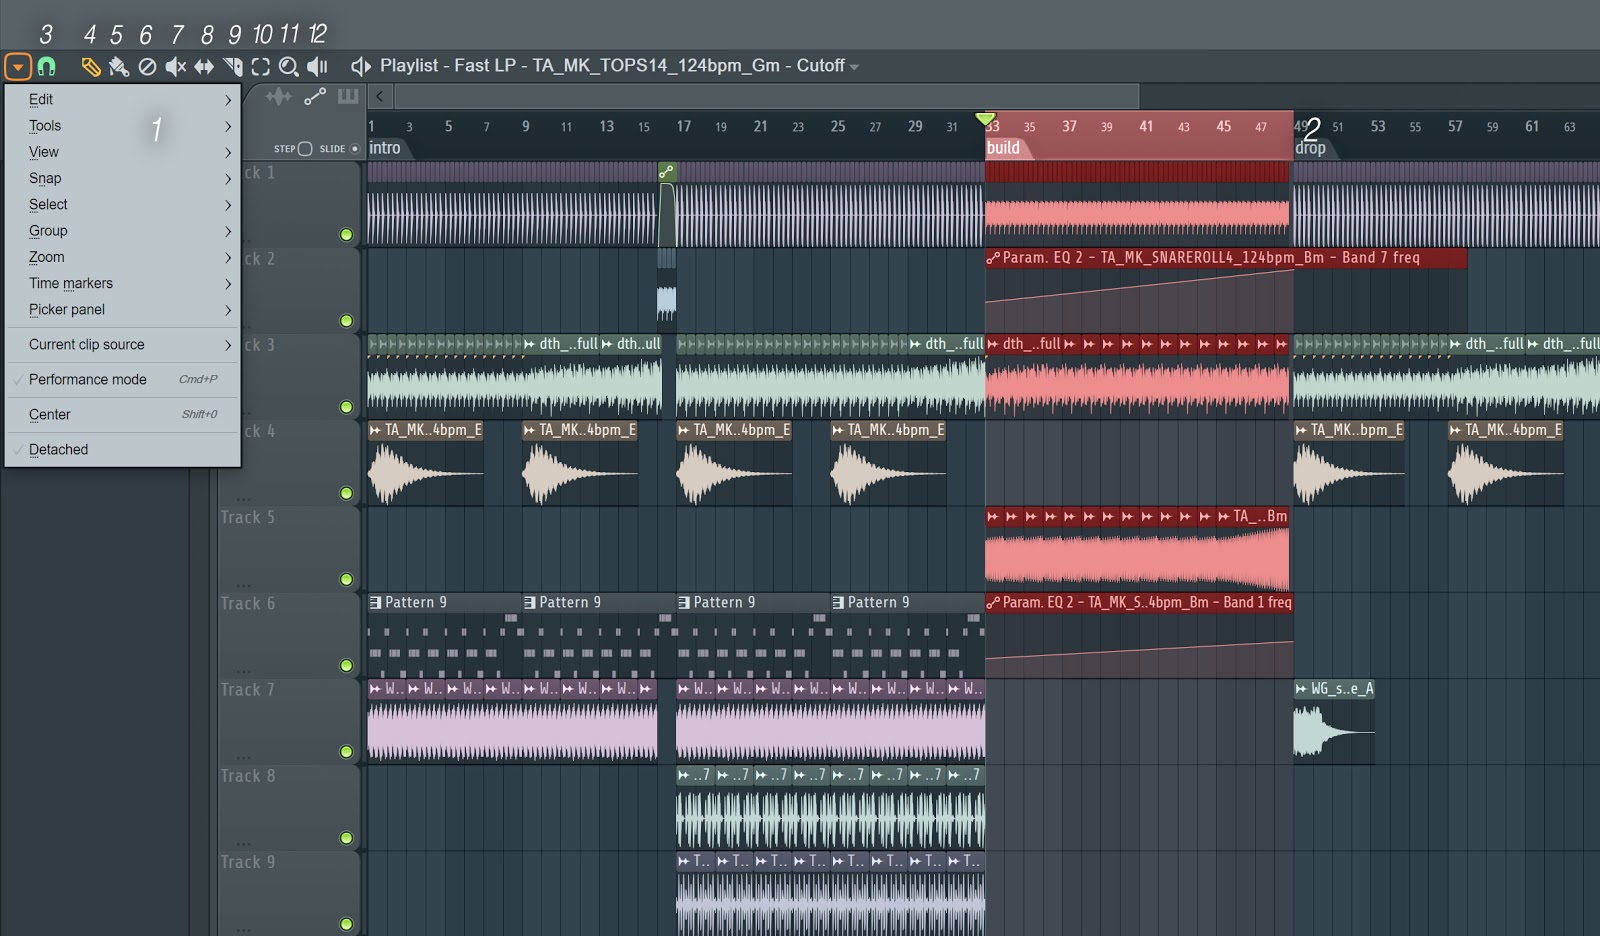
The main menu (1) is similar in its controls to the piano roll, so check out its settings and configure them to your liking. You will find many useful tools here like snap settings and the ability to add time markers (2).
The tool bar is where you will find many useful controls for the playlist. To select a tool, simply click on it.
The magnet symbol (3) controls how the grid ‘snaps.’ The smaller the interval, the looser things will feel when you arrange them in your playlist. The larger the interval, the stiffer arranging objects will feel. Usually, keeping things on the stiffer side will make things easier to manage.
Next is the draw tool (4), which places your selected item in your playlist and instantaneously gives you the option to drag it left or right.
Similarly, the paintbrush tool (5) will allow you to click to add your item to the playlist, while dragging to the left and right will duplicate the item. This is useful for arranging percussion and patterns that repeat!
The delete tool (6) deletes anything that you click. Right-clicking objects will also delete them, even when the delete tool is not in-use.
The mute tool (7) will mute any object that you click without deleting it. Re-clicking the object will unmute it. An object will appear ‘greyed-out’ to let you know it is muted.
The slip tool (8) will allow you to shift the contents of a sample or pattern object left or right within the clip while retaining the duration and starting/ending points. Simply click and drag to ‘slip’ the content. This can be used creatively to mix and match audio samples.
The slice tool (9) slices objects into as many sections as you need. Simply click and drag the line generated by the tool vertically against the object to split it into multiple sections. This is useful for truncating bits of audio, instead of a tedious and repetitive click and drag of several objects.
Next, the select tool (10) selects objects. Click an object to select it, or click and drag to select many objects at once. You know an object is selected when it turns red.
The zoom tool (11) allows you to adjust the duration displayed on your playlist. Another quick way to zoom is to hold control + scrolling up and down.
The playback tool (12) will allow you to playback individual objects. To do this, simply click on the object.
To make selections, like the one shown in the image, simply right click and drag in the dark greenish/grey where the numbers of each bar are. This will create a red selection, and when played, this section will loop.
And finally, to deselect the section, simply double click on the timeline (bars).
Now that you understand the locations and features of the fundamental tools in FL Studio, it’s time to get your feet wet and start applying your knowledge!
But first, here are a few quick reminders:
For a more in-depth FL Studio tutorial, check out the “FL Studio Essential Training Level 1: Beginner” course on Academy.fm.

Check out this excerpt from the course taught by SeamlessR.
Right now, you can actually access this course and hundreds of others like it for free by clicking here.
Now we want to hear from you!
What else would you like to see in an FL Studio tutorial?
Let us know in the comments section below!
So where do we begin?
With what seems like a million buttons, getting started can seem intimidating.
But there’s no need to fear! This article will guide you through the menus and tools in FL Studio’s interface, so you can learn everything you need to get started without opening up the manual!
The Menu Bar
The menu bar contains many useful functions and panels. You will find yourself using these windows frequently, so be sure to become familiar with the features and their locations.
File
File is an important section in FL Studio. Like most programs, the File tab is where you can create a new project, open a project, save a project, import/export a project, and quickly access recent projects.
While all these operations are standard ones that are easy to use, there is one important button you should know more about.
The one we’re referring to is called “New from template”. Clicking this will open an additional window. In this additional window, you can open a blank project with specific pre-determined features.
These pre-determined features include a kick, clap, hi hat and snare and the type of master output you’d like. Each template includes a description, so you can read through the different templates and select the one that best suits your needs.
Since you’ll be using this feature and the others located in the File tab frequently, we’ve laid out some of the hotkeys below for you to memorize:
This way, you’ll be able to save time throughout the creation process. It might not seem like much time, but when you’re constantly using these keys, you’ll be thankful for these shortcuts.
Open = Ctrl + O
Save = Ctrl + S
Save as = Shift + Ctrl + S
Save new version = Ctrl + N
Recent Projects = Alt + 1
Edit
The Edit tab is relatively brief but does contain very important controls. Undo, cut, copy, and paste are all incredibly important tools to use in FL Studio.
Using undo will erase your most recent action, which comes in handy when you make a mistake.
Cutting a selected object ‘cuts’ it off of your screen so that you can paste it somewhere else. You’ll use this often when you feel as though a piece of your track, like a snare or vocal, sounds better in another part of the song. It takes a lot of tries to get your track sounding completely cohesive, so this will be done regularly.
Using the copy function will simply allow you to duplicate a selection. This is great for when you finally create a beat you like and want to spread it throughout the entire track. All you would need to do is simply copy the beat and paste it throughout your song.
While using the Edit tab to implement these controls is acceptable, memorizing the hotkeys will be more favorable for your efficiency and workflow.
Undo = Ctrl + X
Cut =Ctrl + X
Copy = Ctrl + C
Paste = Ctrl + V
Add
The add menu is very important, because it is where you can select VSTs to add to your composition. In other words, if you want to load a virtual instrument, this is one way you can load VSTs into your project.
Note that you’ll be able to do the same thing by clicking the “+” in the channel rack.
And to help you find the VSTs you’re looking for faster, toggle between categories, simple, and tree. This will change the way the VSTs are organized. Using the simple option keeps everything in alphabetical order, which is most helpful when hunting for a specific VST to select.
You can also click “More plugins...” to search for newly-downloaded VSTs.
Patterns
The patterns section will allow you select different patterns that you create from the channel rack, which we will talk more about later in the article.
Alternatively, you can select patterns from the drop-down window above the playlist.
View
The View tab in FL’s menu bar will allow you to choose which windows are visible. This will help you keep things organized as you’re producing.
The first thing you need to know about this tab is that the windows that are currently open will have a black checkmark next to them.
You’ll also notice that there’s a toolbars section in the View tab. This will allow you to select which tools to include in the toolbar. This means you have the ability to remove certain sections from the toolbar should you want to make more room for other tools.
This will further help you stay organized, because you’ll be able to have your most used tools all in one place.
One of the most useful controls in the View section though, is the ability to close all windows. If your CPU starts to overload or things start to lag, simply click “Close all windows” to help things move steadily again!
The hotkey to close all windows is F12.
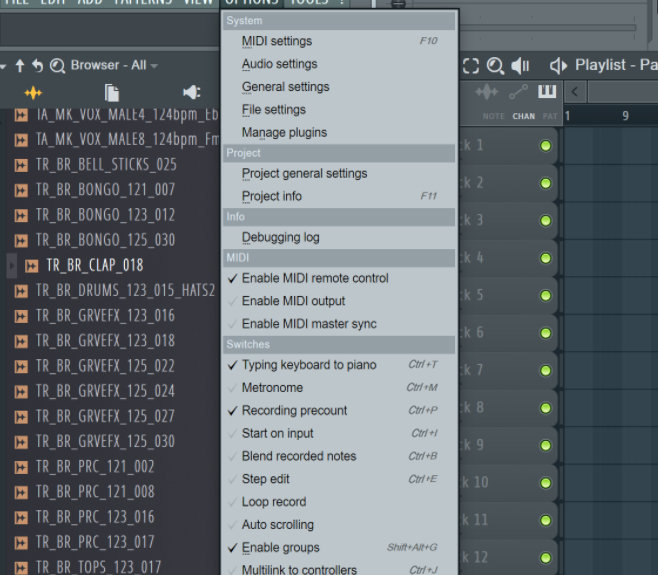
Options
The options tab is where you can configure the settings within your DAW.
The MIDI settings can configure your MIDI devices and which ones are connected, while the Audio settings can control your inputs and outputs and so on.
Be sure to explore these settings to customize your production experience.
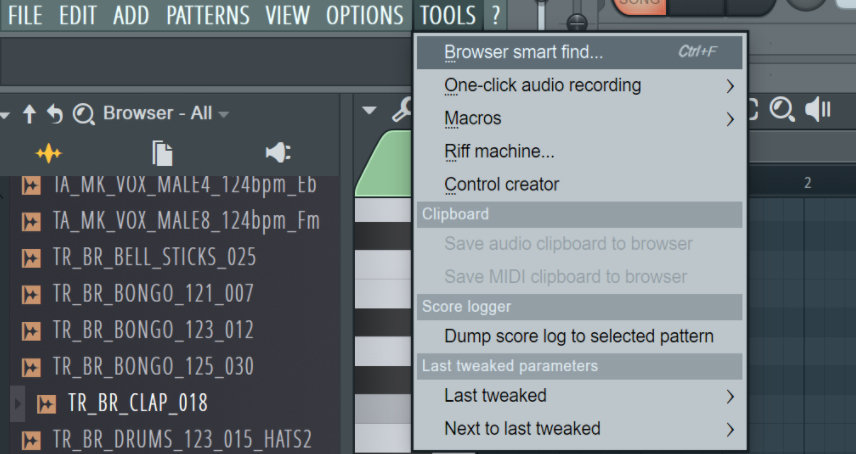
Tools
In the tools section, one of the most helpful options is the browser smart find.
Clicking this will allow you to search your browser for a specific sample. This is incredibly useful when you know you want a specific sample but can’t remember which folder it is located in.
From the tools section, you will also have the ability to quickly set up audio recordings or even create a random a riff melody for some instant inspiration.
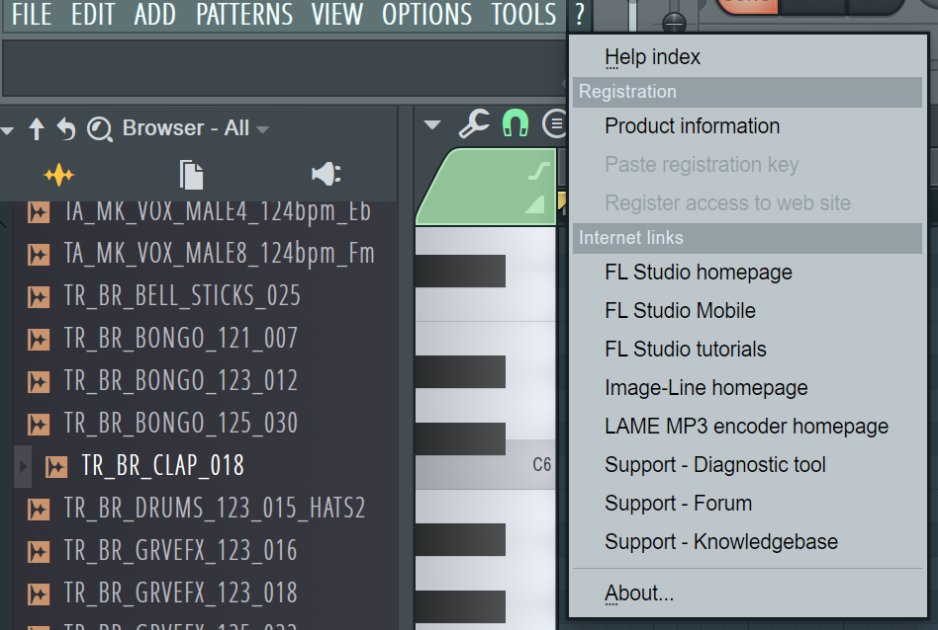
? (Help)
The help section will provide you with miscellaneous resources to understand more about your DAW.
The help index will link you to a web page within Image-line’s reference manual, which will contain the answer to any questions you may have.
Additionally, this is where you can register FL Studio and find links to other various web resources!
Toolbar Panels
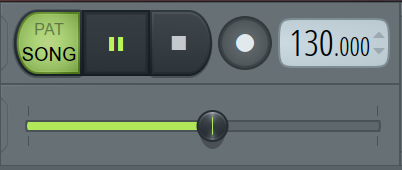
Next to the menu bar, you will find other useful tools.
Clicking the button to the left of the play/pause button will allow you to switch between playing a playlist audio or the audio from a pattern.
The play button will play/pause your song, and the stop button will set your playhead to the beginning of the playlist. The record button will allow you to record various information, such as MIDI and audio into your DAW.
Just below the play button, the horizontal line will allow you to drag your playhead position to different periods of time in your playlist. This way, if you’re working on one specific portion of your track, you’ll be able to playback only that portion instead of listening to the whole track.
The BPM (beats per minute) can also be adjusted in this section. This will be useful when trying to create a specific genre, which requires a specific BPM.
Lastly, the song position box will tell you where the playhead is located in minutes/seconds, or by beats if you click in the window. You’ll use this more than you think if you have a lengthy track (like a full mix) and can’t remember where you last left the playhead at.
Just below it is your pattern picker, which we will explain in more depth later on in the article.
The Browser
Here in the browser, you will find a multitude of important sections that are useful in creating your music. We will cover the most essential objects located in the browser section.
Current Project
The current project section of the browser will show you the resources and history from the project that is currently open.
By clicking on history, you can see all of the recent changes made in your project. Clicking on one of these will revert the project to the selected history’s data. This way, if you end up liking your first version of the song better, you can just simply restore it.
You also have the ability to select and view different patterns from here. Additionally, you can view the effect plugins, VSTi, and samples from your project in the current project section.
And finally, the remote control section is used for automation clips.
Plugin Database
The plugin database will allow you to select and browse both effect plugins and VSTi. Clicking and dragging them to the mixer or channel rack respectively will open the selected plugin.
You can also add new plugins with this section by clicking “more plugins” in the add section in the menu bar. Newly-found VSTs will be placed in the “new” folder for ease of access.
Backup
The backup section is very useful as it contains autosaved versions of your project. Should you chose to load one of the auto-saved versions of your project, simply give it a double click!
Packs
The packs section of the browser is where all of your samples will be organized. This is an incredibly useful section of the browser because most, if not all, of your percussion sounds will be located in this section.
FL comes with some stock samples, mostly residing in the Legacy folder. However it is crucial that you expand your sample library to add diversity to your tracks. If you need more samples, check out these free downloads!
It is important to keep these folders organized for ease of access to your samples.
Now that you understand the fundamental tools and their locations in the FL, let’s dive a little deeper!
Get access to over 10,000 sounds plus hundreds of courses & tutorials - Click Here
The Channel Rack
The Channel rack, previously known as the step sequencer, is where you can arrange drums and other sounds.
In its earlier versions, the main focus of FL was its step sequencer, which allowed the user to sequence sounds easily and intuitively.
Over the years, the sequencer has evolved into the channel rack, which is now much more advanced and versatile.
To sequence drums, try clicking on the grey and red buttons. Then play it back to hear what you create!
Each color change from grey to red represents each beat in the time signature. As you can see below, it has four beats. This is considered a 4/4 time signature.
The speaker icon next to “Channel rack” will play your pattern.
Just to its left, you will find a drop down menu containing folders. This allows you to organize samples and VSTs that you add by specific sections!
Even your automation clips will be categorized into their own folder! To create an automation clip, right click the parameter and adjust the anchor points of the generated clip to manipulate the automation.
The green ‘lights’ let you know that the corresponding channel is active. Clicking any green light will effectively mute the channel.
Similarly, holding ctrl while clicking on one of the green lights will solo the corresponding channel.
Next to the mute/solo lights, you will find the pan and volume knobs. More precise volume and pan controls can also be found in the mixer.
Clicking and dragging on the numbers to the right of the volume knobs will affect which mixer channel the elements are assigned to, which leads us into the next section.
The Mixer
The mixer is what all of your audio will funnel into.
Starting on the right side, you will notice ten slots. These slots are where you can apply channel effects like a reverb on a single channel, or a limiter on the master channel as seen in this screenshot.
Below the effects slots you will find an EQ (Equalizer). This EQ is useful for very quick fixes, but using an EQ plugin in the effects slots will always give you more control and flexibility.
In the middle of the mixer, you will notice inserts 1-125. Remember those numbers we talked about earlier in the channel rack? They correspond with the numbers in the mixer’s inserts so that you can apply EQ, reverb, delay, and many more effects to specific sounds!
Just like the channel rack, clicking the green ‘lights’ can be used to mute or solo the insert. This way you have control over the elements that you want to focus on while creating your track. This is crucial during the mixing process.
Below the mute/solo buttons, you will find a pan knob. Below the pan you will find a volume fader. Levels are one of the most important things to control to achieve a clean mix, so using the faders in the mixer is very important.
And of course, all the way to the left you will find the master channel. You can also view your master db from this section.
The Piano Roll
You might have seen videos of old pianos that can play music on their own.
Those special pianos are fed note information that tell it what keys to play and when.
In today’s digital age, producers can create music in a similar fashion with what is known as a piano roll.
Piano rolls allow the user to sequence note information (known as MIDI). This is where you will write all of your melodies, chords, bass lines, etc.
To draw a note, simply click in the piano roll’s window.
Dragging the note up or down will change which key on the piano roll it plays, while clicking and dragging the end of the note left or right will make it shorter or longer.
Double-clicking a note will allow you to change its pan, volume, release, and even its numerical duration.
From the main menu drop-down menu, you can open MIDI files, export note information, create arps, generate ghost notes, and much more.
Take a look at the drop down menu and play around with the settings until they are configured to your liking!
To delete a note, simply give it a right click. Alternatively, you can select groups of notes with the select tool and hit your delete key to remove a large portion of notes at once.
The Playlist
The playlist is the last section that we will cover to help you get started with FL Studio.
In this section of the DAW, you will lay out all of the elements of your track.
The main menu (1) is similar in its controls to the piano roll, so check out its settings and configure them to your liking. You will find many useful tools here like snap settings and the ability to add time markers (2).
The tool bar is where you will find many useful controls for the playlist. To select a tool, simply click on it.
The magnet symbol (3) controls how the grid ‘snaps.’ The smaller the interval, the looser things will feel when you arrange them in your playlist. The larger the interval, the stiffer arranging objects will feel. Usually, keeping things on the stiffer side will make things easier to manage.
Next is the draw tool (4), which places your selected item in your playlist and instantaneously gives you the option to drag it left or right.
Similarly, the paintbrush tool (5) will allow you to click to add your item to the playlist, while dragging to the left and right will duplicate the item. This is useful for arranging percussion and patterns that repeat!
The delete tool (6) deletes anything that you click. Right-clicking objects will also delete them, even when the delete tool is not in-use.
The mute tool (7) will mute any object that you click without deleting it. Re-clicking the object will unmute it. An object will appear ‘greyed-out’ to let you know it is muted.
The slip tool (8) will allow you to shift the contents of a sample or pattern object left or right within the clip while retaining the duration and starting/ending points. Simply click and drag to ‘slip’ the content. This can be used creatively to mix and match audio samples.
The slice tool (9) slices objects into as many sections as you need. Simply click and drag the line generated by the tool vertically against the object to split it into multiple sections. This is useful for truncating bits of audio, instead of a tedious and repetitive click and drag of several objects.
Next, the select tool (10) selects objects. Click an object to select it, or click and drag to select many objects at once. You know an object is selected when it turns red.
The zoom tool (11) allows you to adjust the duration displayed on your playlist. Another quick way to zoom is to hold control + scrolling up and down.
The playback tool (12) will allow you to playback individual objects. To do this, simply click on the object.
To make selections, like the one shown in the image, simply right click and drag in the dark greenish/grey where the numbers of each bar are. This will create a red selection, and when played, this section will loop.
And finally, to deselect the section, simply double click on the timeline (bars).
FL Studio Tutorial - Conclusion
Now that you understand the locations and features of the fundamental tools in FL Studio, it’s time to get your feet wet and start applying your knowledge!
But first, here are a few quick reminders:
- Use FL’s hotkeys to be most efficient with your time.
- The “Add” section of the menu bar is where you can add VSTi to your channel rack.
- Your samples and VSTs will appear in the channel rack section and can be divided into several folders.
- All of your audio is routed through the mixer, and can also be individualized to specific inserts.
- The piano roll is where you will write your musical ideas.
- Your objects will be sequenced in the playlist.
For a more in-depth FL Studio tutorial, check out the “FL Studio Essential Training Level 1: Beginner” course on Academy.fm.
Check out this excerpt from the course taught by SeamlessR.
Right now, you can actually access this course and hundreds of others like it for free by clicking here.
Now we want to hear from you!
What else would you like to see in an FL Studio tutorial?
Let us know in the comments section below!
Do you want better Serum presets?
Download our free Ultimate Serum Library and improve your sound library today.
