
The Step By Step Guide To Creating Plucks in Xfer Serum


Creating great plucks in Serum may seem simple at first glance, but making a unique, playable pluck can be one of the hardest sound design tasks.
People often ask me how I make my plucks so consistently useful, so I wanted to show everyone some secret tips and techniques we use to make our best selling Serum patches.
Keep in mind, the key to mastering sound design is PRACTICE, PRACTICE, PRACTICE!
So without further ado, let's make some plucks...
If you want to read an in depth review of Xfer Serum, click here.
One of the most important things that distinguish a pluck sound are its amplitude and time.
Plucks usually start with a very short attack, often accented with a transient.
Then its amplitude fades quite quickly, creating a punchy, plucky sound.
The trick is to build a pluck envelope in such a way that will make it fit the song tempo and performed melody.
Quite often, creating the pluck amplitude envelope depends on the circumstance. Each case is different, but there are some rules you should follow.
It is important to keep the sound clean and sharp so it doesn’t lose its punchiness, but also makes it so it decays nicely and sounds full.
At first sight, the Serum envelopes are no different than any other synthesizer envelope with a classic Attack, Hold, Decay, Sustain, and Release.
However, they do have some “hidden” functions that are very handy when it comes to making a precise envelopes for sounds like plucks.
There is great feature called the Envelope Auto-Zoom Switch. It helps to create a very detailed envelope shape by zooming the entire envelope length and representing the other two envelopes’ “ghost” shapes.
It helps to fully control the relation between all three envelopes after assigning them to various parameters.

One of the most perfect tools for designing pluck envelopes built into Serum is the note duration to time calculator.
Double click a parameter and type a note duration value (for example “1/16”).
Press Enter and the synth will calculate the time for you based on the global project tempo!
This way you will have a full control of your pluck’s amplitude shape so it perfectly fits your song tempo.
Pro Technique: This tool has a many other applications like setting the delay or compressor release time.

Because LFO shapes can also act like envelopes, it is worth it to use them while shaping pluck sounds.
One of my favorite features helping to create a more interesting pluck envelopes is the LFO Delay.
It allows you to build truly multidimensional sounds.
For example, if you delay the signal from one oscillator relative to the second by assigning the delayed LFO to its amplitude, it will create an effect very close to traditional delay, but much deeper.
The delayed signal will have totally different timbre than the main one.
This technique is very commonly used in Jack Ü style plucky snares, built of two transients rapidly appearing after each other creating a snappy double pluck.
This feature can be used very creatively coupled with the possibility of synchronization the envelopes to tempo.
https://cymatics-assets.sfo2.cdn.digitaloceanspaces.com/2017/04/LFO-Delay_CLIPCHAMP_keep.mp4
There is a very effective way to emphasize a pluck attack.
This technique is commonly used for drum sounds design but when subtly used it can work wonders for the pluck.
Make an envelope with a really short decay (around 20 ms, or simply set it’s value to 1/32 or 1/64).
Assign the the Envelope to the Oscillator Coarse Pitch with unipolar modulation to add an extra transient at the start of the sound.

BEFORE:
[x_audio_player mp3="https://cymatics-assets.sfo2.cdn.digitaloceanspaces.com/2017/04/Pluck-Transient-Trick-Before.mp3"]
AFTER:
[x_audio_player mp3="https://cymatics-assets.sfo2.cdn.digitaloceanspaces.com/2017/04/Pluck-Transient-Trick-After.mp3"]
The essence of a pluck sound is its timbre and sonic characteristics.
Choosing the features that will make up the sound will depend on the genre and context.
While Progressive House plucks can be made of detuned saws passed through low pass filter, Big Room plucks can be a woody percussive sound with a lots of gated reverb.
Therefore it is difficult to distinguish one characteristic that would be common to all kinds of plucks.
However, there are some tricks that are versatile and make the sound more interesting.
Depth and Layering are crucial!
It is important to use all possible tools to make a pluck sound interesting.
Pluck sounds are relatively short and there is not much opportunity for complicated sound morphing, but any movement will add a desired depth to the sound.
This is really crucial.
When you modulate amplitude, filter cutoff, and other parameters with the same modulation source, the sound will usually lack depth.
Even slight changes in the shape of the envelopes assigned to various parameters will introduce an interesting sound movement.

Although Serum has only two oscillators, there are many techniques to increase your sound’s complexity and depth.
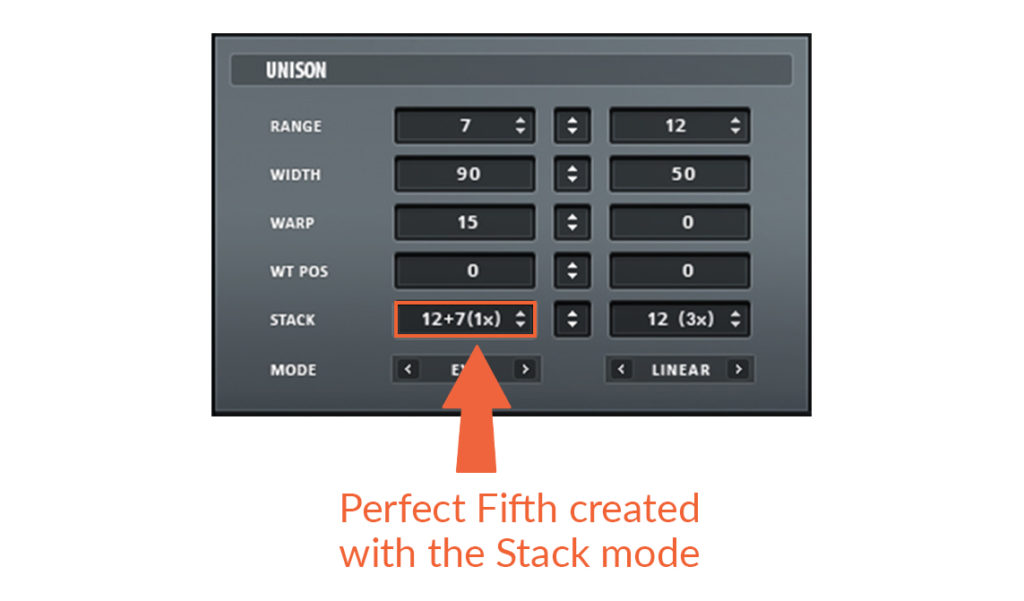
A very important one is to use unison stacking.
When unison is set to more than three voices, the stack control in the Global tab provides multiple options for having the unison voices playing different pitches.
The most obvious and effective solution is adding voices an octave higher using the “12 (1x)” setting, but Serum offers the possibility of including perfect fifth in the layering using the “12+7(1x)” setting.
BEFORE:
[x_audio_player mp3="https://cymatics-assets.sfo2.cdn.digitaloceanspaces.com/2017/04/Unison-Stack-Trick-Before.mp3"]
AFTER:
[x_audio_player mp3="https://cymatics-assets.sfo2.cdn.digitaloceanspaces.com/2017/04/Unison-Stack-Trick-After.mp3"]
The Oscillator fine setting is a very good tool for achieving fatter and more “analog” style pluck sounds.
It is also a less CPU hungry solution than adding a lot of unison voices.
Detuning both oscillators a couple of cents opposite from each other is always a good solution.
For a vintage feel, a cool trick is to assign the Chaos or NoteOn Rand modulation sources to the Oscillator fine.
Going beyond 30 cents usually causes the sound to be out of tune, so moderation is key.

BEFORE:
[x_audio_player mp3="https://cymatics-assets.sfo2.cdn.digitaloceanspaces.com/2017/04/Fine-Tune-Chaos-Trick-Before.mp3"]
AFTER:
[x_audio_player mp3="https://cymatics-assets.sfo2.cdn.digitaloceanspaces.com/2017/04/Fine-Tune-Chaos-Trick-After.mp3"]
Unfortunately Serum’s Unison stack feature allows to obtain only perfect fifth, but there is a way to walk around this and create more chords.
Oscillator Unison Range can be used for creating virtually every chord.
By default it is set to 2 semitones but you can change it to any value and create major, diminished, or any other chord.
However, it works properly only when Osc Unison voices are set to 2 and unison detune to maximum.
You should also lower the Unison Stereo Width when the Unison is set to two voices to make it more mono and not spread to the left and right channels.
Of course this technique only applies when you are aiming for pre-made chord plucks used in genres such as Deep House.
If you are aiming for classic polyphonic pluck sounds, stacking a lot of voices in different pitches makes them unplayable.
https://cymatics-assets.sfo2.cdn.digitaloceanspaces.com/2017/04/Unison-Range-Trick_CLIPCHAMP_keep.mp4
Don’t forget that Serum’s Noise Oscillator is a super powerful and high quality sampler.
It is perfect for adding a whole new dimension to your plucks.
Serum offers a variety of samples to choose from, but its library is limited to a very basic transients, noises, and ambient sounds.
Fortunately, adding your own samples is extremely easy.
A well designed pluck can be turned into sound design masterpiece when you add a layer of an acoustic instrument or rich texture underneath it.
It is good to remember that the best way to save your sample along with the preset is to DRAG them into Noise OSC directly from your external sample library - NOT from Serum’s Noise Osc drop down menu.
If you open the sample from within Serum’s Noise Osc folder drop down menu, the sample will NOT be saved within the patch… It will simply reference the file from within the folder.
Pro technique: When the background of the Noise Osc sample name becomes dark blue (not dark gray), it is a sign that the wav file will be saved with the preset.
https://cymatics-assets.sfo2.cdn.digitaloceanspaces.com/2017/04/Noise-Osc_CLIPCHAMP_keep.mp4
The simpler, the better.
The pluck’s function is to carry an interesting melody or chord progression.
It is great for it to sound interesting, but when it is overdone simply starts to fight with other elements and loses its original function.
That’s why when it comes to plucks, it is best to choose from some “classic” filters.
Of course there are some exceptions to this rule and you will have to reach for some more exotic filters like Combs of Flanges, but in most cases a simple Low Pass will do the trick.
In the case of plucks there is almost never too much wideness.
In addition to the usual effects that increase the stereo field like Dimension Expander, Chorus, Reverb etc., it is good idea to modulate the Filter Stereo.
It will deepen the sound creating a cutoff offset for the left and right signals.

Any effect that increases the space is welcome when it comes to plucks.
A subtle stereo delay in combination with the reverb will almost always enhance the sound.
However, it is very important to not overuse these effects.
When the reverb tail is blurring the transients, it is a sign that you have used too much.
There is a very efficient technique for making pluck sound rich and spacey while keeping the overall mix clean.
The point is to emulate a gated reverb, which can be achieved by placing after the reverb a device that will cut its long tail and act like a noise gate.
The most obvious choice is a low pass filter. With the cutoff modulated by an envelope, it won’t have any unwanted long tails, but it will let the initial signal be thickened by a big size reverb.
If the filter device is used for other purposes in fx chain, there is always the Chorus effect that has LP filter built in.
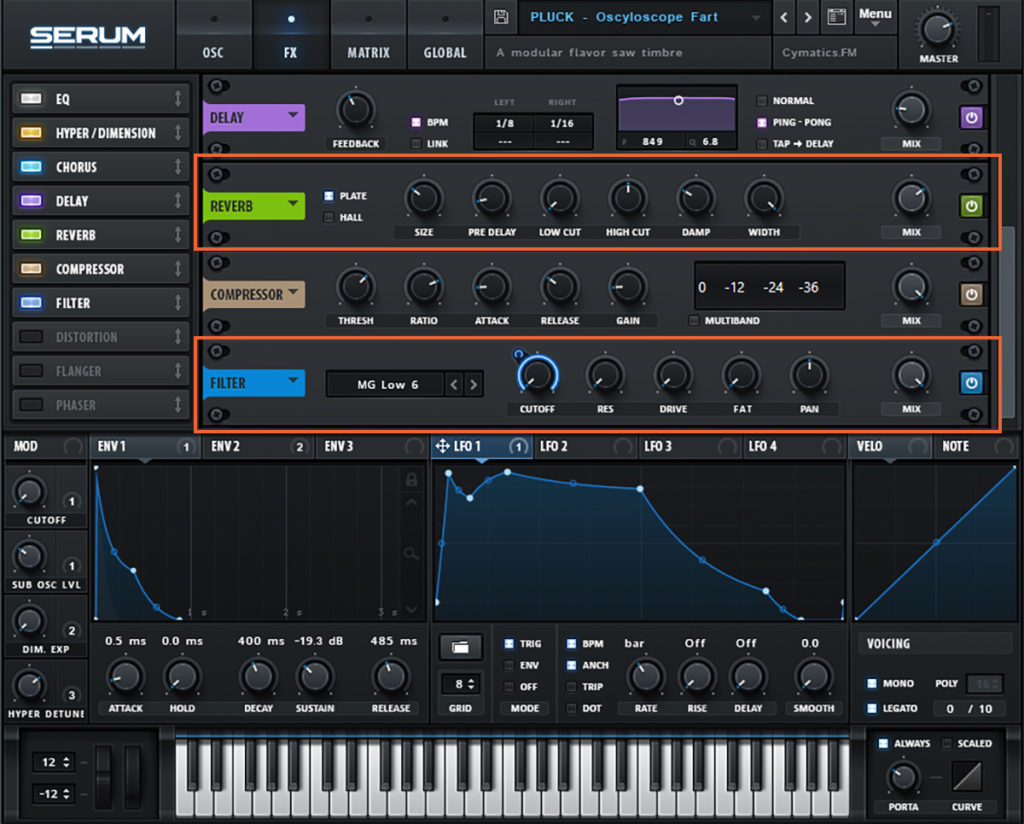
An example of gated reverb emulation setup. The reverb is set to relatively high size and mix but the filter is modulated by envelope to cut out the too long tail making sound rich and spacey but clean and sharp at the same time.
Plucks should be melodic and harmonic.
Some of the exotic Serum filters drastically change the sound and are very sensitive to minor changes.
Always use the Filter Key Tracking feature to make your filter follow the sound’s pitch.
https://cymatics-assets.sfo2.cdn.digitaloceanspaces.com/2017/04/Filter-Keytrack_CLIPCHAMP_keep.mp4
Plucks are very percussive sounds.
It is very important to make them consistent with your song's groove and tempo.
All actions aimed at building your pluck timing in coherence with the song structure may be additionally emphasized with the good use of the compressor.
When it comes to EDM plucks, it is very important to set the compressor's attack and release time in a way that will emphasize the pluck amplitude and make the sound “pump”.
If you are not great at using compressors, delay time calculators that can be found online are very helpful.
They translate your beat division to milliseconds and help to perfectly synchronize your compressor's attack and release with your song tempo.
Remember that Serum also has a note division to time calculator!
While this method doesn’t work when typing note division inside the compressor parameters, you can copy the exact numbers from envelope times after calculating them within one of Serum’s envelopes.

Creating plucks in Serum can be quite the daunting task, but if you use these methods I guarantee you will be able to create useful plucks with more consistency.
If you haven't already, I highly encourage you check out our 30 Day Guide to Advanced Bass Design in Serum!
It's a 33 page PDF that goes WAY more in depth than this article did, and it gives you daily tasks to complete that will advance your sound design faster than you could ever imagine...
It also includes tons of daily videos to show you step by step how to complete each daily task.
So if you're looking to step up your sound design, go check it out: CLICK HERE
If you have any questions about this article, comment below and we will help you out!
People often ask me how I make my plucks so consistently useful, so I wanted to show everyone some secret tips and techniques we use to make our best selling Serum patches.
Keep in mind, the key to mastering sound design is PRACTICE, PRACTICE, PRACTICE!
So without further ado, let's make some plucks...
If you want to read an in depth review of Xfer Serum, click here.
Shaping Your Pluck's Amplitude & Length
One of the most important things that distinguish a pluck sound are its amplitude and time.
Plucks usually start with a very short attack, often accented with a transient.
Then its amplitude fades quite quickly, creating a punchy, plucky sound.
The trick is to build a pluck envelope in such a way that will make it fit the song tempo and performed melody.
Quite often, creating the pluck amplitude envelope depends on the circumstance. Each case is different, but there are some rules you should follow.
It is important to keep the sound clean and sharp so it doesn’t lose its punchiness, but also makes it so it decays nicely and sounds full.
At first sight, the Serum envelopes are no different than any other synthesizer envelope with a classic Attack, Hold, Decay, Sustain, and Release.
However, they do have some “hidden” functions that are very handy when it comes to making a precise envelopes for sounds like plucks.
Tip #1: Take full control over your envelopes.
There is great feature called the Envelope Auto-Zoom Switch. It helps to create a very detailed envelope shape by zooming the entire envelope length and representing the other two envelopes’ “ghost” shapes.
It helps to fully control the relation between all three envelopes after assigning them to various parameters.
One of the most perfect tools for designing pluck envelopes built into Serum is the note duration to time calculator.
Double click a parameter and type a note duration value (for example “1/16”).
Press Enter and the synth will calculate the time for you based on the global project tempo!
This way you will have a full control of your pluck’s amplitude shape so it perfectly fits your song tempo.
Pro Technique: This tool has a many other applications like setting the delay or compressor release time.
Tip #2: Take advantage of the LFO to make it complex envelope.
Because LFO shapes can also act like envelopes, it is worth it to use them while shaping pluck sounds.
One of my favorite features helping to create a more interesting pluck envelopes is the LFO Delay.
It allows you to build truly multidimensional sounds.
For example, if you delay the signal from one oscillator relative to the second by assigning the delayed LFO to its amplitude, it will create an effect very close to traditional delay, but much deeper.
The delayed signal will have totally different timbre than the main one.
This technique is very commonly used in Jack Ü style plucky snares, built of two transients rapidly appearing after each other creating a snappy double pluck.
This feature can be used very creatively coupled with the possibility of synchronization the envelopes to tempo.
https://cymatics-assets.sfo2.cdn.digitaloceanspaces.com/2017/04/LFO-Delay_CLIPCHAMP_keep.mp4
Tip #3: Shape the transient.
There is a very effective way to emphasize a pluck attack.
This technique is commonly used for drum sounds design but when subtly used it can work wonders for the pluck.
Make an envelope with a really short decay (around 20 ms, or simply set it’s value to 1/32 or 1/64).
Assign the the Envelope to the Oscillator Coarse Pitch with unipolar modulation to add an extra transient at the start of the sound.
BEFORE:
[x_audio_player mp3="https://cymatics-assets.sfo2.cdn.digitaloceanspaces.com/2017/04/Pluck-Transient-Trick-Before.mp3"]
AFTER:
[x_audio_player mp3="https://cymatics-assets.sfo2.cdn.digitaloceanspaces.com/2017/04/Pluck-Transient-Trick-After.mp3"]
Creating the Pluck's Timbre
The essence of a pluck sound is its timbre and sonic characteristics.
Choosing the features that will make up the sound will depend on the genre and context.
While Progressive House plucks can be made of detuned saws passed through low pass filter, Big Room plucks can be a woody percussive sound with a lots of gated reverb.
Therefore it is difficult to distinguish one characteristic that would be common to all kinds of plucks.
However, there are some tricks that are versatile and make the sound more interesting.
Depth and Layering are crucial!
It is important to use all possible tools to make a pluck sound interesting.
Pluck sounds are relatively short and there is not much opportunity for complicated sound morphing, but any movement will add a desired depth to the sound.
Tip #4: Always use more than one envelope for modulation.
This is really crucial.
When you modulate amplitude, filter cutoff, and other parameters with the same modulation source, the sound will usually lack depth.
Even slight changes in the shape of the envelopes assigned to various parameters will introduce an interesting sound movement.
Tip #5: Take advantage of the Global tab.
Although Serum has only two oscillators, there are many techniques to increase your sound’s complexity and depth.
A very important one is to use unison stacking.
When unison is set to more than three voices, the stack control in the Global tab provides multiple options for having the unison voices playing different pitches.
The most obvious and effective solution is adding voices an octave higher using the “12 (1x)” setting, but Serum offers the possibility of including perfect fifth in the layering using the “12+7(1x)” setting.
BEFORE:
[x_audio_player mp3="https://cymatics-assets.sfo2.cdn.digitaloceanspaces.com/2017/04/Unison-Stack-Trick-Before.mp3"]
AFTER:
[x_audio_player mp3="https://cymatics-assets.sfo2.cdn.digitaloceanspaces.com/2017/04/Unison-Stack-Trick-After.mp3"]
Tip #6: Oscillator fine pitch.
The Oscillator fine setting is a very good tool for achieving fatter and more “analog” style pluck sounds.
It is also a less CPU hungry solution than adding a lot of unison voices.
Detuning both oscillators a couple of cents opposite from each other is always a good solution.
For a vintage feel, a cool trick is to assign the Chaos or NoteOn Rand modulation sources to the Oscillator fine.
Going beyond 30 cents usually causes the sound to be out of tune, so moderation is key.
BEFORE:
[x_audio_player mp3="https://cymatics-assets.sfo2.cdn.digitaloceanspaces.com/2017/04/Fine-Tune-Chaos-Trick-Before.mp3"]
AFTER:
[x_audio_player mp3="https://cymatics-assets.sfo2.cdn.digitaloceanspaces.com/2017/04/Fine-Tune-Chaos-Trick-After.mp3"]
Tip #7: Stack voices even further to achieve rich chord stab plucks.
Unfortunately Serum’s Unison stack feature allows to obtain only perfect fifth, but there is a way to walk around this and create more chords.
Oscillator Unison Range can be used for creating virtually every chord.
By default it is set to 2 semitones but you can change it to any value and create major, diminished, or any other chord.
However, it works properly only when Osc Unison voices are set to 2 and unison detune to maximum.
You should also lower the Unison Stereo Width when the Unison is set to two voices to make it more mono and not spread to the left and right channels.
Of course this technique only applies when you are aiming for pre-made chord plucks used in genres such as Deep House.
If you are aiming for classic polyphonic pluck sounds, stacking a lot of voices in different pitches makes them unplayable.
https://cymatics-assets.sfo2.cdn.digitaloceanspaces.com/2017/04/Unison-Range-Trick_CLIPCHAMP_keep.mp4
Tip #8: Using your sample library for the Noise OSC as an additional layer.
Don’t forget that Serum’s Noise Oscillator is a super powerful and high quality sampler.
It is perfect for adding a whole new dimension to your plucks.
Serum offers a variety of samples to choose from, but its library is limited to a very basic transients, noises, and ambient sounds.
Fortunately, adding your own samples is extremely easy.
A well designed pluck can be turned into sound design masterpiece when you add a layer of an acoustic instrument or rich texture underneath it.
It is good to remember that the best way to save your sample along with the preset is to DRAG them into Noise OSC directly from your external sample library - NOT from Serum’s Noise Osc drop down menu.
If you open the sample from within Serum’s Noise Osc folder drop down menu, the sample will NOT be saved within the patch… It will simply reference the file from within the folder.
Pro technique: When the background of the Noise Osc sample name becomes dark blue (not dark gray), it is a sign that the wav file will be saved with the preset.
https://cymatics-assets.sfo2.cdn.digitaloceanspaces.com/2017/04/Noise-Osc_CLIPCHAMP_keep.mp4
Perfecting the Filtering & FX For Your Pluck
The simpler, the better.
The pluck’s function is to carry an interesting melody or chord progression.
It is great for it to sound interesting, but when it is overdone simply starts to fight with other elements and loses its original function.
That’s why when it comes to plucks, it is best to choose from some “classic” filters.
Of course there are some exceptions to this rule and you will have to reach for some more exotic filters like Combs of Flanges, but in most cases a simple Low Pass will do the trick.
Tip #9: Add some more stereo with the filter.
In the case of plucks there is almost never too much wideness.
In addition to the usual effects that increase the stereo field like Dimension Expander, Chorus, Reverb etc., it is good idea to modulate the Filter Stereo.
It will deepen the sound creating a cutoff offset for the left and right signals.
Tip #10: Plucks like to be treated with reverb and delay.
Any effect that increases the space is welcome when it comes to plucks.
A subtle stereo delay in combination with the reverb will almost always enhance the sound.
However, it is very important to not overuse these effects.
When the reverb tail is blurring the transients, it is a sign that you have used too much.
There is a very efficient technique for making pluck sound rich and spacey while keeping the overall mix clean.
The point is to emulate a gated reverb, which can be achieved by placing after the reverb a device that will cut its long tail and act like a noise gate.
The most obvious choice is a low pass filter. With the cutoff modulated by an envelope, it won’t have any unwanted long tails, but it will let the initial signal be thickened by a big size reverb.
If the filter device is used for other purposes in fx chain, there is always the Chorus effect that has LP filter built in.
An example of gated reverb emulation setup. The reverb is set to relatively high size and mix but the filter is modulated by envelope to cut out the too long tail making sound rich and spacey but clean and sharp at the same time.
Tip #11: Use the Filter Key Tracking when using filters from the Flanges and Misc group.
Plucks should be melodic and harmonic.
Some of the exotic Serum filters drastically change the sound and are very sensitive to minor changes.
Always use the Filter Key Tracking feature to make your filter follow the sound’s pitch.
https://cymatics-assets.sfo2.cdn.digitaloceanspaces.com/2017/04/Filter-Keytrack_CLIPCHAMP_keep.mp4
Tip #12: Control the dynamics of the sound using the Compressor.
Plucks are very percussive sounds.
It is very important to make them consistent with your song's groove and tempo.
All actions aimed at building your pluck timing in coherence with the song structure may be additionally emphasized with the good use of the compressor.
When it comes to EDM plucks, it is very important to set the compressor's attack and release time in a way that will emphasize the pluck amplitude and make the sound “pump”.
If you are not great at using compressors, delay time calculators that can be found online are very helpful.
They translate your beat division to milliseconds and help to perfectly synchronize your compressor's attack and release with your song tempo.
Remember that Serum also has a note division to time calculator!
While this method doesn’t work when typing note division inside the compressor parameters, you can copy the exact numbers from envelope times after calculating them within one of Serum’s envelopes.
Conclusion
Creating plucks in Serum can be quite the daunting task, but if you use these methods I guarantee you will be able to create useful plucks with more consistency.
If you haven't already, I highly encourage you check out our 30 Day Guide to Advanced Bass Design in Serum!
It's a 33 page PDF that goes WAY more in depth than this article did, and it gives you daily tasks to complete that will advance your sound design faster than you could ever imagine...
It also includes tons of daily videos to show you step by step how to complete each daily task.
So if you're looking to step up your sound design, go check it out: CLICK HERE
If you have any questions about this article, comment below and we will help you out!
Do you want better Serum presets?
Download our free Ultimate Serum Library and improve your sound library today.