
5 Proven Techniques That Will Make Your Mix Louder


Do you ever ask yourself "my song is so good, but why can't I get it louder?!"
One of the biggest mixdown questions we get asked here at Cymatics is “how do I make my track louder”.
You may think it’s a mastering problem, but it's really it’s mixing.
Before a master can really polish and improve your song, you need a mix that will work well being mastered.
Now really if you think of it, all tracks when mastered are the same volume, even yours.
Usually a song hits a limiter with a ceiling of 0.
So really this means that other songs are just “perceptually louder”.
Now this perceptual loudness can be explained with another saying known as “maximum volume, minimum voltage”.
Essentially this means you want the elements of your track to be perceptually loud, while using the least amount of actual volume.
This can occur for a multitude of different reasons.
A sound with a lot of harmonic content may be perceptually louder for example.
Another might be a heavily compressed sound with a constant dynamic range.
Below are 5 techniques you can implement into your mixes to make your music perceptually louder.
When learning how to mix, one of the first skills you want to master is “slotting”.
Slotting is the concept is placing each element of your track in their own unique space in the dimensions of “height”, “depth”, and “width”.
This technique will allow each element to shine by taking up it’s own space, allowing maximum perceptual volume.
Imagine your song is actually existing in a massive 3D space.
Each element can exist somewhere in the space, typically with your main elements close to front and center, and your less important elements placed elsewhere.
Now let’s talk about how to place elements in these three dimensions.
Height:
When listening to sounds, low frequency ranges are perceptually lower to the ground, and the higher the frequency the higher in height it is perceived.
Therefore, by giving each element it’s own space in the frequency spectrum you are also filling out your song in the dimension of “height”.
The obvious tool to tackle this with is EQ, but this should also be applied in the writing process.
You want to limit how many sounds exist in certain frequency ranges to let each one shine individually.
So when writing, be very selective as to which sounds sit where.
For example, maybe I would have a sub bass in the lowest frequencies, a low mid bass taking up the mids (lightly bleeding into the highs), a lead taking up the high mids, and cymbals and fx taking up the highs.
Now this is just an example, but hopefully it’s getting you thinking.
One thing to be careful of however is over-slotting.
Sounds tend to sound unnatural if you limit them to a certain frequency range.
For example, taking a bass, removing all the sub, and removing all the highs.
This would likely sound weird, so when slotting, try using shelves more than hard cuts.
It’s more natural when elements still cover the full frequency spectrum, just less so in certain areas.
Depth:
The “depth” of your track is most often created with time based FX such as delays and reverbs.
By mastering these tools you can place your sounds further away, or, alternatively with little to no delay or reverb, can set your sound upfront in the mix.
In its most basic form, the longer reverb and delay a sound has the more distant it is perceptually. Here is a basic diagram to illustrate this concept:
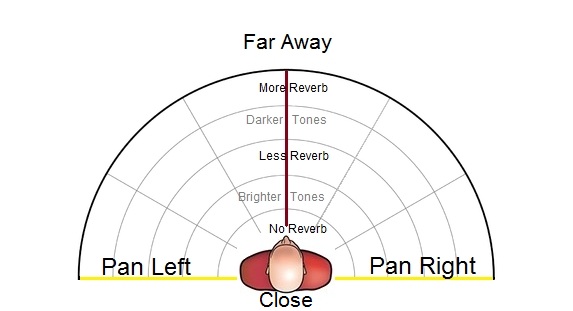
Width:
Lastly the width of your track is where you are placing your sounds in the stereo field.
This is usually dealing with two different concepts.
The first being how “wide” the actual sound is, and the second being how far panned left or right your sound is.
Panning is a quite straight forward and obvious concept, where is the sound in regards to left or right.
Where things get more complicated however is how wide that sound is in the left and right field.
In the diagram above, the left to right spectrum of sound is broken up into 6 sections.
Imagine a sound was taking up only the middle left section by panning it to that location.
Now however, imagine if that sound we’re actually wider than that, and started to take up parts of the two adjacent sections.
Try to think of all your sounds in that sense. Is it completely dead center? Or is it dead center, but also wide?
Now the real question is how do we make a sound wider or less wide.
In its most basic summary, we perceive sounds as being “wider” when there are differences in the sound between the left and right speaker, or opposite to that, something is perceptually “mono” when there are no differences in the sound coming out the left or right speaker.
Let’s say for example you recorded your voice with a single microphone.
Your speakers would playback that voice with identical information in each ear to create a “phantom center”, a perceptual center for the sound.
If however one of side of your vocal was detuned a few cents for example, your ear would perceive these differences and your mind would start to hear the sound as being wider.
There are a lot of things you could do to then make a sound wide based off this knowledge. You could detune one side, delay it slightly timewise, EQ it differently, etc….
With that knowledge, you can now slot sounds around each other in the stereo field.
Some sounds dead center, others wide stretching across the whole mix, others very close to mono off to the side.
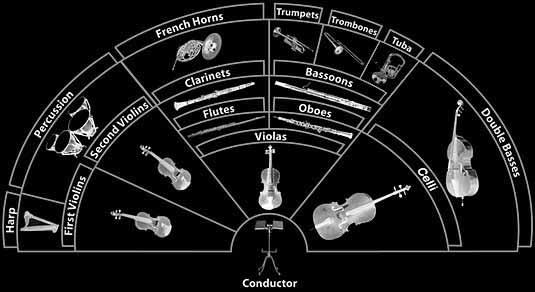
To finish this section off, take a look at the diagram of a real life orchestra below.
You can see how this is done in real life, so why not apply this to your synthetic sounds.
Take it one step further, and try to draw your mix before you start, so you know exactly where you will be slotting your sounds.
Now with all of this in mind you can start to imagine your mixdown as fitting sounds into a 3 dimensional space.
By smartly placing sounds in their own unique space, you can fit more sounds overall, giving your mix greater perceptual volume and maximum clarity.
This is something I briefly mentioned on the subject of frequency slotting, but want to mention a bit more in depth.
When writing a song, you want to arrange your sounds so they are taking up different frequency ranges or, more easy to keep track of, the octave range.
If when writing and layering your sounds each one has a unique octave range, you will then achieve the greatest results.
Let’s say for example you we’re writing a song in E, and to keep things simple your bassline only hit a low E at 41.2 Hz. Well then you would now have room to play your mid bass one octave above that with a root of 87.31 Hz.
Then potentially the root of your kick could be one octave above that at 164 Hz.
Then you can continue from there, next octave the root of your snare, the next octave is the range of your lead, the next octave is the range of your arps.
Now this is a mathematical way of looking at it, but this has been common in music for ages.
A string quartet for example comprises of a double bass, cello, viola, and violin, each of which will play in their own octave range.
The double bass in the low octaves creating deep sub like tones, while the violin playing some of the highest notes.

Think of this when writing. If your music had a double bass but then 3 cellos, none of the cellos would stand out, and they would all mask each other.
Below is a chart on what frequency ranges sounds play, and what octaves they naturally can play in as well.
Consider this when picking elements of your song, and limit their ranges to squeeze the elements into the right spot.

One of the first thing that comes to mind when maximizing somethings volume is compression.
Compression when used correctly is an excellent way to make something perceptually louder.
By turning down loudest peaks, but then compensating by turning up the whole sound, something will be perceptually louder due to it’s smaller dynamic range.
The big problem I see is producers either incorrectly compressing sounds, hyper compressing sounds, or compressing too many sounds in the mix.
Having a balance between compresses sounds and dynamic sounds will let the right sounds pop at the right moment.
Going into immense detail on mastering compression may take some time, but what I do want to teach you is how put just a touch of the “right” sounding compression on everything.
The first step is to put a compressor on a sound and tighten up the settings.
Bring the threshold quite far down, ratio quite high, attack very quick, and release quite tight as well.
Now everything we’re going to do after this is based off “feel”. First dial back the attack, only listening to the front of the sound, and listening for the perfect “feel” for the front of that sound.
Never do the same thing with the release.
After that, dial back the ratio, still focusing on just the “feel” of the sound.
Next, dial back the threshold so the sound only touches it every so often.
After that, dial back the dry/wet to taste.
This is the most transparent way of applying compression while having the best effect based on the “feel”.
This slight limiting of the dynamic range will give your sound that extra boost of perceptual volume.

This is quite straightforward, the concept of less is more.
When I was a new producer I used to pack my songs to the brim; huge drums, layers and layers of synths and bass.
I used to think this fullness would make my song feel huge, but due to the large amount of elements it wouldn’t hit mastering nearly as hard, and thus sound weak in comparison to some of the most minimal tracks.
This is simply because each element is taking up so much headroom.
Sometimes the right move is to actually have LESS elements in your song to make it perceptually bigger.
If for example you had a kick, an 808, some cymbals, and one REALLY catch trap lead, your song would be HUGE sounding when it hit mastering because each element would be clear as day.
The last and final way to maximize your headroom in your song is by using “distortion”.
Now when you think of distortion you may think of making a sound overly crunchy, similar to a guitar tone.
That however is only one type of distortion and not necessarily the technique we are going for, at least not so obviously.
By slightly distorting the elements of your song you are introducing new harmonic content into your sound.
This additional harmonic content will make your sound perceptually louder.
You don’t even need very much distortion, even just barely distorting all your sounds will give it that little bit of extra content to make it stand out and truly maximize it’s volume while using less energy.
There we go, those were 5 potential ways you can increase the perceptual volume of your sound creating that “loud” mix and master you always hear from the pros.
Use these techniques in combination to show off your true mastery.
If you have any questions leave a comment below!
Finally, if you want to download some amazing samples make sure to download our FREE Ultimate Sample Library:

One of the biggest mixdown questions we get asked here at Cymatics is “how do I make my track louder”.
You may think it’s a mastering problem, but it's really it’s mixing.
Before a master can really polish and improve your song, you need a mix that will work well being mastered.
Now really if you think of it, all tracks when mastered are the same volume, even yours.
Usually a song hits a limiter with a ceiling of 0.
So really this means that other songs are just “perceptually louder”.
Now this perceptual loudness can be explained with another saying known as “maximum volume, minimum voltage”.
Essentially this means you want the elements of your track to be perceptually loud, while using the least amount of actual volume.
This can occur for a multitude of different reasons.
A sound with a lot of harmonic content may be perceptually louder for example.
Another might be a heavily compressed sound with a constant dynamic range.
Below are 5 techniques you can implement into your mixes to make your music perceptually louder.
Loudness Technique #1: Slotting
When learning how to mix, one of the first skills you want to master is “slotting”.
Slotting is the concept is placing each element of your track in their own unique space in the dimensions of “height”, “depth”, and “width”.
This technique will allow each element to shine by taking up it’s own space, allowing maximum perceptual volume.
Imagine your song is actually existing in a massive 3D space.
Each element can exist somewhere in the space, typically with your main elements close to front and center, and your less important elements placed elsewhere.
Now let’s talk about how to place elements in these three dimensions.
Height:
When listening to sounds, low frequency ranges are perceptually lower to the ground, and the higher the frequency the higher in height it is perceived.
Therefore, by giving each element it’s own space in the frequency spectrum you are also filling out your song in the dimension of “height”.
The obvious tool to tackle this with is EQ, but this should also be applied in the writing process.
You want to limit how many sounds exist in certain frequency ranges to let each one shine individually.
So when writing, be very selective as to which sounds sit where.
For example, maybe I would have a sub bass in the lowest frequencies, a low mid bass taking up the mids (lightly bleeding into the highs), a lead taking up the high mids, and cymbals and fx taking up the highs.
Now this is just an example, but hopefully it’s getting you thinking.
One thing to be careful of however is over-slotting.
Sounds tend to sound unnatural if you limit them to a certain frequency range.
For example, taking a bass, removing all the sub, and removing all the highs.
This would likely sound weird, so when slotting, try using shelves more than hard cuts.
It’s more natural when elements still cover the full frequency spectrum, just less so in certain areas.
Depth:
The “depth” of your track is most often created with time based FX such as delays and reverbs.
By mastering these tools you can place your sounds further away, or, alternatively with little to no delay or reverb, can set your sound upfront in the mix.
In its most basic form, the longer reverb and delay a sound has the more distant it is perceptually. Here is a basic diagram to illustrate this concept:
Width:
Lastly the width of your track is where you are placing your sounds in the stereo field.
This is usually dealing with two different concepts.
The first being how “wide” the actual sound is, and the second being how far panned left or right your sound is.
Panning is a quite straight forward and obvious concept, where is the sound in regards to left or right.
Where things get more complicated however is how wide that sound is in the left and right field.
In the diagram above, the left to right spectrum of sound is broken up into 6 sections.
Imagine a sound was taking up only the middle left section by panning it to that location.
Now however, imagine if that sound we’re actually wider than that, and started to take up parts of the two adjacent sections.
Try to think of all your sounds in that sense. Is it completely dead center? Or is it dead center, but also wide?
Now the real question is how do we make a sound wider or less wide.
In its most basic summary, we perceive sounds as being “wider” when there are differences in the sound between the left and right speaker, or opposite to that, something is perceptually “mono” when there are no differences in the sound coming out the left or right speaker.
Let’s say for example you recorded your voice with a single microphone.
Your speakers would playback that voice with identical information in each ear to create a “phantom center”, a perceptual center for the sound.
If however one of side of your vocal was detuned a few cents for example, your ear would perceive these differences and your mind would start to hear the sound as being wider.
There are a lot of things you could do to then make a sound wide based off this knowledge. You could detune one side, delay it slightly timewise, EQ it differently, etc….
With that knowledge, you can now slot sounds around each other in the stereo field.
Some sounds dead center, others wide stretching across the whole mix, others very close to mono off to the side.
To finish this section off, take a look at the diagram of a real life orchestra below.
You can see how this is done in real life, so why not apply this to your synthetic sounds.
Take it one step further, and try to draw your mix before you start, so you know exactly where you will be slotting your sounds.
Now with all of this in mind you can start to imagine your mixdown as fitting sounds into a 3 dimensional space.
By smartly placing sounds in their own unique space, you can fit more sounds overall, giving your mix greater perceptual volume and maximum clarity.
Loudness Technique #2: Arrangement
This is something I briefly mentioned on the subject of frequency slotting, but want to mention a bit more in depth.
When writing a song, you want to arrange your sounds so they are taking up different frequency ranges or, more easy to keep track of, the octave range.
If when writing and layering your sounds each one has a unique octave range, you will then achieve the greatest results.
Let’s say for example you we’re writing a song in E, and to keep things simple your bassline only hit a low E at 41.2 Hz. Well then you would now have room to play your mid bass one octave above that with a root of 87.31 Hz.
Then potentially the root of your kick could be one octave above that at 164 Hz.
Then you can continue from there, next octave the root of your snare, the next octave is the range of your lead, the next octave is the range of your arps.
Now this is a mathematical way of looking at it, but this has been common in music for ages.
A string quartet for example comprises of a double bass, cello, viola, and violin, each of which will play in their own octave range.
The double bass in the low octaves creating deep sub like tones, while the violin playing some of the highest notes.
Think of this when writing. If your music had a double bass but then 3 cellos, none of the cellos would stand out, and they would all mask each other.
Below is a chart on what frequency ranges sounds play, and what octaves they naturally can play in as well.
Consider this when picking elements of your song, and limit their ranges to squeeze the elements into the right spot.
Loudness Technique #3: Compression
One of the first thing that comes to mind when maximizing somethings volume is compression.
Compression when used correctly is an excellent way to make something perceptually louder.
By turning down loudest peaks, but then compensating by turning up the whole sound, something will be perceptually louder due to it’s smaller dynamic range.
The big problem I see is producers either incorrectly compressing sounds, hyper compressing sounds, or compressing too many sounds in the mix.
Having a balance between compresses sounds and dynamic sounds will let the right sounds pop at the right moment.
Going into immense detail on mastering compression may take some time, but what I do want to teach you is how put just a touch of the “right” sounding compression on everything.
The first step is to put a compressor on a sound and tighten up the settings.
Bring the threshold quite far down, ratio quite high, attack very quick, and release quite tight as well.
Now everything we’re going to do after this is based off “feel”. First dial back the attack, only listening to the front of the sound, and listening for the perfect “feel” for the front of that sound.
Never do the same thing with the release.
After that, dial back the ratio, still focusing on just the “feel” of the sound.
Next, dial back the threshold so the sound only touches it every so often.
After that, dial back the dry/wet to taste.
This is the most transparent way of applying compression while having the best effect based on the “feel”.
This slight limiting of the dynamic range will give your sound that extra boost of perceptual volume.
Loudness Technique #4: Less Is More
This is quite straightforward, the concept of less is more.
When I was a new producer I used to pack my songs to the brim; huge drums, layers and layers of synths and bass.
I used to think this fullness would make my song feel huge, but due to the large amount of elements it wouldn’t hit mastering nearly as hard, and thus sound weak in comparison to some of the most minimal tracks.
This is simply because each element is taking up so much headroom.
Sometimes the right move is to actually have LESS elements in your song to make it perceptually bigger.
If for example you had a kick, an 808, some cymbals, and one REALLY catch trap lead, your song would be HUGE sounding when it hit mastering because each element would be clear as day.
Loudness Technique #5: Distortion
The last and final way to maximize your headroom in your song is by using “distortion”.
Now when you think of distortion you may think of making a sound overly crunchy, similar to a guitar tone.
That however is only one type of distortion and not necessarily the technique we are going for, at least not so obviously.
By slightly distorting the elements of your song you are introducing new harmonic content into your sound.
This additional harmonic content will make your sound perceptually louder.
You don’t even need very much distortion, even just barely distorting all your sounds will give it that little bit of extra content to make it stand out and truly maximize it’s volume while using less energy.
Conclusion
There we go, those were 5 potential ways you can increase the perceptual volume of your sound creating that “loud” mix and master you always hear from the pros.
Use these techniques in combination to show off your true mastery.
If you have any questions leave a comment below!
Finally, if you want to download some amazing samples make sure to download our FREE Ultimate Sample Library:
