
How To Crush Your Production Goals for 2022!


We asked thousands of producers what their goals are for the new year.
And after listening to their ambitions, we saw that their goals ranged from “learn how to get started as a producer”, to “how to get more followers on social media.”
We figured you may have similar “resolutions”, so we decided to break down each goal and give you a few tips, tricks, and resources to help get you started.
This way, your 2022 can be filled with success! And if you’ve already “messed up” on your resolutions, don’t worry! Hopefully, this article can help you get right back on track.
Follow along as we go over the following topics to get you headed in the right direction:
It’s never been easier to get started as a musician. For the most part, all you need is a pair of headphones, a computer, and a tenacity to learn, and you’re ready to rock.
But the question remains, how are you going to stand out amongst the thousands of new producers out there?
The answer: Sound Design.
How many songs are there, right now, that you can hear the first drum hit or synth note and know immediately, who that artist is? Being able to craft and develop a unique sound is something that shouldn’t be overlooked when you’re creating your music.
This is why we believe that having a good foundation in sound design will put you above most of the music producers that are out there.
Think of it like a cooking competition - everyone is working with the same ingredients, but it’s up to you to cook the best dish. Many producers have access to the same samples, DAWs, and plugins as you do.
What sets you apart from the rest, is how you make use of them to create your unique sound.
So, here a couple of quick, efficient tips to get you started on improving your sound design.
This is one of the hardest parts, since there are so many options out there!
But here’s the secret - just pick one and stick with it.
Take a look at the many software synths out there, see what looks good to you, and start mastering one synth.

The biggest mistake music producers make when learning sound design is the constant jumping back and forth between VST’s.
This is because they see that a famous producer uses a certain VST to make one type of sound, and another producer using a different VST for a different sound.
This constant jumping back and forth will only cause you pain, because you’ll never fully understand and master one piece of software. As a result, your sounds will suffer.
Nowadays, almost every synthesizer can do what the other can in terms of its features, so take a leap and get to work learning how to use just one before you make the effort to learn another.
You’ll thank us in the long run.
Don’t discount the sheer number of articles, video tutorials, and how-to guides on sound design that will show you how to make the sounds you’re looking to create.
A quick Google search on “how to make a Dubstep growl with [insert VST plugin name here]” will bring back thousands of results.
Pick a few beginner walk-throughs and really pick apart what’s happening with each parameter that’s being added to a sound. Check out this video to get an idea of what synthesis is and how the fundamentals work to get you started.
There are a ton of free presets for most of the popular software synthesizers out there (Like Serum or Massive) that you can open up, pick apart, and begin to digest.

One of the easiest ways to learn the basics of sound design is to take a sound preset, such as a lead or bass sound, and begin to tweak the parameters within the preset to see how it affects the sound.
From there, you can begin to understand how adding or subtracting certain effects will help create exactly what you’re looking for in your track.
You can also reverse engineer presets to understand exactly how they were made and even try to recreate it to solidify your understanding.
With these methods, you’re sure to get a good start on your sound design journey and grasp a few sound design tricks here and there.
But to get to a point where you can make any sound you hear in your head, you need both foundational knowledge on your VST as well as a good understanding of advanced techniques.
That’s why we created the Serum Masterclass. This 60-day course will take you through everything you need to know to master sound design from how to create basic sounds in Serum to even the post-processing part.
And since it walks you through every step of the sound design journey, it doesn’t matter if you’re a beginner or an advanced sound designer. You can start with the Serum Walkthrough or jump ahead and learn how to use macros in Serum or how to create wavetables.
We’ve even included 4 start-to-finish courses that are made completely from scratch, which means you’ll get to witness professional producers mess up and then find a solution.
The best part is, you can access this course for free right now on Academy.fm (which you can also join for free.)
You can check it out here.
Next, we will cover some tips on how to arrange your songs to help you out with songwriting!
One of the biggest hang ups that music producers is how to take a song from an idea to a finished track.
This can usually be attributed to their comfort level with arrangement, music theory, or even the intimidation you can face by trying to make a song work that doesn’t have a good foundation to it.

Here are a few things you can try to break through and get your ideas fleshed out into full songs.
Have a bunch of 8 or 16 bar loops that you’re sitting on and haven’t gone anywhere? Do you like how it all sounds but are struggling to move past the main idea phase?
If you answered yes to any of the above questions, it’s usually because you don’t have a clear understanding of arrangement yet. Don’t worry though! One way to learn is to look at your favorite artists and really take a look at their music.
Take one of their songs and drag it into your DAW. Take note and add location markers when the song changes. This way, you can clearly see where the intro, breakdowns, build-ups, and drops are.
Once you’re finished doing that, how many bars is each section? What changes from section to section? Really dive deep and deconstruct the song to see when the kick comes in and out, where the pads come in, and when the lead hits. Do this for every element that you can hear.
Don’t just do this for one type of music - go across multiple genres and study up on multiple songs. Being able to deconstruct and take a look at music objectively is a skill that is developed over time so practice, practice, practice!
Now back to your loop! Here’s a quick way to get your idea out to the length of a full song after you’ve looked at the patterns of other artists.
Your loop is probably created up of a few elements, just like the songs you were just taking a look at. This usually includes a kick, snare, percussion, your main lead/pad, and a bass.
Take your loop and copy, paste, and delete your way through until it matches where the elements come in and out in of a song you’ve taken a look at in the genre you’re trying to emulate. By doing this, you’ll have successfully reverse-engineered a skeleton of a full song.
Obviously, you will need to add in transition effects and make sure your builds all flow together, but your main idea has now quickly turned into a nice little arrangement that you can work with.
Another way you can work on your arrangement skills is to check out some tutorials online surrounding music theory or arrangement.
These can really help give you an idea of where songs start, or how artists lay down the foundations that lead to the song you hear on the radio.
Take a look at this video on Zedd’s Spectrum to give you an idea of how producers can break down a song into its basic form and really analyze how popular EDM songs are created.
As with any art, practice breeds experience and music isn’t any different. Above, we talked about really challenging yourself to sit down and finish a song within a month or a week.
By constantly challenging yourself to create a song from start to finish, you will learn what works, what doesn’t work, and how to go about writing a song faster than if you were to watch 100 Youtube videos.
Take your favorite songs and deconstruct them. See what makes them work, and understand how their arrangement is laid out - try to recreate this in your tracks.
If you try these techniques we promise you will see a big difference in your music in no time at all.
This next section goes hand in hand with knowing how to arrange your song. Being able to finish a track from start to finish is another roadblock many of you want to conquer in 2022 - let’s take a look.
There a few questions you need to ask yourself in order to approach this goal.
To you, what makes a song finished? How do you know that the last little bit of compression, or that last reverb adjustment means that everything is ready to be sent out into the world?
How do you set a quality standard for your tracks so that your satisfied with the end result?
We hear this all the time - “But it just doesn’t sound like my favorite tracks!” There’s a disconnect from what you WANT your music to sound like and what it ACTUALLY sounds like. You can hear the difference and it’s frustrating.
But here’s the thing, the only way you will get better is if you allow yourself to evolve as a musician. This means, eventually, you will need to close the book on one project so that you can open another.
You need to understand that finishing a track is just as important to a producer as starting one because it allows you to begin and create a new idea, separate from what you were working on.
If you didn’t do this, you’d be working on the same 16 bar loop forever and nothing would ever be finished. This really is an essential part to becoming a better producer and necessary if you want to make it in the music world.
Here are a few tips that can help you push through and help you not only finish a track, but be able to create a track every month or even every week!

Set a date for your track that it needs to be done by. Anything past that date is a new idea, no matter how far you got! That means if all you were able to make was a sick drop, or even just an intro, then that’s what you have.
This is a great way to hold yourself accountable for actually finishing some of your work, even if you don’t feel that it’s “ready”. Start with a longer set of time, like a month, and set out to finish a song by then.
By setting a due date, it will help you make final choices on sounds, samples, and the arrangement of your track. In the music industry, most artists work with deadlines and it helps them create a sense of urgency to finish their work.
If you know you only have a day left to finish a track, you’re going to lock in your pad sound and move on. You’re not going to have time to tweak that reverb for four hours in order to get just the right sound.
At first, it might be like pulling teeth, and you may only get a few parts of a song actually finished. But, like with most challenging aspects in music, this will become easier with practice.
Next, crank up the difficulty and try to finish a track within a week. We dare you.
This way of working will only benefit you in the future if you really hold yourself to it. It allows you to sift through your own thoughts, pick sounds, and make decisions that really make sense in the moment and move on.
Do you think musicians that are collaborating on a song during a studio session have hours to pick the right snare or figure out the perfect compression settings? Trust us when we say, working with due dates will only help you develop a better workflow and sense of your creativity.
Maybe your schedule is hectic and you just can’t find the time to spend on making a track from start to finish. To that, we recommend setting a time block aside to work on music and only music.

We know that being new to producing can seem daunting, especially when you’re trying to hold yourself to making a new track every so often. The amount of information and Youtube tutorials alone can be very intimidating to someone who has never studied music before.
The best way to navigate all that information is to set aside a specific block of time, and set a small goal for those few hours.
Whether that’s to look up music production techniques, sound design, songwriting, or whatever strikes your fancy, it doesn’t matter - what matters is that you have a goal and that you stick to working on something music related.
It’s okay to have days where you sit for hours and learn how to make a lead sound but remember - you’re trying to finish a track here. Don’t forget to block out time where you’re just working on your track.
It’s easy to get caught up in tutorial after tutorial, but all that knowledge won’t get you anywhere unless you sit down and take the time to put those tools into practice.
Consistency and accountability is key here. Having a plan and working it into your schedule is a surefire way to get moving on your 2022 goal of being able to finish a track. You will never find the time, you have to make the time.
Everyone has their own day-to-day schedule, so determine what works best for you so that you can get some music time in.
Now that you’ve got a few tracks under your belt in the new year, it’s time to learn how to get those out into the real world.
Being signed to a label is a dream for most, but how do you do it? There are several ways to go about getting a track released through a label, so let’s go over a few of them.
Remember, before you go pitching your music to labels, your tracks need to be top notch. Most label reps can tell if a song has been professionally made within seconds of listening to it, so your first step should be to work and hone your craft.
Here are a few ways to go about getting a label to release your tracks.
One way to get the attention of a label is to show them you have a loyal following. Most producers gain a following through blog releases. These typically feature artist spotlights that talk about the artist’s brand, their music, and what they’re trying to accomplish with their music.

Go check out one of your favorite blogs and check out to see who has written the article. Most of the time, a quick Google search will reveal a contact email.
This is your chance to reach out, be friendly, and express interest in being featured in a blog release. As with everything in music, make sure your tracks are golden before you start reaching out to blog writers.
If your music isn’t good enough, you could end up burning some bridges out there before you even get started.
Gaining a following from blog posts is still one of the best ways to get a label to discover your work and hopefully, release a track for you.
Record labels have what they call A&R (artist and repertoire) reps that are in charge of discovering, signing, and developing talent.
Most reps for major record labels have contact information regarding the submission of demos, some even only take demos via their Twitter DM’s, so take note of this.
You can find this information by going to Google, typing in the record label you’re interested in, followed by, “A&R rep”. Making an excel spreadsheet of these contact points is a great way to stay organized as you submit your tracks to record labels.
From here, if they like what they see, they will reach out and begin talks about writing up a contract to work with you. These contracts usually have a designated number of songs that they’re looking to sign, so make sure you have a large library of songs ready to go!
Check out this article if you want a more in-depth look at where you submit your music!
Now that you’ve made a ton of music, you want to make this a full-time career, but how does that work?

You’re in luck, there are a number of ways you can make money off your music whether that’s producing, playing live gigs, or working within the industry itself.
The music industry has changed a lot over the years and more “bedroom producers” are making a name for themselves. Technology has never made getting started with music easier than it is today.
Because there are so many ways to go about this, we’ll focus on just a few places to get you started online. Let’s start with the obvious route: Royalties.
There are countless websites that you can use to register your music to collect royalties from plays, downloads, or purchases of your music online.
Here’s a quick guide to walk you through how to register and submit your music and what the process looks like to collect royalties from any plays or downloads.
Now, for those who don’t already have a following quite yet, don’t worry. There are plenty of other ways to make money while producing music.
Basically, a music license is the documented permission to use the intellectual property (your song) for a duration of time for a specific purpose. This means you’re paid for your song or track to be used in a TV ad, film, or video game.
Consider this Nike commercial. Do you hear the song in the background? A producer made that track and got paid to do so, giving the rights to their song over to that company.
If this is something that interests you, here’s another guide to get you started. Some musicians can make quite a living off of sync/licensing of their music on the side, so don’t forget about this route as a producer!
These types of websites shouldn’t be overlooked as well, if you’re looking to make money from producing.
These sites offer services like:
Many freelance websites, like Upwork, function much like Craigslist. You can post your skills on a profile and people using the website will hire you based on what they need.

Other websites like AudioJungle allow you to add songs to their massive, royalty free, music libraries. Here, Youtubers or small advertisers will search through the library and purchase songs they would like to use in their media.
The more your song gets purchased, the more money you make!

Another great website to get you started is BeatStars. Here you can make beats and sell your music with either an exclusive, or non-exclusive contract. You set the price and deliver your product either by stems or MP3/WAV.
If they’re great, people will bite and purchase your music!

There are two versions of this website, a free and pro version. The Pro version of this website costs 9.99USD/month which includes a professional website, a Soundcloud Pro account, and social media connectivity to ensure that getting your beats out there is a breeze!
This website also generates an automatic licensing contract for those interested. Writing up your own contract can be cumbersome and frustrating, so they’ve made it easier than ever for the artist to get paid.
Keep in mind, there are more ways to make money from producing than what we’ve talked about here.
If you have contacts in the industry, you may be able to ghost produce or work in a singer-songwriter role, selling your music for those looking to have a sick track under their name.
Basically, there are many avenues to go down that will end with the same goal: to get paid as a producer.
Use your imagination along with some hard work ethic, and you’re bound to make your production dreams come true.
Regardless of the path you choose, making money as a music producer will require some promotion. We’re going to go over one of the best ways to promote yourself in this modern age: Social Media.
Like all producers that want to create music professionally, having a following or making a name for yourself is extremely important.
There’s a lot of great content out there outlining the importance of social media in the music industry and how it’s changed the way we do things.
Here are a few tips to help build your social media presence for the new year.
It starts with having a unified front on all your social media pages. Having a brand that looks, sounds, and conveys a consistent message is extremely important to have.
Take a look at your favorite artists that have a large following for an example. What stands out? What grabs you by the eye and wants you to keep diving into what they’re about?
It’s all about breaking down the barriers between you and your listeners. You do this by sticking to a continuous message in order for your followers to understand and connect with you on a regular basis.
Different artists take different approaches to their brand and social media. Dillon Francis, for instance, has a huge draw because of his comedic characters, transparency, and all around “funny guy” attributes.

Other artists like Elohim go with more of the mysterious route, keeping her face hidden and using a robotic female voice in her interviews to answer questions.

Showcase who you are as a person and as a musician - be consistent with your message.
Continuity goes a long way when trying to gain a following because people will be drawn to attributes that make you who you are.
If you are constantly changing the message behind your branding, people will find it difficult to connect with you.

How many times have you gone to an artist’s Instagram page to basically see the same style of photo, over and over again with little to no diversity? It happens more often than you think.
If your social media accounts aren’t interesting, then people will tend to not follow you.
Think about what you would find interesting and apply that to what you’re trying to accomplish. Film videos, take interesting photographs, or show how you made a specific part of a song that you’ve created.
Have a plan for what each outlet is going to be used for. Maybe you use Facebook for events and shows, while you use Twitter to interact with other artists, or talk about what’s going on in your day-to-day.
Maybe Instagram is where you highlight some of the places you’ve been, or showcase the music you’re working on. Snapchat is great to show your “behind the scenes” action.
This will give everyone some insight as to who you are and what you are about.
Watch this quick video from Zedd for a great example. Though it may not be helpful in terms of how to actually make his signature bass sound, it gives us a look into his personality.
The possibilities are truly endless with how you can catch the eye of someone looking for their next favorite artist.
Having a bunch of great ideas, or a perfect definition of your branding, is one thing - without planning, it could all fall flat on its face. This means planning your posts ahead of time to know what you’re going to do and when.

Write it out and set a posting schedule so you don’t forget.
Do you have the launch of a new single coming up and want to get people excited about it? You could release a teaser trailer a month or two in advance with the release date posted.
Post pictures of when you were creating the song and how you feel about it, or how the song fits in your ultimate musical vision for you as an artist - the possibilities here are endless!
The whole idea is to keep the buzz surrounding your music new and vibrant while captivating those who you interact with. Having a good plan of when and how you go about it will only lead to success.
This brings us to the ever-important algorithms that go along with all social media. Hashtags, key phrases, and what you do with your content as it gains traction only begin to scratch the surface of how to gain more exposure.
Believe us, there is a whole science behind how to go about working with these algorithms to get traction, and there are some rules to follow to get more interaction on your posts.
How many hashtags you should use on Facebook vs Instagram, to when you should post your content to get the most eyes on it are just a few examples of things to keep in mind.
We know this is a lot of information, so feel free to check out our blog post where we dive into the realm of social media and give you the information you need to be successful!
This brings us to another very popular 2022 goal: mixing and mastering.
Mixing and mastering are among the final stages of music creation. This is where your music gets ready to be played, streamed, or downloaded on a number of platforms that are out there.
Being such a delicate process, it’s no surprise we get a lot of questions about the “secret sauce” when it comes to mastering a track.
Truth be told, it’s a common misconception that mastering is this magical “fix-all” to any problem in a song. In reality, mastering should just be the final polish added onto a song to make it truly shine.
Your song should already sound amazing before getting to this stage, otherwise you’re going to run into some problems.
Read some of our tips to get your mixes sounding clean, pristine, and ready to go before you get to the mastering stage.
Once you’ve got a clean sounding mix, check out the next section for some of our quick-tips to get your masters up to speed and sounding radio ready.
Here’s a quick step-by-step guide that focuses on a couple of things to keep in mind when mastering your tracks. If you’d like to go more in-depth, or follow a more how-to approach, we have a ton of video tutorials and resources available over at Academy.fm.
1) Control Dynamics To Maximize The Overall Volume
What you’re trying to do is catch anything that really jumps up in your song. Most likely, your kick, snare, or even your chords might have some rogue peaks that can cause issues once you get to the loudness stage of mastering.
It’s a good idea to use a transparent compressor with a quick attack and release to catch the peaks. Only compress your song about 1 dB at most.
Don’t forget to keep an eye on the ratio of the compressor. Starting with a 1.5:1 ratio is a safe bet, and we wouldn’t advice to go higher than 4:1. That’s already a very aggressive setting (in a mastering scenario), so if you need to control your mix a little bit more it’s way better to go back to the mixing phase.
Keep in mind, you’re not trying to squash your song, you’re just catching anything that jumps out in order to control some of the dynamics and make your overall volume level more even.
2) Correct Tonal Issues - Balance Your Song
Here, you’re going to take an EQ and boost/cut areas to make your track sound balanced. Use a spectrum analyzer to see if there are any huge dips or boosts in frequencies and try to balance them out.
Maybe the mid-range could use a boost, or the highs could be cut a little. Really, it’s dependent on the type of track you’ve created and it changes with every song. Use your ear to pick out problem areas and fix them with subtle changes - nothing drastic.
The mindset you should have here is to only fix minor issues and try to focus on areas that will embellish, or dress up, your track. Listen, no mix is perfect so you shouldn’t be really doing anything crazy at this stage.
Anything that seems like it requires a large dB in boosts or cuts is a problem with your mix so you’ll need to go back in and fix those before moving forward.
3) Enhance Your Sound by Adding Color To Your Track
Just as you would boost or cut a certain frequency to correct a tonal problem, a vintage-type EQ is a good way to add color or richness to your track. Most producers use this type of EQ to simulate what it would be like to work on analog gear.
As with using a normal EQ, adjust to taste in order to give your track that extra spice, but do it sparingly. This should be used to add more character to your track, as opposed to correcting like you did in the prior stage with an EQ.
Try to experiment with exciters or saturation as well to do the same! Below is an image of iZotope’s exciter. Again, keep the original vibe of the song - don’t overdo it.
Think about it like you’re adding just a little bit of seasoning, too much would ruin the plate.

4) Enhance Your Stereo Image
In the mixdown stage of your track, keep in mind that it’s not a good idea to have everything directly in the middle. You just spent hours slaving over your song, and you want everyone to hear your production skills, so make room for it!
As a general rule of thumb, it’s a good idea to keep your kick, snare, vocals, and main lead in the center, while things like backing vocals, guitars, or other instruments should be slightly off-center.
In this stage, you’re going to enhance the stereo image from your mix by using an imager and making sure your low end is completely mono (to avoid phasing issues), while taking your top end and spreading it ever so slightly to give the impression of a larger stereo image.
As with everything, do this to taste. iZoptope offers a great stereo imager to do just that.
5) If Necessary, Compress Slightly Again
After all of this is accomplished, it may be necessary to add another compressor to tighten up your track before you go to the loudness stage of mastering. Keep in mind this might not even be necessary.
Remember all of the processing you’ve already done on your track, you don’t want to overdo it here.
It’s very obvious when the song has been over-compressed. Here’s an example of what it sounds like when a song is overly-compressed so that you can hear the difference.
Again, just slight compression here if you really need it to keep everything cohesive. Now, time to make your track loud.
6) Try Staged Limiting
Now that you’ve added that final polish to make your track sound as cohesive as you see fit, it’s time to get it ready for radio/streaming loudness.
There are many articles that will help you determine the level of loudness your track to be on par with the music that is out there today. There are a few ways to go about doing this.
For one, you can throw on one limiter and crank up the dBs until you get to the RMS value you’re looking for. For most electronic genres this is perfectly fine as it’s all you need.
However, if you’re looking to get your track loud and want to avoid unintentional digital clipping, you might want to try staged limiting.
Try taking a number of limiters and placing them one right after the other to help spread out the workload of this whole process. Increase the gain on each limiter until you see about 1 dB in gain reduction at each stage.
However, you can try multiple combinations. If you need around 8 dB of gain on your limiting stage, you can add 4 dB with one limiter, and 4 dB with a second one. Alternatively, you can do 4-2-2. Experimenting with staged limiting is worthwhile as you can achieve incredibly transparent and loud results.
Give it a shot and compare the results against using just one limiter. Again, for most genres this isn’t necessary but when you’re working in the trap genre for example, it may help your tracks get to where you’d like them to be.
Just as a warning, this is NOT an ultimate mastering guide. Obviously, these are just a few tips to get you started down the rabbit hole that is mixing and mastering. These are just some general guidelines to get you in the right mindset and moving in the right direction.
Truth be told, mixing and mastering easily deserves an article, or multiple articles, unto itself! This stuff is tough so stick with it!
Now that you have a lot of knowledge on how to take your production to the next level, let’s get into some basics on how to create a studio in your own home.
We get it, building your own in-home studio is a painstaking process that takes time, research, and money. Though it may seem difficult, we promise you that it isn’t!
The best way to go about this is to set a budget for yourself, think about the bare minimum of what you think you’d need to get started, and start building your studio!
Here’s a quick overview of what you’re going to need to get started in your own home.
Now, there are varying levels of equipment out there to keep in mind and it all relates directly to how much you’re willing to spend. You don’t need the latest and greatest to get your music career up and running.
For instance, if you wanted to get started and have almost no experience with working with music, we’d suggest just opting for a pair of headphones first before buying a set of studio monitors.
That way, you can take your music with you wherever you go and take the time to listen to different sets of monitors to see which ones you like the best. All of the reviews in the world aren’t going to show you how they sound to your ears.
As a reminder, you don’t need to go for the most expensive pieces of equipment right off the bat. A lot of entry level equipment will suit you just fine to get you started.
Remember, a nice studio is built over time! You don’t have to drop a few thousand dollars to get yourself going.
We’ve taken a look at some of the goals you’ve been saying you’re trying to crush in 2022. We hope that our guide will give you some light and guidance to help you achieve those goals.
Being a music producer is both a commitment and a lifestyle, but we know you’re up to the challenge!
From sound design in your music, to creating a bigger social media presence, to even constructing your first in-home studio, we hope that you’ve learned something that you help you meet your 2022 production goals.
Now here’s where you come in. What were some of your favorite tips? Did we miss anything that you really want covered in a future blog post?
Let us know in the comments below!
And after listening to their ambitions, we saw that their goals ranged from “learn how to get started as a producer”, to “how to get more followers on social media.”
We figured you may have similar “resolutions”, so we decided to break down each goal and give you a few tips, tricks, and resources to help get you started.
This way, your 2022 can be filled with success! And if you’ve already “messed up” on your resolutions, don’t worry! Hopefully, this article can help you get right back on track.
Follow along as we go over the following topics to get you headed in the right direction:
-
Sound Design
-
Songwriting & Arrangement
-
How To Finish A Track
-
Release A Track Through A Label
-
Get Paid To Produce
-
Get More Social Media Exposure
-
Mixing & Mastering
-
Creating Your Own In-home Studio
Sound Design
It’s never been easier to get started as a musician. For the most part, all you need is a pair of headphones, a computer, and a tenacity to learn, and you’re ready to rock.
But the question remains, how are you going to stand out amongst the thousands of new producers out there?
The answer: Sound Design.
How many songs are there, right now, that you can hear the first drum hit or synth note and know immediately, who that artist is? Being able to craft and develop a unique sound is something that shouldn’t be overlooked when you’re creating your music.
This is why we believe that having a good foundation in sound design will put you above most of the music producers that are out there.
Think of it like a cooking competition - everyone is working with the same ingredients, but it’s up to you to cook the best dish. Many producers have access to the same samples, DAWs, and plugins as you do.
What sets you apart from the rest, is how you make use of them to create your unique sound.
So, here a couple of quick, efficient tips to get you started on improving your sound design.
Pick a Software Synthesizer
This is one of the hardest parts, since there are so many options out there!
But here’s the secret - just pick one and stick with it.
Take a look at the many software synths out there, see what looks good to you, and start mastering one synth.
The biggest mistake music producers make when learning sound design is the constant jumping back and forth between VST’s.
This is because they see that a famous producer uses a certain VST to make one type of sound, and another producer using a different VST for a different sound.
This constant jumping back and forth will only cause you pain, because you’ll never fully understand and master one piece of software. As a result, your sounds will suffer.
Nowadays, almost every synthesizer can do what the other can in terms of its features, so take a leap and get to work learning how to use just one before you make the effort to learn another.
You’ll thank us in the long run.
Google Is Your Friend
Don’t discount the sheer number of articles, video tutorials, and how-to guides on sound design that will show you how to make the sounds you’re looking to create.
A quick Google search on “how to make a Dubstep growl with [insert VST plugin name here]” will bring back thousands of results.
Pick a few beginner walk-throughs and really pick apart what’s happening with each parameter that’s being added to a sound. Check out this video to get an idea of what synthesis is and how the fundamentals work to get you started.
Work With Presets
There are a ton of free presets for most of the popular software synthesizers out there (Like Serum or Massive) that you can open up, pick apart, and begin to digest.
One of the easiest ways to learn the basics of sound design is to take a sound preset, such as a lead or bass sound, and begin to tweak the parameters within the preset to see how it affects the sound.
From there, you can begin to understand how adding or subtracting certain effects will help create exactly what you’re looking for in your track.
You can also reverse engineer presets to understand exactly how they were made and even try to recreate it to solidify your understanding.
With these methods, you’re sure to get a good start on your sound design journey and grasp a few sound design tricks here and there.
But to get to a point where you can make any sound you hear in your head, you need both foundational knowledge on your VST as well as a good understanding of advanced techniques.
That’s why we created the Serum Masterclass. This 60-day course will take you through everything you need to know to master sound design from how to create basic sounds in Serum to even the post-processing part.
And since it walks you through every step of the sound design journey, it doesn’t matter if you’re a beginner or an advanced sound designer. You can start with the Serum Walkthrough or jump ahead and learn how to use macros in Serum or how to create wavetables.
We’ve even included 4 start-to-finish courses that are made completely from scratch, which means you’ll get to witness professional producers mess up and then find a solution.
The best part is, you can access this course for free right now on Academy.fm (which you can also join for free.)
You can check it out here.
Next, we will cover some tips on how to arrange your songs to help you out with songwriting!
Songwriting & Arrangement
One of the biggest hang ups that music producers is how to take a song from an idea to a finished track.
This can usually be attributed to their comfort level with arrangement, music theory, or even the intimidation you can face by trying to make a song work that doesn’t have a good foundation to it.
Here are a few things you can try to break through and get your ideas fleshed out into full songs.
Get Out Of The 8 Bar Loop Of Death
Have a bunch of 8 or 16 bar loops that you’re sitting on and haven’t gone anywhere? Do you like how it all sounds but are struggling to move past the main idea phase?
If you answered yes to any of the above questions, it’s usually because you don’t have a clear understanding of arrangement yet. Don’t worry though! One way to learn is to look at your favorite artists and really take a look at their music.
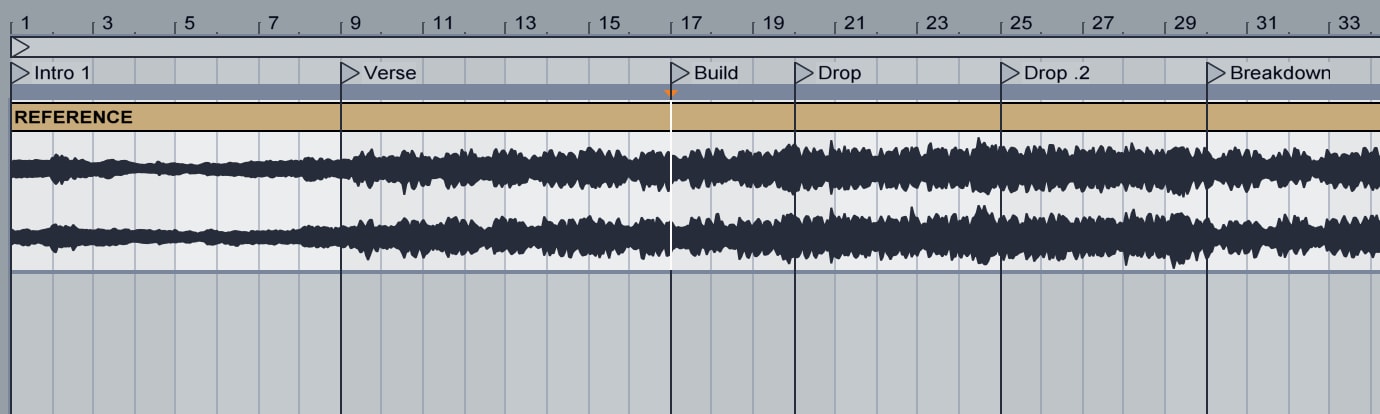
Take one of their songs and drag it into your DAW. Take note and add location markers when the song changes. This way, you can clearly see where the intro, breakdowns, build-ups, and drops are.
Once you’re finished doing that, how many bars is each section? What changes from section to section? Really dive deep and deconstruct the song to see when the kick comes in and out, where the pads come in, and when the lead hits. Do this for every element that you can hear.
Don’t just do this for one type of music - go across multiple genres and study up on multiple songs. Being able to deconstruct and take a look at music objectively is a skill that is developed over time so practice, practice, practice!
Now back to your loop! Here’s a quick way to get your idea out to the length of a full song after you’ve looked at the patterns of other artists.
Your loop is probably created up of a few elements, just like the songs you were just taking a look at. This usually includes a kick, snare, percussion, your main lead/pad, and a bass.
Take your loop and copy, paste, and delete your way through until it matches where the elements come in and out in of a song you’ve taken a look at in the genre you’re trying to emulate. By doing this, you’ll have successfully reverse-engineered a skeleton of a full song.
Obviously, you will need to add in transition effects and make sure your builds all flow together, but your main idea has now quickly turned into a nice little arrangement that you can work with.
Brush Up On Some Music Theory
Another way you can work on your arrangement skills is to check out some tutorials online surrounding music theory or arrangement.
These can really help give you an idea of where songs start, or how artists lay down the foundations that lead to the song you hear on the radio.
Take a look at this video on Zedd’s Spectrum to give you an idea of how producers can break down a song into its basic form and really analyze how popular EDM songs are created.
Practice, Practice, Practice
As with any art, practice breeds experience and music isn’t any different. Above, we talked about really challenging yourself to sit down and finish a song within a month or a week.
By constantly challenging yourself to create a song from start to finish, you will learn what works, what doesn’t work, and how to go about writing a song faster than if you were to watch 100 Youtube videos.
Take your favorite songs and deconstruct them. See what makes them work, and understand how their arrangement is laid out - try to recreate this in your tracks.
If you try these techniques we promise you will see a big difference in your music in no time at all.
This next section goes hand in hand with knowing how to arrange your song. Being able to finish a track from start to finish is another roadblock many of you want to conquer in 2022 - let’s take a look.
How To Finish A Track
There a few questions you need to ask yourself in order to approach this goal.
To you, what makes a song finished? How do you know that the last little bit of compression, or that last reverb adjustment means that everything is ready to be sent out into the world?
How do you set a quality standard for your tracks so that your satisfied with the end result?
We hear this all the time - “But it just doesn’t sound like my favorite tracks!” There’s a disconnect from what you WANT your music to sound like and what it ACTUALLY sounds like. You can hear the difference and it’s frustrating.
But here’s the thing, the only way you will get better is if you allow yourself to evolve as a musician. This means, eventually, you will need to close the book on one project so that you can open another.
You need to understand that finishing a track is just as important to a producer as starting one because it allows you to begin and create a new idea, separate from what you were working on.
If you didn’t do this, you’d be working on the same 16 bar loop forever and nothing would ever be finished. This really is an essential part to becoming a better producer and necessary if you want to make it in the music world.
Here are a few tips that can help you push through and help you not only finish a track, but be able to create a track every month or even every week!
Set Due Dates
Set a date for your track that it needs to be done by. Anything past that date is a new idea, no matter how far you got! That means if all you were able to make was a sick drop, or even just an intro, then that’s what you have.
This is a great way to hold yourself accountable for actually finishing some of your work, even if you don’t feel that it’s “ready”. Start with a longer set of time, like a month, and set out to finish a song by then.
By setting a due date, it will help you make final choices on sounds, samples, and the arrangement of your track. In the music industry, most artists work with deadlines and it helps them create a sense of urgency to finish their work.
If you know you only have a day left to finish a track, you’re going to lock in your pad sound and move on. You’re not going to have time to tweak that reverb for four hours in order to get just the right sound.
At first, it might be like pulling teeth, and you may only get a few parts of a song actually finished. But, like with most challenging aspects in music, this will become easier with practice.
Next, crank up the difficulty and try to finish a track within a week. We dare you.
This way of working will only benefit you in the future if you really hold yourself to it. It allows you to sift through your own thoughts, pick sounds, and make decisions that really make sense in the moment and move on.
Do you think musicians that are collaborating on a song during a studio session have hours to pick the right snare or figure out the perfect compression settings? Trust us when we say, working with due dates will only help you develop a better workflow and sense of your creativity.
Maybe your schedule is hectic and you just can’t find the time to spend on making a track from start to finish. To that, we recommend setting a time block aside to work on music and only music.
Block Out Time To Work
We know that being new to producing can seem daunting, especially when you’re trying to hold yourself to making a new track every so often. The amount of information and Youtube tutorials alone can be very intimidating to someone who has never studied music before.
The best way to navigate all that information is to set aside a specific block of time, and set a small goal for those few hours.
Whether that’s to look up music production techniques, sound design, songwriting, or whatever strikes your fancy, it doesn’t matter - what matters is that you have a goal and that you stick to working on something music related.
It’s okay to have days where you sit for hours and learn how to make a lead sound but remember - you’re trying to finish a track here. Don’t forget to block out time where you’re just working on your track.
It’s easy to get caught up in tutorial after tutorial, but all that knowledge won’t get you anywhere unless you sit down and take the time to put those tools into practice.
Consistency and accountability is key here. Having a plan and working it into your schedule is a surefire way to get moving on your 2022 goal of being able to finish a track. You will never find the time, you have to make the time.
Everyone has their own day-to-day schedule, so determine what works best for you so that you can get some music time in.
Now that you’ve got a few tracks under your belt in the new year, it’s time to learn how to get those out into the real world.
Release A Track Through A Label
Being signed to a label is a dream for most, but how do you do it? There are several ways to go about getting a track released through a label, so let’s go over a few of them.
Remember, before you go pitching your music to labels, your tracks need to be top notch. Most label reps can tell if a song has been professionally made within seconds of listening to it, so your first step should be to work and hone your craft.
Here are a few ways to go about getting a label to release your tracks.
Get Traction Through Music Blogs
One way to get the attention of a label is to show them you have a loyal following. Most producers gain a following through blog releases. These typically feature artist spotlights that talk about the artist’s brand, their music, and what they’re trying to accomplish with their music.
Go check out one of your favorite blogs and check out to see who has written the article. Most of the time, a quick Google search will reveal a contact email.
This is your chance to reach out, be friendly, and express interest in being featured in a blog release. As with everything in music, make sure your tracks are golden before you start reaching out to blog writers.
If your music isn’t good enough, you could end up burning some bridges out there before you even get started.
Gaining a following from blog posts is still one of the best ways to get a label to discover your work and hopefully, release a track for you.
Submit Directly To A&R Reps
Record labels have what they call A&R (artist and repertoire) reps that are in charge of discovering, signing, and developing talent.
Most reps for major record labels have contact information regarding the submission of demos, some even only take demos via their Twitter DM’s, so take note of this.
You can find this information by going to Google, typing in the record label you’re interested in, followed by, “A&R rep”. Making an excel spreadsheet of these contact points is a great way to stay organized as you submit your tracks to record labels.
From here, if they like what they see, they will reach out and begin talks about writing up a contract to work with you. These contracts usually have a designated number of songs that they’re looking to sign, so make sure you have a large library of songs ready to go!
Check out this article if you want a more in-depth look at where you submit your music!
Now that you’ve made a ton of music, you want to make this a full-time career, but how does that work?
Get Paid to Produce
You’re in luck, there are a number of ways you can make money off your music whether that’s producing, playing live gigs, or working within the industry itself.
The music industry has changed a lot over the years and more “bedroom producers” are making a name for themselves. Technology has never made getting started with music easier than it is today.
Because there are so many ways to go about this, we’ll focus on just a few places to get you started online. Let’s start with the obvious route: Royalties.
Royalties
There are countless websites that you can use to register your music to collect royalties from plays, downloads, or purchases of your music online.
Here’s a quick guide to walk you through how to register and submit your music and what the process looks like to collect royalties from any plays or downloads.
Now, for those who don’t already have a following quite yet, don’t worry. There are plenty of other ways to make money while producing music.
Sync/Licensing Your Music
Basically, a music license is the documented permission to use the intellectual property (your song) for a duration of time for a specific purpose. This means you’re paid for your song or track to be used in a TV ad, film, or video game.
Consider this Nike commercial. Do you hear the song in the background? A producer made that track and got paid to do so, giving the rights to their song over to that company.
If this is something that interests you, here’s another guide to get you started. Some musicians can make quite a living off of sync/licensing of their music on the side, so don’t forget about this route as a producer!
Production Services Websites
These types of websites shouldn’t be overlooked as well, if you’re looking to make money from producing.
These sites offer services like:
- Mixing
- Mastering
- Ghost producing
- Laying down vocals
- Other audio engineering needs (depending on what a client is looking for)
Many freelance websites, like Upwork, function much like Craigslist. You can post your skills on a profile and people using the website will hire you based on what they need.
Other websites like AudioJungle allow you to add songs to their massive, royalty free, music libraries. Here, Youtubers or small advertisers will search through the library and purchase songs they would like to use in their media.
The more your song gets purchased, the more money you make!
Another great website to get you started is BeatStars. Here you can make beats and sell your music with either an exclusive, or non-exclusive contract. You set the price and deliver your product either by stems or MP3/WAV.
If they’re great, people will bite and purchase your music!
There are two versions of this website, a free and pro version. The Pro version of this website costs 9.99USD/month which includes a professional website, a Soundcloud Pro account, and social media connectivity to ensure that getting your beats out there is a breeze!
This website also generates an automatic licensing contract for those interested. Writing up your own contract can be cumbersome and frustrating, so they’ve made it easier than ever for the artist to get paid.
Keep in mind, there are more ways to make money from producing than what we’ve talked about here.
If you have contacts in the industry, you may be able to ghost produce or work in a singer-songwriter role, selling your music for those looking to have a sick track under their name.
Basically, there are many avenues to go down that will end with the same goal: to get paid as a producer.
Use your imagination along with some hard work ethic, and you’re bound to make your production dreams come true.
Regardless of the path you choose, making money as a music producer will require some promotion. We’re going to go over one of the best ways to promote yourself in this modern age: Social Media.
Get More Social Media Exposure
Like all producers that want to create music professionally, having a following or making a name for yourself is extremely important.
There’s a lot of great content out there outlining the importance of social media in the music industry and how it’s changed the way we do things.
Here are a few tips to help build your social media presence for the new year.
Define Your Brand
It starts with having a unified front on all your social media pages. Having a brand that looks, sounds, and conveys a consistent message is extremely important to have.
Take a look at your favorite artists that have a large following for an example. What stands out? What grabs you by the eye and wants you to keep diving into what they’re about?
It’s all about breaking down the barriers between you and your listeners. You do this by sticking to a continuous message in order for your followers to understand and connect with you on a regular basis.
Different artists take different approaches to their brand and social media. Dillon Francis, for instance, has a huge draw because of his comedic characters, transparency, and all around “funny guy” attributes.
Other artists like Elohim go with more of the mysterious route, keeping her face hidden and using a robotic female voice in her interviews to answer questions.
Showcase who you are as a person and as a musician - be consistent with your message.
Continuity goes a long way when trying to gain a following because people will be drawn to attributes that make you who you are.
If you are constantly changing the message behind your branding, people will find it difficult to connect with you.
Make Your Content Interesting
How many times have you gone to an artist’s Instagram page to basically see the same style of photo, over and over again with little to no diversity? It happens more often than you think.
If your social media accounts aren’t interesting, then people will tend to not follow you.
Think about what you would find interesting and apply that to what you’re trying to accomplish. Film videos, take interesting photographs, or show how you made a specific part of a song that you’ve created.
Have a plan for what each outlet is going to be used for. Maybe you use Facebook for events and shows, while you use Twitter to interact with other artists, or talk about what’s going on in your day-to-day.
Maybe Instagram is where you highlight some of the places you’ve been, or showcase the music you’re working on. Snapchat is great to show your “behind the scenes” action.
This will give everyone some insight as to who you are and what you are about.
Watch this quick video from Zedd for a great example. Though it may not be helpful in terms of how to actually make his signature bass sound, it gives us a look into his personality.
The possibilities are truly endless with how you can catch the eye of someone looking for their next favorite artist.
Plan Ahead
Having a bunch of great ideas, or a perfect definition of your branding, is one thing - without planning, it could all fall flat on its face. This means planning your posts ahead of time to know what you’re going to do and when.
Write it out and set a posting schedule so you don’t forget.
Do you have the launch of a new single coming up and want to get people excited about it? You could release a teaser trailer a month or two in advance with the release date posted.
Post pictures of when you were creating the song and how you feel about it, or how the song fits in your ultimate musical vision for you as an artist - the possibilities here are endless!
The whole idea is to keep the buzz surrounding your music new and vibrant while captivating those who you interact with. Having a good plan of when and how you go about it will only lead to success.
Engagement
This brings us to the ever-important algorithms that go along with all social media. Hashtags, key phrases, and what you do with your content as it gains traction only begin to scratch the surface of how to gain more exposure.
Believe us, there is a whole science behind how to go about working with these algorithms to get traction, and there are some rules to follow to get more interaction on your posts.
How many hashtags you should use on Facebook vs Instagram, to when you should post your content to get the most eyes on it are just a few examples of things to keep in mind.
We know this is a lot of information, so feel free to check out our blog post where we dive into the realm of social media and give you the information you need to be successful!
This brings us to another very popular 2022 goal: mixing and mastering.
Mixing and Mastering
Mixing and mastering are among the final stages of music creation. This is where your music gets ready to be played, streamed, or downloaded on a number of platforms that are out there.
Being such a delicate process, it’s no surprise we get a lot of questions about the “secret sauce” when it comes to mastering a track.
Truth be told, it’s a common misconception that mastering is this magical “fix-all” to any problem in a song. In reality, mastering should just be the final polish added onto a song to make it truly shine.
Your song should already sound amazing before getting to this stage, otherwise you’re going to run into some problems.
Read some of our tips to get your mixes sounding clean, pristine, and ready to go before you get to the mastering stage.
Once you’ve got a clean sounding mix, check out the next section for some of our quick-tips to get your masters up to speed and sounding radio ready.
Mastering Basics
Here’s a quick step-by-step guide that focuses on a couple of things to keep in mind when mastering your tracks. If you’d like to go more in-depth, or follow a more how-to approach, we have a ton of video tutorials and resources available over at Academy.fm.
1) Control Dynamics To Maximize The Overall Volume
What you’re trying to do is catch anything that really jumps up in your song. Most likely, your kick, snare, or even your chords might have some rogue peaks that can cause issues once you get to the loudness stage of mastering.
It’s a good idea to use a transparent compressor with a quick attack and release to catch the peaks. Only compress your song about 1 dB at most.
Don’t forget to keep an eye on the ratio of the compressor. Starting with a 1.5:1 ratio is a safe bet, and we wouldn’t advice to go higher than 4:1. That’s already a very aggressive setting (in a mastering scenario), so if you need to control your mix a little bit more it’s way better to go back to the mixing phase.
Keep in mind, you’re not trying to squash your song, you’re just catching anything that jumps out in order to control some of the dynamics and make your overall volume level more even.
2) Correct Tonal Issues - Balance Your Song
Here, you’re going to take an EQ and boost/cut areas to make your track sound balanced. Use a spectrum analyzer to see if there are any huge dips or boosts in frequencies and try to balance them out.
Maybe the mid-range could use a boost, or the highs could be cut a little. Really, it’s dependent on the type of track you’ve created and it changes with every song. Use your ear to pick out problem areas and fix them with subtle changes - nothing drastic.
The mindset you should have here is to only fix minor issues and try to focus on areas that will embellish, or dress up, your track. Listen, no mix is perfect so you shouldn’t be really doing anything crazy at this stage.
Anything that seems like it requires a large dB in boosts or cuts is a problem with your mix so you’ll need to go back in and fix those before moving forward.
3) Enhance Your Sound by Adding Color To Your Track
Just as you would boost or cut a certain frequency to correct a tonal problem, a vintage-type EQ is a good way to add color or richness to your track. Most producers use this type of EQ to simulate what it would be like to work on analog gear.
As with using a normal EQ, adjust to taste in order to give your track that extra spice, but do it sparingly. This should be used to add more character to your track, as opposed to correcting like you did in the prior stage with an EQ.
Try to experiment with exciters or saturation as well to do the same! Below is an image of iZotope’s exciter. Again, keep the original vibe of the song - don’t overdo it.
Think about it like you’re adding just a little bit of seasoning, too much would ruin the plate.
4) Enhance Your Stereo Image
In the mixdown stage of your track, keep in mind that it’s not a good idea to have everything directly in the middle. You just spent hours slaving over your song, and you want everyone to hear your production skills, so make room for it!
As a general rule of thumb, it’s a good idea to keep your kick, snare, vocals, and main lead in the center, while things like backing vocals, guitars, or other instruments should be slightly off-center.
In this stage, you’re going to enhance the stereo image from your mix by using an imager and making sure your low end is completely mono (to avoid phasing issues), while taking your top end and spreading it ever so slightly to give the impression of a larger stereo image.
As with everything, do this to taste. iZoptope offers a great stereo imager to do just that.
5) If Necessary, Compress Slightly Again
After all of this is accomplished, it may be necessary to add another compressor to tighten up your track before you go to the loudness stage of mastering. Keep in mind this might not even be necessary.
Remember all of the processing you’ve already done on your track, you don’t want to overdo it here.
It’s very obvious when the song has been over-compressed. Here’s an example of what it sounds like when a song is overly-compressed so that you can hear the difference.
Again, just slight compression here if you really need it to keep everything cohesive. Now, time to make your track loud.
6) Try Staged Limiting
Now that you’ve added that final polish to make your track sound as cohesive as you see fit, it’s time to get it ready for radio/streaming loudness.
There are many articles that will help you determine the level of loudness your track to be on par with the music that is out there today. There are a few ways to go about doing this.
For one, you can throw on one limiter and crank up the dBs until you get to the RMS value you’re looking for. For most electronic genres this is perfectly fine as it’s all you need.
However, if you’re looking to get your track loud and want to avoid unintentional digital clipping, you might want to try staged limiting.
Try taking a number of limiters and placing them one right after the other to help spread out the workload of this whole process. Increase the gain on each limiter until you see about 1 dB in gain reduction at each stage.
However, you can try multiple combinations. If you need around 8 dB of gain on your limiting stage, you can add 4 dB with one limiter, and 4 dB with a second one. Alternatively, you can do 4-2-2. Experimenting with staged limiting is worthwhile as you can achieve incredibly transparent and loud results.
Give it a shot and compare the results against using just one limiter. Again, for most genres this isn’t necessary but when you’re working in the trap genre for example, it may help your tracks get to where you’d like them to be.
Just as a warning, this is NOT an ultimate mastering guide. Obviously, these are just a few tips to get you started down the rabbit hole that is mixing and mastering. These are just some general guidelines to get you in the right mindset and moving in the right direction.
Truth be told, mixing and mastering easily deserves an article, or multiple articles, unto itself! This stuff is tough so stick with it!
Now that you have a lot of knowledge on how to take your production to the next level, let’s get into some basics on how to create a studio in your own home.
Creating their own in-home studio
We get it, building your own in-home studio is a painstaking process that takes time, research, and money. Though it may seem difficult, we promise you that it isn’t!
The best way to go about this is to set a budget for yourself, think about the bare minimum of what you think you’d need to get started, and start building your studio!
Here’s a quick overview of what you’re going to need to get started in your own home.
- Computer (laptop or desktop)
- DAW (Digital Audio Workstation)
Now, there are varying levels of equipment out there to keep in mind and it all relates directly to how much you’re willing to spend. You don’t need the latest and greatest to get your music career up and running.
For instance, if you wanted to get started and have almost no experience with working with music, we’d suggest just opting for a pair of headphones first before buying a set of studio monitors.
That way, you can take your music with you wherever you go and take the time to listen to different sets of monitors to see which ones you like the best. All of the reviews in the world aren’t going to show you how they sound to your ears.
As a reminder, you don’t need to go for the most expensive pieces of equipment right off the bat. A lot of entry level equipment will suit you just fine to get you started.
Remember, a nice studio is built over time! You don’t have to drop a few thousand dollars to get yourself going.
Conclusion
We’ve taken a look at some of the goals you’ve been saying you’re trying to crush in 2022. We hope that our guide will give you some light and guidance to help you achieve those goals.
Being a music producer is both a commitment and a lifestyle, but we know you’re up to the challenge!
From sound design in your music, to creating a bigger social media presence, to even constructing your first in-home studio, we hope that you’ve learned something that you help you meet your 2022 production goals.
Now here’s where you come in. What were some of your favorite tips? Did we miss anything that you really want covered in a future blog post?
Let us know in the comments below!
Do you want better Serum presets?
Download our free Ultimate Serum Library and improve your sound library today.