
Ableton Tutorial - 20 Ableton Tips You Need To Know


Whether you're a beginner or advanced user of Ableton Live, you have probably watched useless Ableton tutorial after tutorial...
And you can probably agree that there is an endless amount of things still to learn.
Learning tons of small tricks in the DAW can be the difference between being just another bedroom producer and being one of the best.
That's why we decided to gather 20 of our favorite Ableton tips and tricks for you to level up your production with!
If you prefer watching videos, we also made an Ableton tutorial video with these 20 tips that you can watch:
With many effects and plug-ins it may unfortunately seem like an “all or nothing” situation. Take the Ableton’s auto-filter for example. It’s either on or it isn’t, no middle ground to introduce some of the original signal back in.
Well what if I told you there was a powerful work around inside of Ableton. By setting up this powerful rack you’ll be able to add a “dry/wet” knob to anything.
First thing you’ll want to do is group your initial effect inside an effect rack. Simply right click to do so, or press Command + G (Mac) / Control + G (Windows)
Let’s label this the “Wet” chain
Next, right click and insert a new chain below it, let’s call this one the “Dry” chain
Now is where the fun comes in, let’s head on over to the chain selector tab.
For those of you who don’t know, this tab allows us to select which chain is actually outputting signal.
You can select the output by placing the “zone selector” over the “zones”. Simply click and drag zones to move them around, and click and drag their edges to stretch or shrink them.
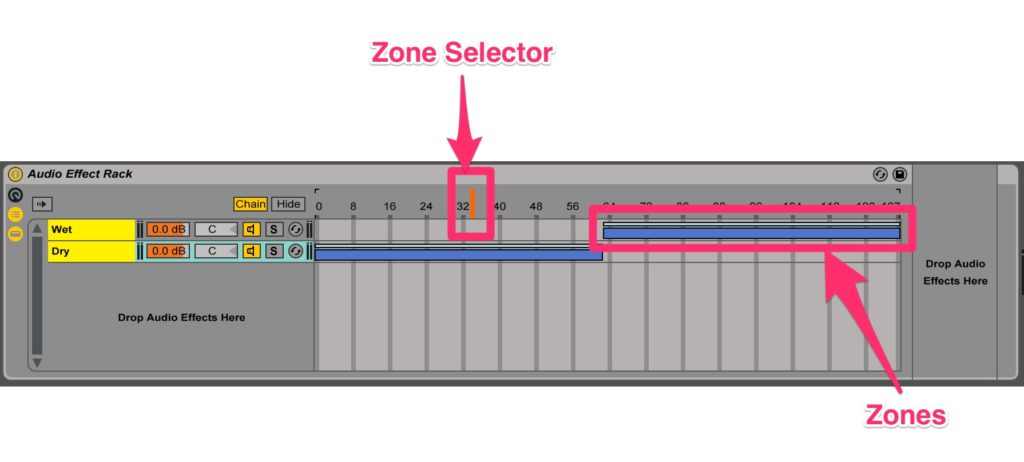
In the above diagram the “dry” chain would be outputting because the zone selector is hovered over that zone.
Now that you have a basic understanding, let’s really take advantage of it. What you’ll want to do is spread the selector’s all the way across.

Next, click and drag the light blue bars above in opposite directions, these are the zone volume faders.

These volume fade bars allow you to set different volume amounts across the ruler. Therefore, in this situation here, we are clearly fading between the volume of the dry signal and the wet signal based off of what side we are on.
Next, map the fader to a macro.

You have now created your very own “dry/wet” knob. Simply drag and drop any effect on the “wet” chain, and use the macro to fade between the wet and dry signal
Every second counts in the studio, so it’s best to master every shortcut you can.
One ultimate time saver is not having to manually fade every single time. Simply highlight a desired length of time in your audio clip and press Command + Alt + F (Mac) / Control + Alt + F (PC)

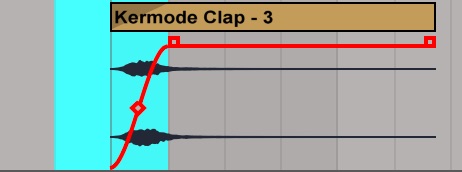
Quick, easy fading
Believe it or not in Ableton you actually have the ability to warp multiple tracks at once.
This is incredibly useful if say for example you are editing some recorded drums, and each drum was recorded on a different mic.
Literally the only prerequisites to make this work is making sure all the desired tracks are selected, warp modes are on, and they are the EXACT same length.
Even the slightest difference will make it impossible. Once they’re all the exact same however, you’re off to the races, that easy.
If you want to watch a full Ableton tutorial on this, check out this one we made:
Too often have I gotten quite far in a track, only to want to switch out all my perfectly placed kicks.
Many of us like to write our drums in audio, and this would mean manually going through and switching out each one….or so you might have thought.
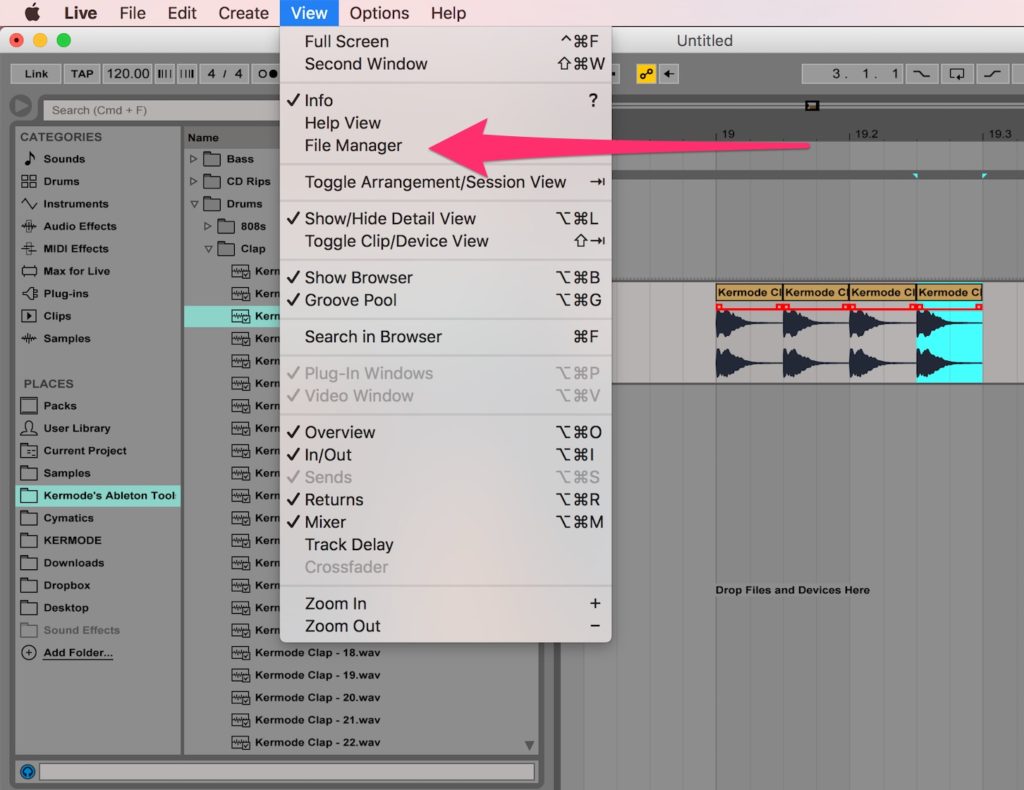
In Ableton you can actually locate your file in the “file manager” window, and hot swap it out.
Hit the “view” tab to locate the File Manager.
From here, click “manage set”.
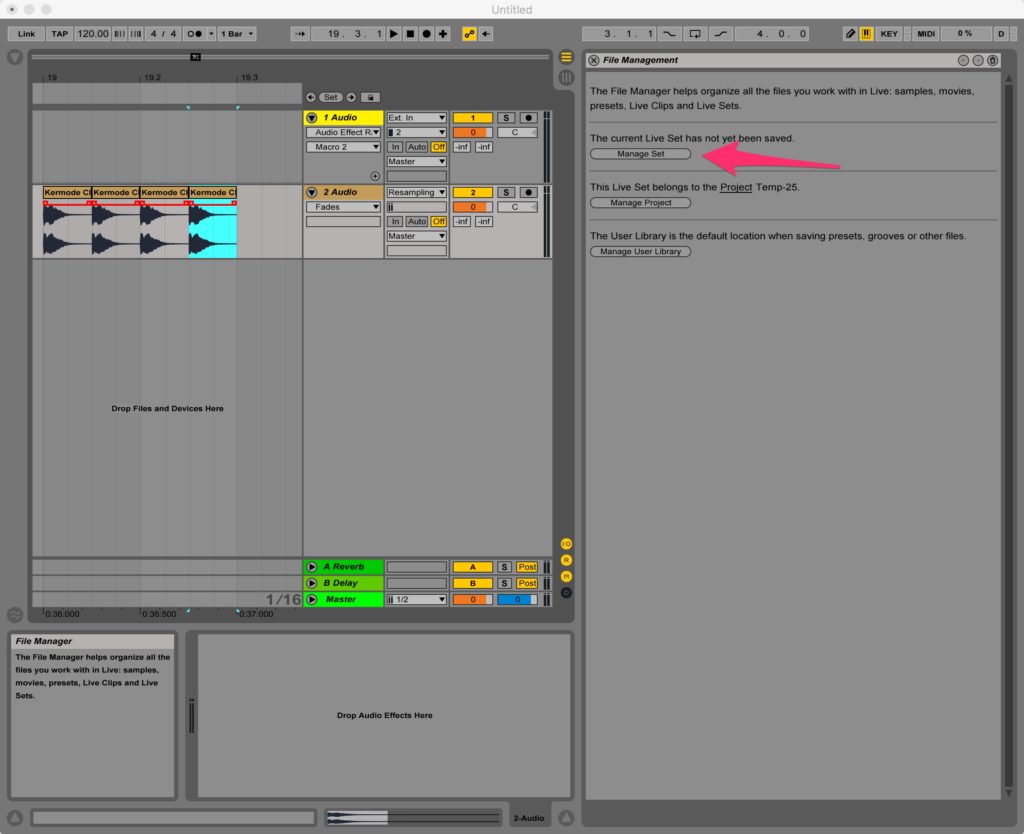
Now you can hit “view files”.
And boom, a hot-swap button to switch out any file used in your song.
If you want to learn more about hot-swapping audio, check out this Ableton tutorial we made:
Ableton can in-fact group groups… sort of…
At least the audio routing part, just not the visual.
Create yourself a new audio track, this is going to be where all the audio from our groups is routed.
Now simply highlight the desired amount of groups and send their audio to the track.
With it monitoring “in” you will now always have their signal routed to this track, now giving you the ability to affect and manipulate their summed outputs.
Trying to insert or delete entire sections of songs can be an absolute mess. Having to cut and paste sections risks messing up important automation if done incorrectly.
Thankfully Ableton has a way of inserting or deleting time that just pushes or pulls your song apart without any issues whatsoever.
Simply highlight a desired amount of time and press Command + I (Mac) / Control + I (PC) to insert that much blank space, or Command + Shift + Delete (Mac) / Control + Shift + Delete (PC) to completely delete that amount of time.
Doing this will move all the music around it to compensate, either pulling sections together or pushing them apart.
You can even press Command + Shift + D / Control + Shift + D to duplicate entire sections, making room for it simultaneously
Sometimes my things to do in music production is use tools in ways they weren't meant.
By overworking settings on many devices, you can yield weird tones and results which we’re never originally intended.
One of my favorites of these is turning compressors into their own distortion units.
By overworking compressors in terms of their time values and ratios they will actually start to distort.
To really over do it, pull back the attack and release as quick as possible, crank the threshold down, and max out your ratio.
And voila!
Now this may be over the top, but from here you can dial back the settings to get the desired tone.
At first glance Ableton is lacking a very common and important production tool, tremolo. There seems to be no obvious way to automate the volume of something, at least it may not seem that way.
Here you can harness the hidden powers of auto-pan.
Auto-pan typically works by dipping the volume in one channel, while the other rises in volume. This back and forth volume switch gives the sensation of something panning around our head.
When this tool becomes even more powerful however, is when you set the phase to 0.
Now what will be happening is each ear will now be dipping in volume in sync.
This now gives us not only the ability to tremolo, but also the most powerful technique of all, pseudo-sidechain.
We can create a pumping effect without any sort of signal necessary.
Simply invert a “saw” shaped volume automation, and set the desired speed, I recommend a quarter note for a four to the floor style sound.
Probably the biggest thing I ever wasted time on in music as a new producer was trying to give every single instrument in a rack the same settings.
Having to input the settings across dozens of instruments was just absurd. If only I had known about copying values to siblings.
Set up a parameter in just one of the desired devices and right-click “copy value to siblings” to instantly give every instrument the same setting….that easy…..
The second you are dealing with large compositions, navigating a MIDI clip can be an absolute mess.
One arp sequence can span many octaves and many bars. Scrolling left and right, then up and down takes time, while this techniques is WAY quicker.
Simply hold Command + Option (Mac) / Control + Alt (PC) to click and drag around your MIDI clip in any direction. You are no longer locked to a solid to solid lines, you can scroll as desired, quick and easy
Check out this Ableton tutorial that will show you a cool trick you can do to make your MIDI more interesting:
This tip is absolutely VITAL for any producer, the ability to deactivate
Sometimes in Ableton you need to test what an idea would sound like by removing clips or MIDI. The big issue with this however, is what if you forget what note you removed?
In Ableton you can actually deactivate musical ideas.
What deactivating does is actually leave a “ghost” of the idea, without playing it.
Your clip or piece of MIDI will actually become transparent, stopping it from creating any sound, but leaving it as a placeholder.
Simply click something in Ableton and press 0 to deactivate it, then 0 again when you want to reactivate it.
PRO TIP: When writing a new melody or chord progression in a song, copy and paste an old one and deactivate it so you can see the relationship between your old idea and your new one.
A “chorus” effect in music in it’s most basic form simulates both the pitch and timing inconsistencies of a human chorus to give a sound a thicker, richer and more human quality.
This can actually be made ourselves with a lot more control and interesting distinction between the layers.
With your piece of audio selected, duplicate the track twice.
Now with a desired warp mode, pitch the two separate layers different in just small cent values, detuning them in slightly different directions.
Detuned a bit down:
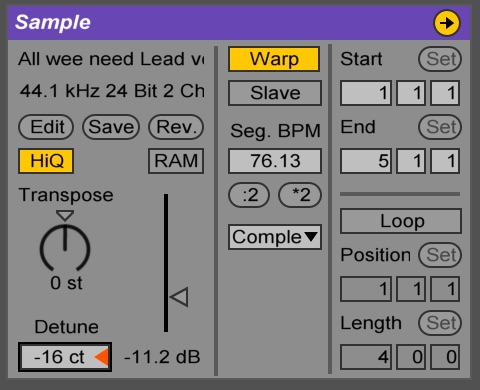
Detuned a bit up:
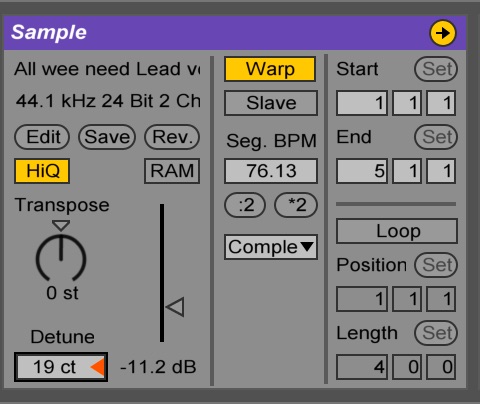
Offset their times by very small amounts as well if desired.
Now the fun thing is, you can do this as many times as you want, each with different pitches and times.
Not only that however, but you can start to affect each layer separately.
Try EQing layers differently, distorting etc…
You’ll be able to create really distinct stereo effects that no one else has.
Take note of your favorite combinations of pitch, time, and effect differences to use later for your own unique stereo effect.
One thing that really pulls me into my favorite music productions is when the producer makes an effort for their drums or melodies to emulate how a human would normally play that piece of music.
For example, some of my favorite drum mixes are panned and played like a real drum kit.
One powerful way to emulate real drums without even thinking is “drum choking”.
On a drum kit, if you are playing a hi-hat, opening and closing it would obviously stop the previous.
I’ll often hear in electronic music open hats and closed hats playing through each other, which sounds very unnatural.
Thankfully in drum racks you can actually “choke” off other drums when the other one starts, stopping it immediately.
This is even useful for 808’s being cut off by the top kick, or crashes being cut off by rides for example.
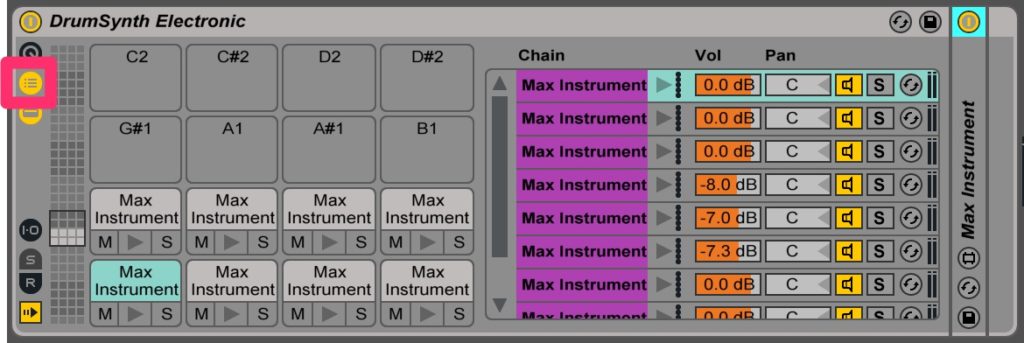
In your drum rack, open up the chain list first:
Next open up the in and out routing tab:
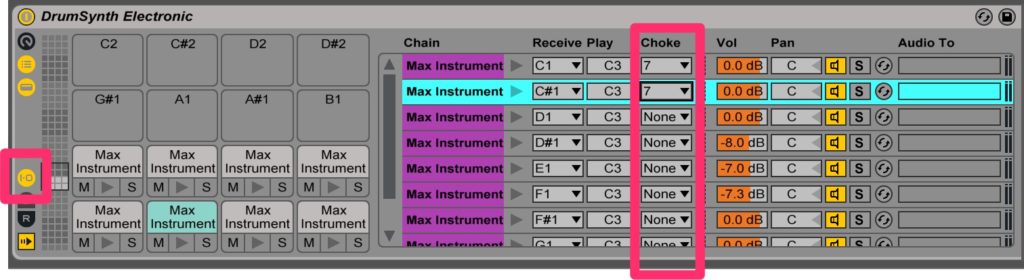
From here you can select different “choke channels” for drums so they will cut each other off.
Just another way of adding depth and character to your work.
For another way to make your drum loops tighter, check out this Ableton tutorial:
By default Ableton’s drum rack cells are filled with the simpler device.
What’s really cool however is you can actually put any sort of instrument in there.
By default it will always be playing a C3, but that can be changed.
What’s so powerful about this is you can actually have an instrument that’s generating an 808, except now you can manipulate and change the character of that 808 on the fly.
You can even have bass sounds all triggered in a drum rack.
Imagine seeing all your basses MIDI inside one drum rack MIDI clip, this would an introduce a whole new workflow into writing music, keeping things fresh and unique.
There could be an entire Ableton tutorial on this technique, so make sure you experiment with it a lot
Drum racks are equipped with another amazing hidden feature, internal sends.
If you open up the chain tab here you can actually click the internal “return” tab
Here you can drop as many audio effects as desired.
This now unlocks the “send” option. Now you can send specific drums to their own internal returns.
This is great for adding big reverb splashes on just your snare layers without washing everything else out for example.
Typically in Ableton the velocity function will increase or lower the volume of a sound to give it a more human feel.
This however is still very non-human, as volume isn’t the only variable when something is played.
Ableton’s velocity capabilities are actually quite customizable for that reason.
Inside of Sampler under the MIDI tab, there is actually a velocity drop down menu where you can select tons of things to be mapped to the velocity.

Small pitch or time offsets for example would make your sound far more human.
Not only that, but you can get incredibly creative, and set the velocity to a sample selector for example.
Now you could potentially jump through 128 samples with just velocity.
Imagine different hi-hats for different velocity sections. The power of this is truly under harnessed and an absolute beast when used correctly.
If you want to learn another way to humanize your drums, check out this Ableton tutorial:
Having to warp clips inside of their own personal clip view can often be disorienting.
Trying to line things up can take a lot of trial and error, and when you’re working with things such as acapellas instead of drum loops, it can be really hard to visually match things up.
Here’s a quick and easy way to warp.
Drop your desire clip where you want it, and make sure it is starting exactly where you need it to.

Now with warp mode off, play with the transposition and see what happens.

Notice the sample stretch or shorten?
Think of it like when you slow or speed up a record player, the music will rise or fall in pitch.
What you can do is actually use the semi tone and cent pitch values to quickly line up the last beat of your sound exactly where it needs to be.
Once locked in to time, turn “warp” back on, and reset the pitch values.
And voila, quick and easy warping.
MIDI effects in Ableton are undeniably powerful.
The main fallback however is actually knowing what MIDI is coming out, or even worse, being restricted to the output of these effects.
Let’s take the arpeggiator for example, a very useful tool, however there aren’t actually a lot of options.
Often it will get me in the ballpark of the results I want, but I may end up hearing something a little more specific in my head.
Well you can actually figure out what MIDI it is outputting so you can further edit it.
Simply create a new MIDI track, arm it, and select the input from the desired MIDI track.
Hit record and boom, you have actually recorded out the MIDI.
Now you can further edit it and make it unique.
You can EASILY transpose things in octaves in Ableton.
All you have to do is select your note or notes, hold shift, and press the up and down arrow keys.
Not only that, but you can even do this while transposing using the transposition knob in the audio clip editor for example.
Last but certainly not least is the ability to save audio file settings.
What do I mean by this?
Let’s say for example you have a favorite snare sample, except you find yourself warping it and pitching it a specific way every single time you use it. Well you can actually drag it in as desired.
Simply set up your audio clip as desired and hit this magic save button.
Now every single time you drag that audio clip in it will be exactly how you had it.
And there we have it, that was 20 Ableton tips to help you with time, workflow, and overall creativity.
These techniques may be helpful, but they are useless without incredible sounding samples to start with.
Learning the Ableton shortcuts can be one of the most useful things you can do!
It will speed up your workflow and help you finish tracks quicker!
Check out this Ableton tutorial we made on our favorite Ableton shortcuts:
I know this was a long article, but I hope this 20 tip Ableton tutorial helped you learn some of the secret tricks in Ableton.
The key to becoming a great producer is experimentation, so never stop trying new tricks in Ableton.
If you want to see another great Ableton tutorial, check out our Ableton Live Beginner Tutorial series.
If you haven't already, make sure to grab our Ableton Starter Pack. With over 300 samples and 2 Ableton projects files, you’ll have everything you’ll need to start writing your musical masterpieces.
And you can probably agree that there is an endless amount of things still to learn.
Learning tons of small tricks in the DAW can be the difference between being just another bedroom producer and being one of the best.
That's why we decided to gather 20 of our favorite Ableton tips and tricks for you to level up your production with!
If you prefer watching videos, we also made an Ableton tutorial video with these 20 tips that you can watch:
Tip 1: Add A Dry/Wet Knob To Anything
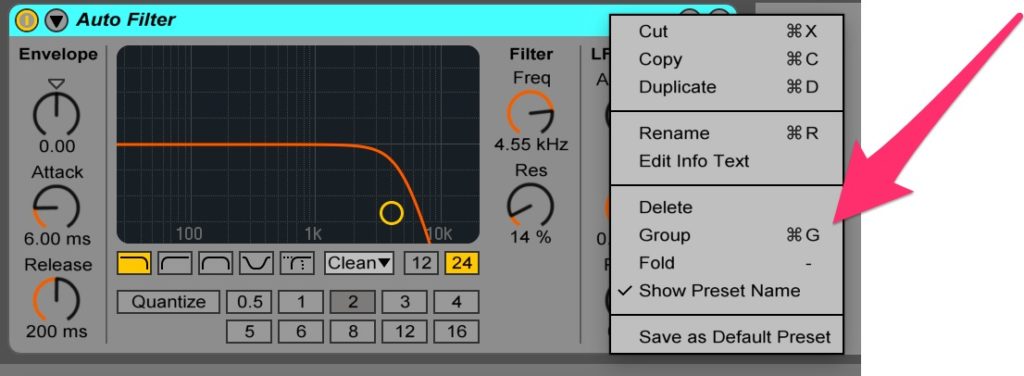
With many effects and plug-ins it may unfortunately seem like an “all or nothing” situation. Take the Ableton’s auto-filter for example. It’s either on or it isn’t, no middle ground to introduce some of the original signal back in.
Well what if I told you there was a powerful work around inside of Ableton. By setting up this powerful rack you’ll be able to add a “dry/wet” knob to anything.
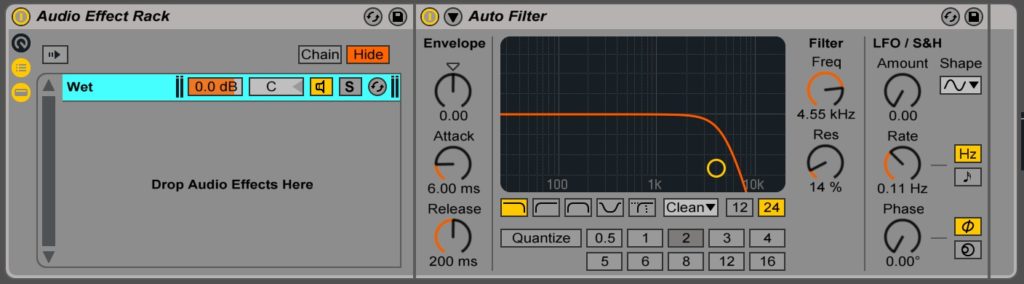
First thing you’ll want to do is group your initial effect inside an effect rack. Simply right click to do so, or press Command + G (Mac) / Control + G (Windows)
Let’s label this the “Wet” chain
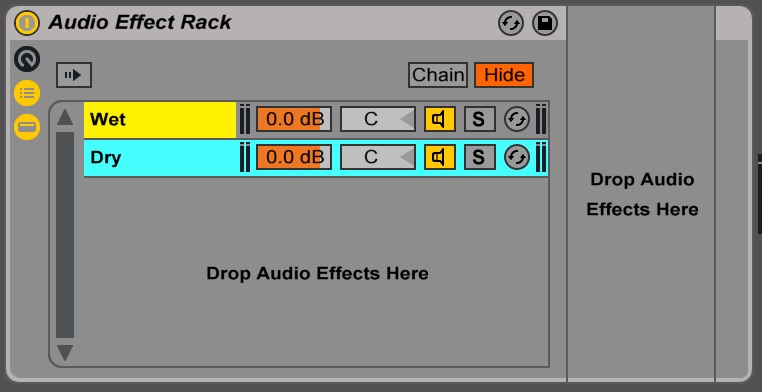
Next, right click and insert a new chain below it, let’s call this one the “Dry” chain
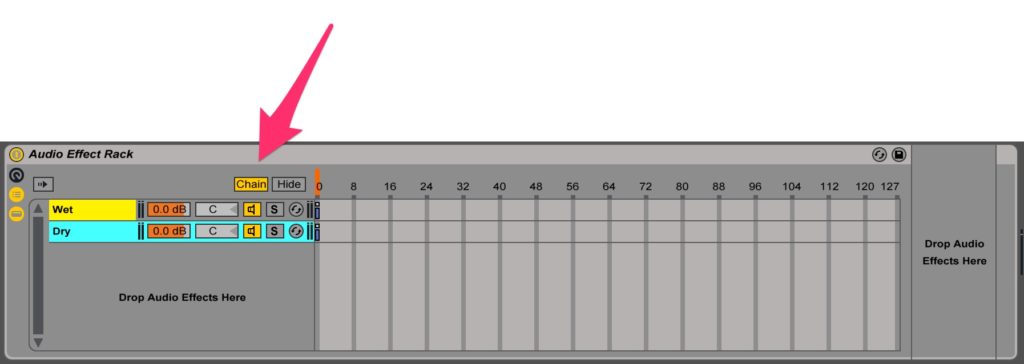
Now is where the fun comes in, let’s head on over to the chain selector tab.
For those of you who don’t know, this tab allows us to select which chain is actually outputting signal.
You can select the output by placing the “zone selector” over the “zones”. Simply click and drag zones to move them around, and click and drag their edges to stretch or shrink them.
In the above diagram the “dry” chain would be outputting because the zone selector is hovered over that zone.
Now that you have a basic understanding, let’s really take advantage of it. What you’ll want to do is spread the selector’s all the way across.
Next, click and drag the light blue bars above in opposite directions, these are the zone volume faders.
These volume fade bars allow you to set different volume amounts across the ruler. Therefore, in this situation here, we are clearly fading between the volume of the dry signal and the wet signal based off of what side we are on.
Next, map the fader to a macro.
You have now created your very own “dry/wet” knob. Simply drag and drop any effect on the “wet” chain, and use the macro to fade between the wet and dry signal
Tip 2: Quick Fades
Every second counts in the studio, so it’s best to master every shortcut you can.
One ultimate time saver is not having to manually fade every single time. Simply highlight a desired length of time in your audio clip and press Command + Alt + F (Mac) / Control + Alt + F (PC)
Quick, easy fading
Tip 3: Warp Multiple Tracks At Once
Believe it or not in Ableton you actually have the ability to warp multiple tracks at once.
This is incredibly useful if say for example you are editing some recorded drums, and each drum was recorded on a different mic.
Literally the only prerequisites to make this work is making sure all the desired tracks are selected, warp modes are on, and they are the EXACT same length.
Even the slightest difference will make it impossible. Once they’re all the exact same however, you’re off to the races, that easy.
If you want to watch a full Ableton tutorial on this, check out this one we made:
Tip 4: Hot-Swapping Audio
Too often have I gotten quite far in a track, only to want to switch out all my perfectly placed kicks.
Many of us like to write our drums in audio, and this would mean manually going through and switching out each one….or so you might have thought.
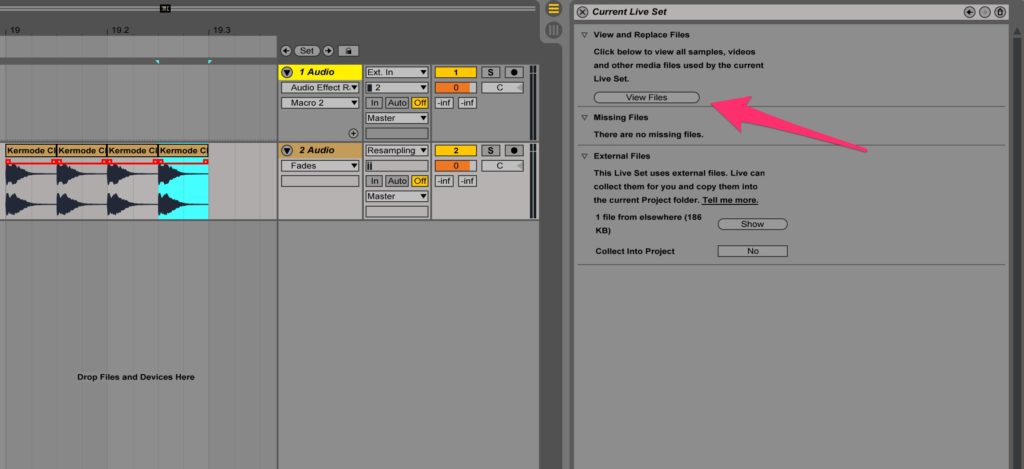
In Ableton you can actually locate your file in the “file manager” window, and hot swap it out.
Hit the “view” tab to locate the File Manager.
From here, click “manage set”.
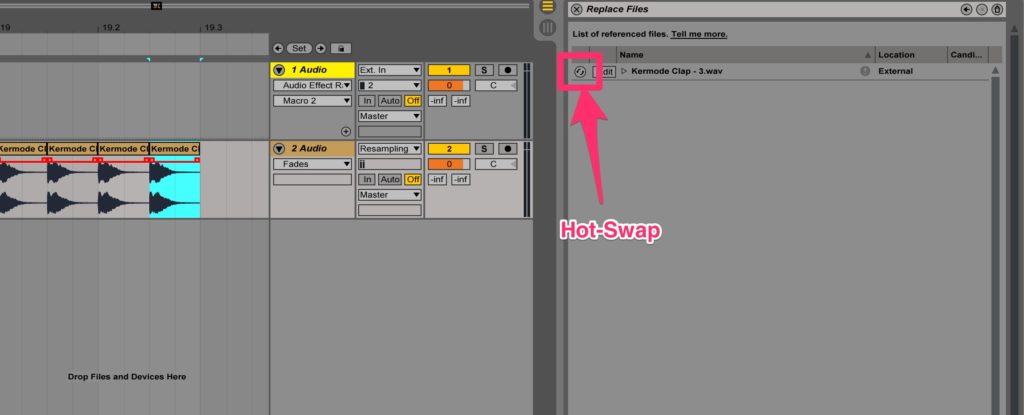
Now you can hit “view files”.
And boom, a hot-swap button to switch out any file used in your song.
If you want to learn more about hot-swapping audio, check out this Ableton tutorial we made:
Tip 5: Grouping Groups
Ableton can in-fact group groups… sort of…
At least the audio routing part, just not the visual.
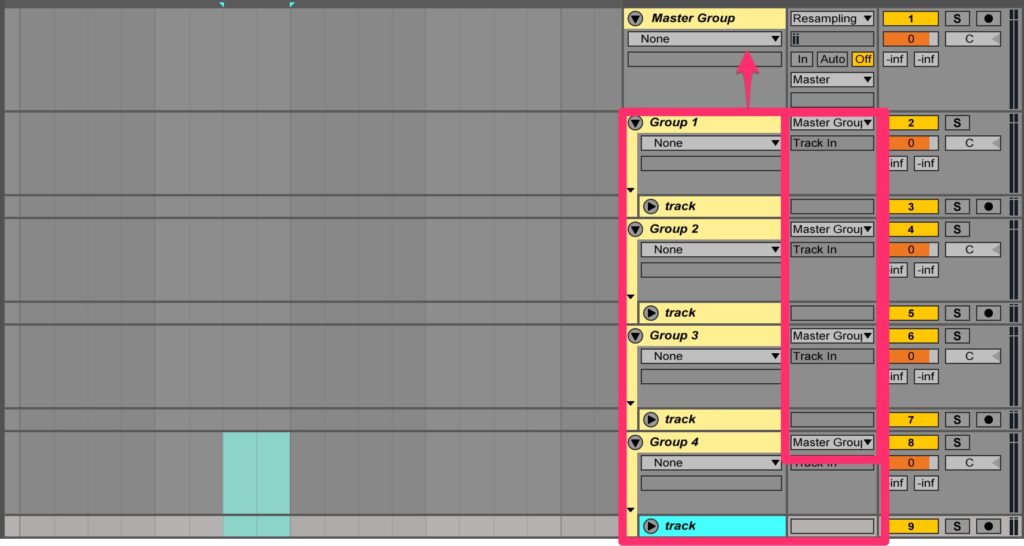
Create yourself a new audio track, this is going to be where all the audio from our groups is routed.
Now simply highlight the desired amount of groups and send their audio to the track.
With it monitoring “in” you will now always have their signal routed to this track, now giving you the ability to affect and manipulate their summed outputs.
Tip 6: Inserting And Deleting Time
Trying to insert or delete entire sections of songs can be an absolute mess. Having to cut and paste sections risks messing up important automation if done incorrectly.
Thankfully Ableton has a way of inserting or deleting time that just pushes or pulls your song apart without any issues whatsoever.
Simply highlight a desired amount of time and press Command + I (Mac) / Control + I (PC) to insert that much blank space, or Command + Shift + Delete (Mac) / Control + Shift + Delete (PC) to completely delete that amount of time.
Doing this will move all the music around it to compensate, either pulling sections together or pushing them apart.
You can even press Command + Shift + D / Control + Shift + D to duplicate entire sections, making room for it simultaneously
Do you want to get a jump start in Ableton Live?
Download our free Ableton Starter Pack and get level up your production today!
(2 Ableton Project Files & 300 Drum Samples + Loops)
(2 Ableton Project Files & 300 Drum Samples + Loops)
Tip 7: Distorting With Compressors
Sometimes my things to do in music production is use tools in ways they weren't meant.
By overworking settings on many devices, you can yield weird tones and results which we’re never originally intended.
One of my favorites of these is turning compressors into their own distortion units.
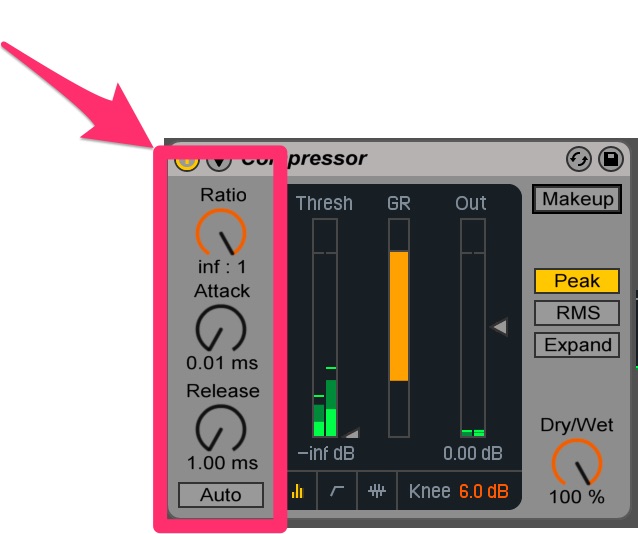
By overworking compressors in terms of their time values and ratios they will actually start to distort.
To really over do it, pull back the attack and release as quick as possible, crank the threshold down, and max out your ratio.
And voila!
Now this may be over the top, but from here you can dial back the settings to get the desired tone.
Tip 8: Pseudo Side-Chain
At first glance Ableton is lacking a very common and important production tool, tremolo. There seems to be no obvious way to automate the volume of something, at least it may not seem that way.
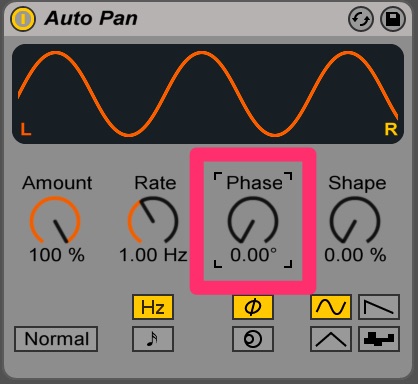
Here you can harness the hidden powers of auto-pan.
Auto-pan typically works by dipping the volume in one channel, while the other rises in volume. This back and forth volume switch gives the sensation of something panning around our head.
When this tool becomes even more powerful however, is when you set the phase to 0.
Now what will be happening is each ear will now be dipping in volume in sync.
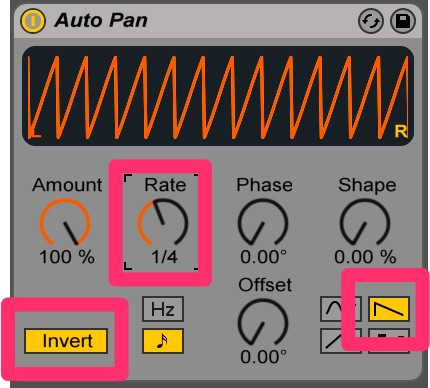
This now gives us not only the ability to tremolo, but also the most powerful technique of all, pseudo-sidechain.
We can create a pumping effect without any sort of signal necessary.
Simply invert a “saw” shaped volume automation, and set the desired speed, I recommend a quarter note for a four to the floor style sound.
Tip 9: Copy Value To Siblings
Probably the biggest thing I ever wasted time on in music as a new producer was trying to give every single instrument in a rack the same settings.
Having to input the settings across dozens of instruments was just absurd. If only I had known about copying values to siblings.
Set up a parameter in just one of the desired devices and right-click “copy value to siblings” to instantly give every instrument the same setting….that easy…..
Tip 10: Quick MIDI Clip Navigation
The second you are dealing with large compositions, navigating a MIDI clip can be an absolute mess.
One arp sequence can span many octaves and many bars. Scrolling left and right, then up and down takes time, while this techniques is WAY quicker.
Simply hold Command + Option (Mac) / Control + Alt (PC) to click and drag around your MIDI clip in any direction. You are no longer locked to a solid to solid lines, you can scroll as desired, quick and easy
Check out this Ableton tutorial that will show you a cool trick you can do to make your MIDI more interesting:
Tip 11: Deactivation
This tip is absolutely VITAL for any producer, the ability to deactivate
Sometimes in Ableton you need to test what an idea would sound like by removing clips or MIDI. The big issue with this however, is what if you forget what note you removed?
In Ableton you can actually deactivate musical ideas.
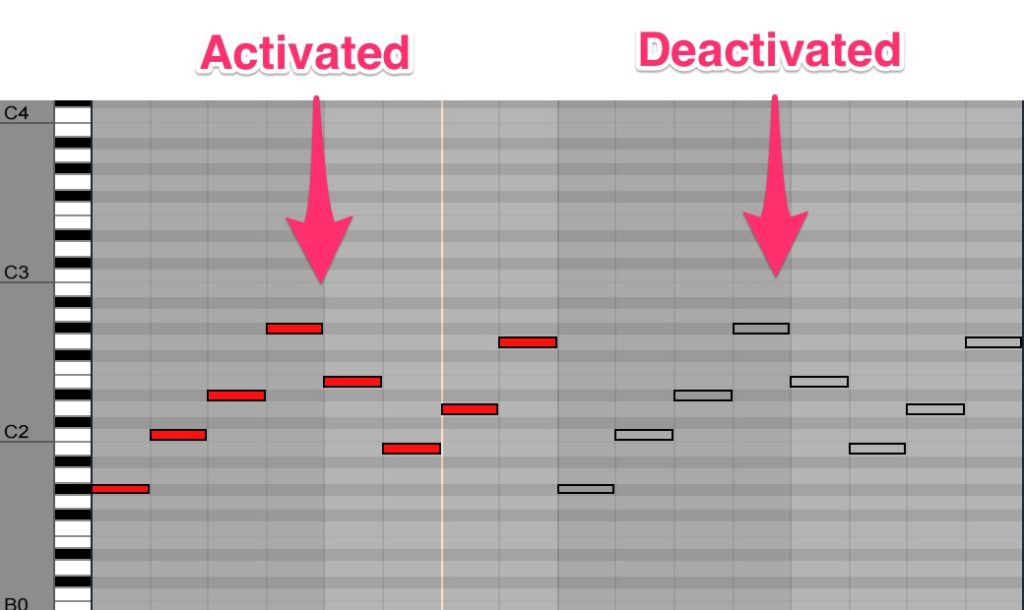
What deactivating does is actually leave a “ghost” of the idea, without playing it.
Your clip or piece of MIDI will actually become transparent, stopping it from creating any sound, but leaving it as a placeholder.
Simply click something in Ableton and press 0 to deactivate it, then 0 again when you want to reactivate it.
PRO TIP: When writing a new melody or chord progression in a song, copy and paste an old one and deactivate it so you can see the relationship between your old idea and your new one.
Tip 12: Custom Chorus
A “chorus” effect in music in it’s most basic form simulates both the pitch and timing inconsistencies of a human chorus to give a sound a thicker, richer and more human quality.
This can actually be made ourselves with a lot more control and interesting distinction between the layers.
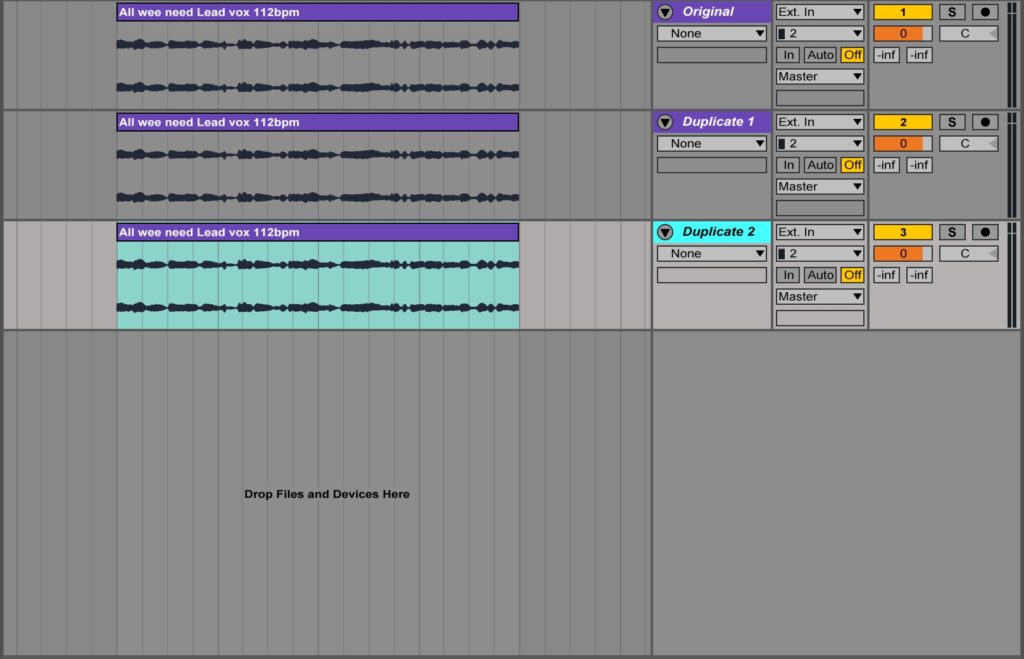
With your piece of audio selected, duplicate the track twice.
Now with a desired warp mode, pitch the two separate layers different in just small cent values, detuning them in slightly different directions.
Detuned a bit down:
Detuned a bit up:
Offset their times by very small amounts as well if desired.
Now the fun thing is, you can do this as many times as you want, each with different pitches and times.
Not only that however, but you can start to affect each layer separately.
Try EQing layers differently, distorting etc…
You’ll be able to create really distinct stereo effects that no one else has.
Take note of your favorite combinations of pitch, time, and effect differences to use later for your own unique stereo effect.
Tip 13: Drum Choking
One thing that really pulls me into my favorite music productions is when the producer makes an effort for their drums or melodies to emulate how a human would normally play that piece of music.
For example, some of my favorite drum mixes are panned and played like a real drum kit.
One powerful way to emulate real drums without even thinking is “drum choking”.
On a drum kit, if you are playing a hi-hat, opening and closing it would obviously stop the previous.
I’ll often hear in electronic music open hats and closed hats playing through each other, which sounds very unnatural.
Thankfully in drum racks you can actually “choke” off other drums when the other one starts, stopping it immediately.
This is even useful for 808’s being cut off by the top kick, or crashes being cut off by rides for example.
In your drum rack, open up the chain list first:
Next open up the in and out routing tab:
From here you can select different “choke channels” for drums so they will cut each other off.
Just another way of adding depth and character to your work.
For another way to make your drum loops tighter, check out this Ableton tutorial:
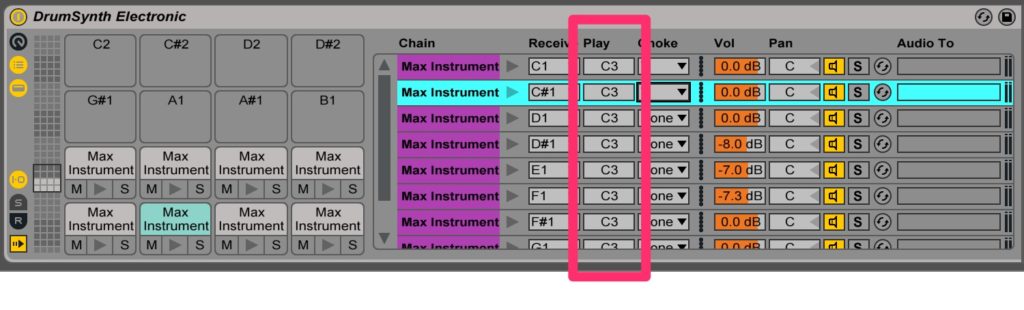
Tip 14: Instruments Within Drum Racks
By default Ableton’s drum rack cells are filled with the simpler device.
What’s really cool however is you can actually put any sort of instrument in there.
By default it will always be playing a C3, but that can be changed.
What’s so powerful about this is you can actually have an instrument that’s generating an 808, except now you can manipulate and change the character of that 808 on the fly.
You can even have bass sounds all triggered in a drum rack.
Imagine seeing all your basses MIDI inside one drum rack MIDI clip, this would an introduce a whole new workflow into writing music, keeping things fresh and unique.
There could be an entire Ableton tutorial on this technique, so make sure you experiment with it a lot
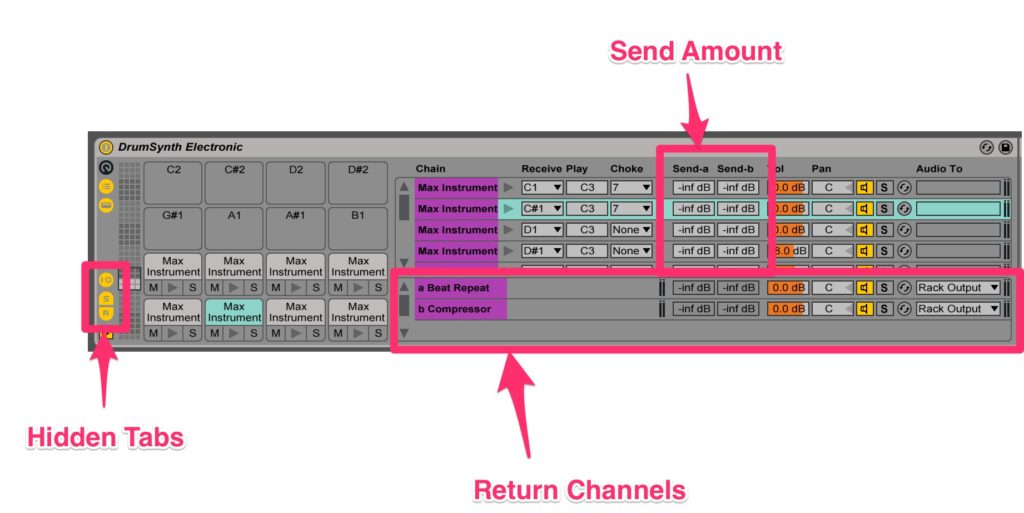
Tip 15: Internal Drum Rack Sends
Drum racks are equipped with another amazing hidden feature, internal sends.
If you open up the chain tab here you can actually click the internal “return” tab
Here you can drop as many audio effects as desired.
This now unlocks the “send” option. Now you can send specific drums to their own internal returns.
This is great for adding big reverb splashes on just your snare layers without washing everything else out for example.
Tip 16: Velocity Mapping
Typically in Ableton the velocity function will increase or lower the volume of a sound to give it a more human feel.
This however is still very non-human, as volume isn’t the only variable when something is played.
Ableton’s velocity capabilities are actually quite customizable for that reason.
Inside of Sampler under the MIDI tab, there is actually a velocity drop down menu where you can select tons of things to be mapped to the velocity.
Small pitch or time offsets for example would make your sound far more human.
Not only that, but you can get incredibly creative, and set the velocity to a sample selector for example.
Now you could potentially jump through 128 samples with just velocity.
Imagine different hi-hats for different velocity sections. The power of this is truly under harnessed and an absolute beast when used correctly.
If you want to learn another way to humanize your drums, check out this Ableton tutorial:
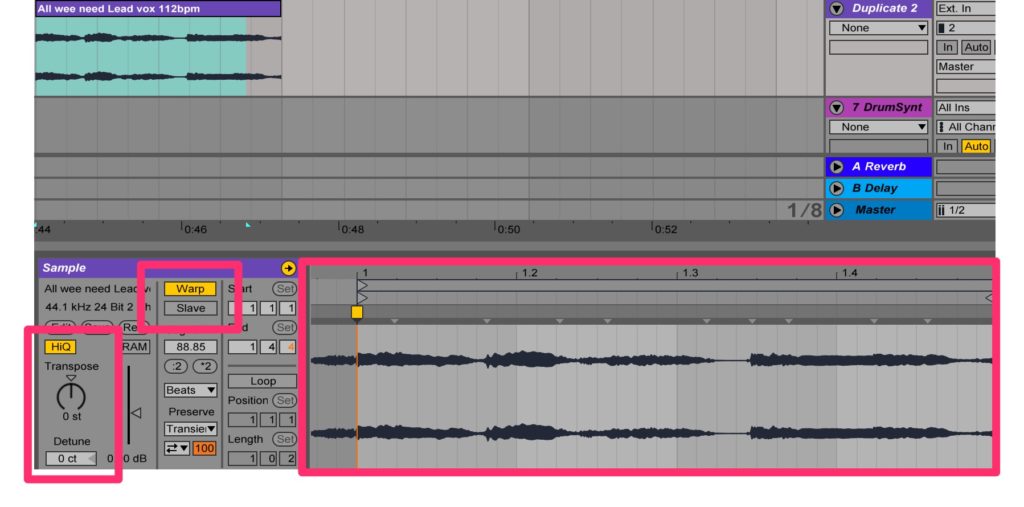
Tip 17: Quick Warping
Having to warp clips inside of their own personal clip view can often be disorienting.
Trying to line things up can take a lot of trial and error, and when you’re working with things such as acapellas instead of drum loops, it can be really hard to visually match things up.
Here’s a quick and easy way to warp.
Drop your desire clip where you want it, and make sure it is starting exactly where you need it to.
Now with warp mode off, play with the transposition and see what happens.
Notice the sample stretch or shorten?
Think of it like when you slow or speed up a record player, the music will rise or fall in pitch.
What you can do is actually use the semi tone and cent pitch values to quickly line up the last beat of your sound exactly where it needs to be.
Once locked in to time, turn “warp” back on, and reset the pitch values.
And voila, quick and easy warping.
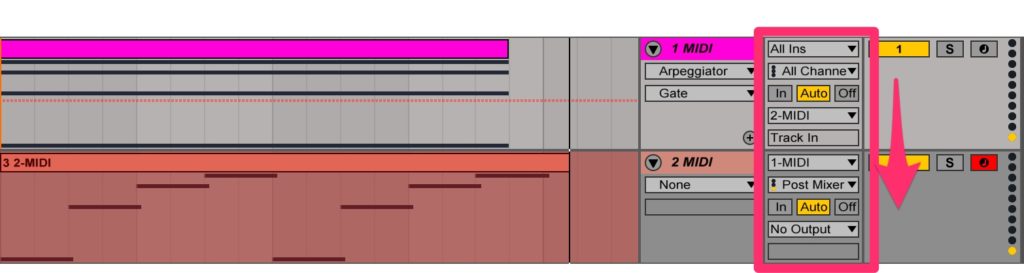
Tip 18: Recording MIDI Effects
MIDI effects in Ableton are undeniably powerful.
The main fallback however is actually knowing what MIDI is coming out, or even worse, being restricted to the output of these effects.
Let’s take the arpeggiator for example, a very useful tool, however there aren’t actually a lot of options.
Often it will get me in the ballpark of the results I want, but I may end up hearing something a little more specific in my head.
Well you can actually figure out what MIDI it is outputting so you can further edit it.
Simply create a new MIDI track, arm it, and select the input from the desired MIDI track.
Hit record and boom, you have actually recorded out the MIDI.
Now you can further edit it and make it unique.
Tip 19: Octave Leaps
You can EASILY transpose things in octaves in Ableton.
All you have to do is select your note or notes, hold shift, and press the up and down arrow keys.
Not only that, but you can even do this while transposing using the transposition knob in the audio clip editor for example.
Tip 20: Save Audio File Settings
Last but certainly not least is the ability to save audio file settings.
What do I mean by this?
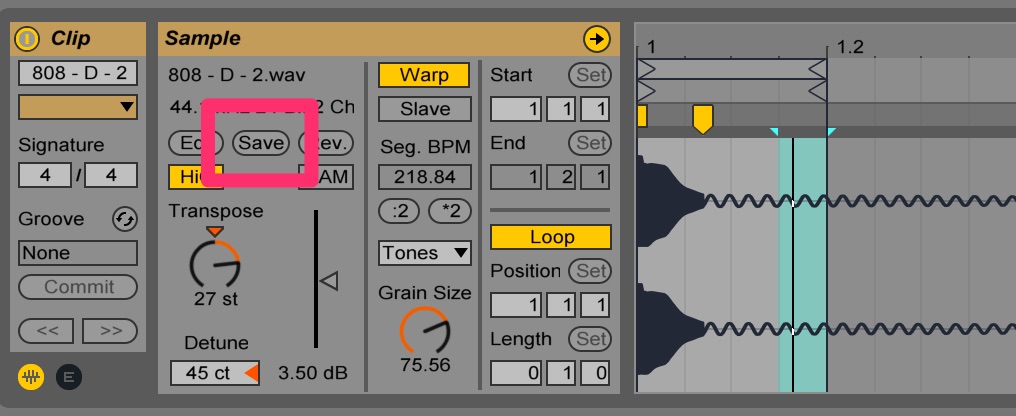
Let’s say for example you have a favorite snare sample, except you find yourself warping it and pitching it a specific way every single time you use it. Well you can actually drag it in as desired.
Simply set up your audio clip as desired and hit this magic save button.
Now every single time you drag that audio clip in it will be exactly how you had it.
And there we have it, that was 20 Ableton tips to help you with time, workflow, and overall creativity.
These techniques may be helpful, but they are useless without incredible sounding samples to start with.
Bonus Tip: Ableton Shortcuts
Learning the Ableton shortcuts can be one of the most useful things you can do!
It will speed up your workflow and help you finish tracks quicker!
Check out this Ableton tutorial we made on our favorite Ableton shortcuts:
Conclusion
I know this was a long article, but I hope this 20 tip Ableton tutorial helped you learn some of the secret tricks in Ableton.
The key to becoming a great producer is experimentation, so never stop trying new tricks in Ableton.
If you want to see another great Ableton tutorial, check out our Ableton Live Beginner Tutorial series.
If you haven't already, make sure to grab our Ableton Starter Pack. With over 300 samples and 2 Ableton projects files, you’ll have everything you’ll need to start writing your musical masterpieces.
