
What Is Gain Staging & How It Can Improve Your Mix


When it comes to producing music, one of the most difficult parts of the whole process is nailing your mix.
But there is one crucial component of mixing that is often overlooked by producers, causing their mixdowns to sound unprofessional and incomplete.
We are talking about gain staging, a critical process that will take your mix to the next level. By the end of this article, you’ll have a better understanding of the gain staging process, and how to use it to maximize the quality of your mixdowns.
To begin, a gain stage refers to any point in a production where you can control the volume level of a device or track. Gain staging is the process of managing all of these volume levels within a project for the purpose of achieving the cleanest mix possible.
Here’s a brief walk through of this process using a soft synth like Serum as an example. On the plugin itself, you will want to set the output to an appropriate level before sending it to any effect devices.
From there, you would make sure the levels of those devices are sitting correctly before sending it all to the master channel, which is the final gain stage.
In doing so, you will develop a solid gain structure within your project that will make it easier to get a professional mix.
By using proper gain staging in your own productions, you can be sure that your final product will be free of excess noise and distortion.
Because it is so often ignored by inexperienced producers, introducing good gain staging practices into your projects is an easy way to get a leg up on the competition.
Once you understand how gain staging can make your mixes stronger, you’ll have no trouble adding it to your production skill set.
Before we dive into gain staging, let’s quickly go over what exactly is meant when we use the term gain.
Gain is often confused with volume, but it’s not quite accurate to view them as the same thing.
It is better to think of gain and volume as two sides of the same coin. Gain refers to the strength of a signal coming into a device, while volume refers to the strength of the output leaving that device.
Because of this, it’s possible to use the gain input to crank the loudness of a device and still have a healthy signal afterwards. There is certain analog equipment like tube compressors, and even some plugins, that sound really nice when the signal is overdriven and comes in hot into their input circuitry; You just have to control the output afterwards to keep your gain staging right!
You should be aware that digital and analog systems measure audio differently. In your DAW, gain is measured in terms of dBFS (decibels full scale). And this is why a good rule of thumb to remember is: -18 dBs (roughly) on the analog domain equals 0 dB on the digital realm.
One last concept to understand is the term Unity Gain. Unity Gain refers to when a device such as a fader or level control is neither cutting or boosting the incoming signal. To achieve Unity Gain, the output must be equal to the input.
You can check to see if your track is at Unity Gain is by turning devices on and off and seeing if the output level changes. Let’s say you are processing a drum loop through a compressor. If you turn the compressor off and the volume decreases, you know you haven’t achieved unity gain.
This is one of the most important principles of gain staging.
This is because louder signals will always sound better to the human ear. It doesn’t matter who you are or how trained your ear is. This is just how human hearing works. You should always strive for unity gain to properly assess if any effect or processor you are adding is improving your audio signal.

When it comes down to it, gain staging is about maximizing the clarity of your mix.
Luckily this has become pretty simple as far as digital audio workstations are concerned. The main tool you will use for gain staging are the output level meters within your DAW.
Output level meters are a straightforward graphical representation of volume levels within a project file, and are usually one of the most accessible tools on the main screen of your DAW.
Each track will feature a peak level meter to let you know how loud it is, and there will be a separate one for the master as well.
Here is an example in Ableton:

Additionally, meters can be found on send tracks and within plugins. In some DAWs you will even find meters in between devices on a track, so you can see if your levels are pushing into the red zone anywhere within your signal chain.
Within a project file, there are dozens of places where you have control over the levels in your song. This includes track levels, input and output gains on plugins and effects, and your master channel.
To make everything sound as good as possible, you have to achieve the right balance between all of these different levels.
When you’re working with a solid gain structure, the result is a mix that is cleaner and ultimately louder. Your tracks gel together better, your mix breathes better, and you’ll be able to master at a higher level.
But when gain staging is executed poorly in your projects, you aren’t taking advantage of your DAW’s full capabilities, and sometimes you might even create frequency balance problems in your mix. This will result in your song not translating well across multiple sound systems.
Additionally, when you have problems with your levels throughout your project, particularly if they’re too loud, it winds up cutting into the overall quality of your audio.
By not leaving enough headroom throughout your mix, it can easily become overloaded with unwanted distortion that will leave it sounding muddy and weak.
To better understand how to avoid these problems, let’s look at some of the elements that are involved in the gain staging process.
To develop good gain staging practices, it’s a good idea to have a basic understanding of signal flow.
A signal chain/flow is simply the order in which sound flows throughout your project.
Let’s look at a basic example of a simple signal chain.
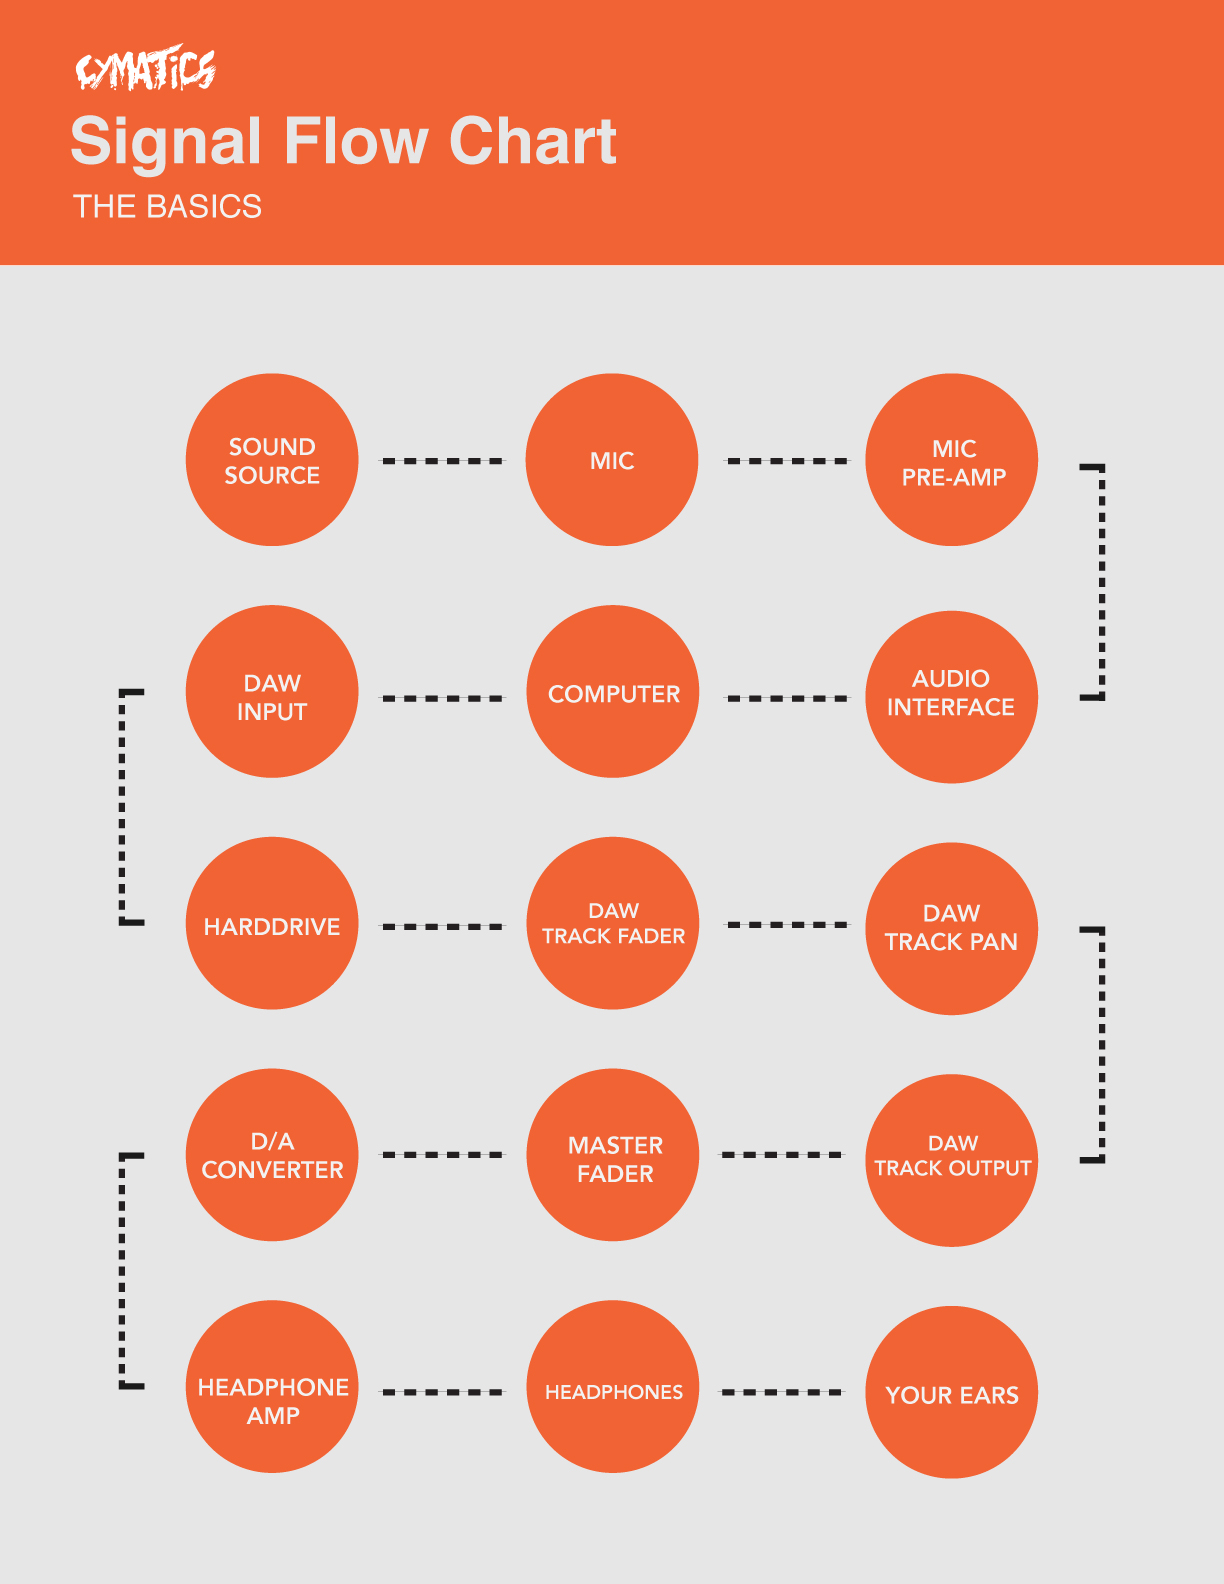
As an example, the first stage in a signal chain, the sound source, could be a vocalist singing. The sound of their voice is then captured as an audio signal by a microphone.
The signal flows from the microphone into a mic-preamp and then into an audio interface. The audio interface then converts the signal from analog to digital as it enters your computer.
The audio signal from the vocalist is then recorded onto your hard drive through a track input in your DAW. From there, the signal flows from the audio track output to the master channel.
As the audio leaves your computer, it’s converted from digital back to analog. The last step in the chain is for the audio to flow through your audio interface output and into your speakers, or headphones, before finally arriving in your ears.
A signal chain can result in many different gain stages. Setting appropriate levels at each stage will ensure that you wind up with a solid gain structure. In the next section, we outline how to set the correct levels by looking at a common problem...clipping.
When a sound is clipped, the peaks of its waveform are literally being cut off. This means that you are losing some of the resolution of your sound and causing distortion!
Check out the diagram below to visually see how clipping affects your sound. The first image is a sine wave with plenty of headroom, the second image is the same tone with less headroom, and the last is the same sound, but clipping.

Notice how the tops and bottoms of the waveform are cut off, meaning that audio information has been lost.
While distortion is commonly used as an effect within your productions, clipping is almost always an unwanted side effect of not leaving enough headroom.
Headroom refers to the amount of gain available before an audio system is overloaded. To help illustrate this, the level meters in most DAW’s use an intuitive color coding system:

When you see tracks entering the red zone, your producer instincts should immediately alert you that there are problems with your mix.
Note: This is basically limited to the digital realm. With analog gear, sometimes driving a signal into the red zone is completely acceptable and often sounds good because there’s actual physical components and “limits” involved.
To help you further understand this concept, consider the following example:
Let’s imagine the total amount of available gain on a track as an 8-ounce drinking glass. In this example, audio will be represented by water which is being poured into the glass.
The top of the glass represents 0 dB, and all the space between the top of the glass and the bottom of the glass is our headroom.
If we pour 2 ounces of water into the glass, we haven’t exceeded our headroom, but we aren’t really making the most of it either. If we pour in 6 ounces of water, the glass will be rather full, but we’ll still have plenty of room left over for safety.
Should we pour 8 ounces into the glass, we’d still technically be in the clear, but who wants to drink out of a glass that is completely filled to the brim? It becomes much more difficult to manage the water right at the top of the glass and more likely to spill and make a mess.
Now imagine that we pour 9 ounces of water into the glass. We have now exceeded our headroom, and we know that a full ounce of water is going to come spilling out of the glass. The water has been clipped!
It’s the same situation when you’re dealing with audio levels, you want to keep them at a level that’s manageable and won’t cause any waste.
By leaving yourself enough headroom during the mixing process, you’ll be able to get your tracks sounding better and louder once you move into the mastering process.

Noise floor refers to the amount of unwanted noise that makes its way into a recording. If you wind up with a bit of noise on each track in a project, eventually this noise will build up and become more noticeable within your mix.
In the days of analog recording, audio engineers had to be careful to control noise floor issues such as tape hiss. With small amounts of noise in each recording, the noise floor in a full project could grow too loud if the gain structure was executed poorly.
Working with digital audio is a bit different however. When dealing with 24 bit digital audio inside a DAW, the noise floor is so low that it doesn’t really come into play. You can drop to lower levels like -15 dB and not have to worry about introducing noise.
However, noise floor can still come into play when you are recording audio such as a vocal or acoustic guitar through a microphone. If you record at too low a level, you may wind up with extra noise in the background of the recording.
You don’t just have the mixer faders to worry about in your DAW. Most plugins have their own output gain control and many also feature an input gain control.
When working with plugins, one important reason for gain staging is to ensure that the devices in your signal chain are actually improving your sound.
If you are running audio through a compressor, you should be able to see how it is actually affecting the signal. In this sense, gain staging will help you make sure the devices in your chain are being used purposefully.
Remember that to the human ear, louder is always better!
If you’re working with EQ’s, be aware that they affect gain on a track as well. If you add a large boost to the low end of your sound, you will be adding gain that you may not notice.
This is why EQ plugins tend to represent boost and cuts in terms of decibels.

You can handle this by using the output gain on the EQ unit to compensate for the increased volume.
When it comes to other audio effects like compressors, it's a good idea to keep an eye on the input of the plugin as well as the output.
Another area that gain comes into play is with send and return tracks in your projects.
When working with send effects, you are creating a second instance of an audio source for the purpose of parallel processing.
The send represents how much of the original signal is sent to the return track, with the effect being placed directly onto the return track. The return track itself will have its own fader, allowing you to adjust the level of the effect independently from the original signal.
For example, you might send a vocal into a return track with a reverb on it. This way you still have the unprocessed original vocal, which is then mixed with the reverb unit’s output.

When dealing with return tracks, you will need to adapt your gain staging practices as it regards different types of effects.
When working with time based effects like reverb and delay, a golden rule is that you shouldn’t touch the faders on those return channels. They should be kept at 0 dB’s.
Say you’re using a reverb send to add the same effect to a number of tracks. If the reverb is too loud on a pad, you may be tempted to adjust this using the return channel fader.
But in doing so, you would be lowering the volume of the reverb on all the tracks it’s applied to and throwing off your mix!
Instead, you can keep the return fader at unity gain and use the send amount to mix in the appropriate amount of the send effect.

However, working with gain dependent plugins such as compressors and analog modelled devices is a whole different story.
For example, if you are using a send to parallel process with a compressor, you want to have its amount turned all the way up. Using the full signal will ensure that the compressor, which is gain dependent, will be engaging properly with the audio.

With the send amount turned all the way up, you can adjust the return channel fader to get the right mix of the original signal to the compressed one.
Experiment with this by yourself. Leave the return fader channel at 0 dB and play with the amount of send levels; Pay close attention to the amount of gain reduction at different send levels.
The changes you will notice are because compressors are gain dependant plugins, so if you send a different amount of gain they will react completely different. This is why it’s advisable to send the full signal, setup your compression, and then blend it to taste with the return channel fader.
In order to get a quality master out of your song, it’s necessary to start with a good mix.
For this reason, you should always keep the master channel fader at 0 dB.
If your master channel is in the red, you aren’t leaving yourself enough headroom to properly master your track.
A good rule of thumb is to leave yourself at least -6 dB of headroom on the master channel while you are mixing your song. This will ensure that whoever masters your song has enough headroom to work their magic, whether that means doing it yourself, or outsourcing to a professional mastering engineer.

If your master channel is being overwhelmed with gain, you should select all of your tracks and turn them all down at once rather than reduce the level using the master fader.
If the volume sounds too quiet while you’re working, you can always turn up your speakers, but you can’t fix a bad mix in the mastering process.
Poor gain staging practices are a problem that many producers aren’t even aware of, but luckily, it’s not a very difficult issue to fix.
It may not be the most exciting part of producing a track, but learning to create proper gain structures in your music will ensure that your mixes sound better.
Not only that, but good gain staging practices will allow you to take full advantage of your DAW’s and plugins capabilities.
With how easy it is to achieve good gain staging practices in digital audio, there’s really no excuse for ignoring this technique in your productions.
Now we want to hear from you!
Are there any gain staging tips we forgot to mention?
Let us know in the comment section below!
But there is one crucial component of mixing that is often overlooked by producers, causing their mixdowns to sound unprofessional and incomplete.
We are talking about gain staging, a critical process that will take your mix to the next level. By the end of this article, you’ll have a better understanding of the gain staging process, and how to use it to maximize the quality of your mixdowns.
To begin, a gain stage refers to any point in a production where you can control the volume level of a device or track. Gain staging is the process of managing all of these volume levels within a project for the purpose of achieving the cleanest mix possible.
Here’s a brief walk through of this process using a soft synth like Serum as an example. On the plugin itself, you will want to set the output to an appropriate level before sending it to any effect devices.
From there, you would make sure the levels of those devices are sitting correctly before sending it all to the master channel, which is the final gain stage.
In doing so, you will develop a solid gain structure within your project that will make it easier to get a professional mix.
By using proper gain staging in your own productions, you can be sure that your final product will be free of excess noise and distortion.
Because it is so often ignored by inexperienced producers, introducing good gain staging practices into your projects is an easy way to get a leg up on the competition.
Once you understand how gain staging can make your mixes stronger, you’ll have no trouble adding it to your production skill set.
What Is Gain?
Before we dive into gain staging, let’s quickly go over what exactly is meant when we use the term gain.
Gain is often confused with volume, but it’s not quite accurate to view them as the same thing.
It is better to think of gain and volume as two sides of the same coin. Gain refers to the strength of a signal coming into a device, while volume refers to the strength of the output leaving that device.
Because of this, it’s possible to use the gain input to crank the loudness of a device and still have a healthy signal afterwards. There is certain analog equipment like tube compressors, and even some plugins, that sound really nice when the signal is overdriven and comes in hot into their input circuitry; You just have to control the output afterwards to keep your gain staging right!
You should be aware that digital and analog systems measure audio differently. In your DAW, gain is measured in terms of dBFS (decibels full scale). And this is why a good rule of thumb to remember is: -18 dBs (roughly) on the analog domain equals 0 dB on the digital realm.
One last concept to understand is the term Unity Gain. Unity Gain refers to when a device such as a fader or level control is neither cutting or boosting the incoming signal. To achieve Unity Gain, the output must be equal to the input.
You can check to see if your track is at Unity Gain is by turning devices on and off and seeing if the output level changes. Let’s say you are processing a drum loop through a compressor. If you turn the compressor off and the volume decreases, you know you haven’t achieved unity gain.
This is one of the most important principles of gain staging.
This is because louder signals will always sound better to the human ear. It doesn’t matter who you are or how trained your ear is. This is just how human hearing works. You should always strive for unity gain to properly assess if any effect or processor you are adding is improving your audio signal.
Understanding Gain Staging
When it comes down to it, gain staging is about maximizing the clarity of your mix.
Luckily this has become pretty simple as far as digital audio workstations are concerned. The main tool you will use for gain staging are the output level meters within your DAW.
Output level meters are a straightforward graphical representation of volume levels within a project file, and are usually one of the most accessible tools on the main screen of your DAW.
Each track will feature a peak level meter to let you know how loud it is, and there will be a separate one for the master as well.
Here is an example in Ableton:
Additionally, meters can be found on send tracks and within plugins. In some DAWs you will even find meters in between devices on a track, so you can see if your levels are pushing into the red zone anywhere within your signal chain.
Within a project file, there are dozens of places where you have control over the levels in your song. This includes track levels, input and output gains on plugins and effects, and your master channel.
To make everything sound as good as possible, you have to achieve the right balance between all of these different levels.
How Gain Staging Improves Your Mix
When you’re working with a solid gain structure, the result is a mix that is cleaner and ultimately louder. Your tracks gel together better, your mix breathes better, and you’ll be able to master at a higher level.
But when gain staging is executed poorly in your projects, you aren’t taking advantage of your DAW’s full capabilities, and sometimes you might even create frequency balance problems in your mix. This will result in your song not translating well across multiple sound systems.
Additionally, when you have problems with your levels throughout your project, particularly if they’re too loud, it winds up cutting into the overall quality of your audio.
By not leaving enough headroom throughout your mix, it can easily become overloaded with unwanted distortion that will leave it sounding muddy and weak.
To better understand how to avoid these problems, let’s look at some of the elements that are involved in the gain staging process.
Signal Chain
To develop good gain staging practices, it’s a good idea to have a basic understanding of signal flow.
A signal chain/flow is simply the order in which sound flows throughout your project.
Let’s look at a basic example of a simple signal chain.
As an example, the first stage in a signal chain, the sound source, could be a vocalist singing. The sound of their voice is then captured as an audio signal by a microphone.
The signal flows from the microphone into a mic-preamp and then into an audio interface. The audio interface then converts the signal from analog to digital as it enters your computer.
The audio signal from the vocalist is then recorded onto your hard drive through a track input in your DAW. From there, the signal flows from the audio track output to the master channel.
As the audio leaves your computer, it’s converted from digital back to analog. The last step in the chain is for the audio to flow through your audio interface output and into your speakers, or headphones, before finally arriving in your ears.
A signal chain can result in many different gain stages. Setting appropriate levels at each stage will ensure that you wind up with a solid gain structure. In the next section, we outline how to set the correct levels by looking at a common problem...clipping.
Avoid Clipping
When a sound is clipped, the peaks of its waveform are literally being cut off. This means that you are losing some of the resolution of your sound and causing distortion!
Check out the diagram below to visually see how clipping affects your sound. The first image is a sine wave with plenty of headroom, the second image is the same tone with less headroom, and the last is the same sound, but clipping.
Notice how the tops and bottoms of the waveform are cut off, meaning that audio information has been lost.
While distortion is commonly used as an effect within your productions, clipping is almost always an unwanted side effect of not leaving enough headroom.
Headroom refers to the amount of gain available before an audio system is overloaded. To help illustrate this, the level meters in most DAW’s use an intuitive color coding system:
- Green levels are good
- Yellow levels are getting close to clipping
- Red levels are clipping
When you see tracks entering the red zone, your producer instincts should immediately alert you that there are problems with your mix.
Note: This is basically limited to the digital realm. With analog gear, sometimes driving a signal into the red zone is completely acceptable and often sounds good because there’s actual physical components and “limits” involved.
To help you further understand this concept, consider the following example:
Let’s imagine the total amount of available gain on a track as an 8-ounce drinking glass. In this example, audio will be represented by water which is being poured into the glass.
The top of the glass represents 0 dB, and all the space between the top of the glass and the bottom of the glass is our headroom.
If we pour 2 ounces of water into the glass, we haven’t exceeded our headroom, but we aren’t really making the most of it either. If we pour in 6 ounces of water, the glass will be rather full, but we’ll still have plenty of room left over for safety.
Should we pour 8 ounces into the glass, we’d still technically be in the clear, but who wants to drink out of a glass that is completely filled to the brim? It becomes much more difficult to manage the water right at the top of the glass and more likely to spill and make a mess.
Now imagine that we pour 9 ounces of water into the glass. We have now exceeded our headroom, and we know that a full ounce of water is going to come spilling out of the glass. The water has been clipped!
It’s the same situation when you’re dealing with audio levels, you want to keep them at a level that’s manageable and won’t cause any waste.
By leaving yourself enough headroom during the mixing process, you’ll be able to get your tracks sounding better and louder once you move into the mastering process.
Noise floor
Noise floor refers to the amount of unwanted noise that makes its way into a recording. If you wind up with a bit of noise on each track in a project, eventually this noise will build up and become more noticeable within your mix.
In the days of analog recording, audio engineers had to be careful to control noise floor issues such as tape hiss. With small amounts of noise in each recording, the noise floor in a full project could grow too loud if the gain structure was executed poorly.
Working with digital audio is a bit different however. When dealing with 24 bit digital audio inside a DAW, the noise floor is so low that it doesn’t really come into play. You can drop to lower levels like -15 dB and not have to worry about introducing noise.
However, noise floor can still come into play when you are recording audio such as a vocal or acoustic guitar through a microphone. If you record at too low a level, you may wind up with extra noise in the background of the recording.
Check Your Plugins
You don’t just have the mixer faders to worry about in your DAW. Most plugins have their own output gain control and many also feature an input gain control.
When working with plugins, one important reason for gain staging is to ensure that the devices in your signal chain are actually improving your sound.
If you are running audio through a compressor, you should be able to see how it is actually affecting the signal. In this sense, gain staging will help you make sure the devices in your chain are being used purposefully.
Remember that to the human ear, louder is always better!
If you’re working with EQ’s, be aware that they affect gain on a track as well. If you add a large boost to the low end of your sound, you will be adding gain that you may not notice.
This is why EQ plugins tend to represent boost and cuts in terms of decibels.
You can handle this by using the output gain on the EQ unit to compensate for the increased volume.
When it comes to other audio effects like compressors, it's a good idea to keep an eye on the input of the plugin as well as the output.
Sends And Returns
Another area that gain comes into play is with send and return tracks in your projects.
When working with send effects, you are creating a second instance of an audio source for the purpose of parallel processing.
The send represents how much of the original signal is sent to the return track, with the effect being placed directly onto the return track. The return track itself will have its own fader, allowing you to adjust the level of the effect independently from the original signal.
For example, you might send a vocal into a return track with a reverb on it. This way you still have the unprocessed original vocal, which is then mixed with the reverb unit’s output.
When dealing with return tracks, you will need to adapt your gain staging practices as it regards different types of effects.
When working with time based effects like reverb and delay, a golden rule is that you shouldn’t touch the faders on those return channels. They should be kept at 0 dB’s.
Say you’re using a reverb send to add the same effect to a number of tracks. If the reverb is too loud on a pad, you may be tempted to adjust this using the return channel fader.
But in doing so, you would be lowering the volume of the reverb on all the tracks it’s applied to and throwing off your mix!
Instead, you can keep the return fader at unity gain and use the send amount to mix in the appropriate amount of the send effect.
However, working with gain dependent plugins such as compressors and analog modelled devices is a whole different story.
For example, if you are using a send to parallel process with a compressor, you want to have its amount turned all the way up. Using the full signal will ensure that the compressor, which is gain dependent, will be engaging properly with the audio.
With the send amount turned all the way up, you can adjust the return channel fader to get the right mix of the original signal to the compressed one.
Experiment with this by yourself. Leave the return fader channel at 0 dB and play with the amount of send levels; Pay close attention to the amount of gain reduction at different send levels.
The changes you will notice are because compressors are gain dependant plugins, so if you send a different amount of gain they will react completely different. This is why it’s advisable to send the full signal, setup your compression, and then blend it to taste with the return channel fader.
Leave Room For The Mastering Process
In order to get a quality master out of your song, it’s necessary to start with a good mix.
For this reason, you should always keep the master channel fader at 0 dB.
If your master channel is in the red, you aren’t leaving yourself enough headroom to properly master your track.
A good rule of thumb is to leave yourself at least -6 dB of headroom on the master channel while you are mixing your song. This will ensure that whoever masters your song has enough headroom to work their magic, whether that means doing it yourself, or outsourcing to a professional mastering engineer.
If your master channel is being overwhelmed with gain, you should select all of your tracks and turn them all down at once rather than reduce the level using the master fader.
If the volume sounds too quiet while you’re working, you can always turn up your speakers, but you can’t fix a bad mix in the mastering process.
Conclusion
Poor gain staging practices are a problem that many producers aren’t even aware of, but luckily, it’s not a very difficult issue to fix.
It may not be the most exciting part of producing a track, but learning to create proper gain structures in your music will ensure that your mixes sound better.
Not only that, but good gain staging practices will allow you to take full advantage of your DAW’s and plugins capabilities.
With how easy it is to achieve good gain staging practices in digital audio, there’s really no excuse for ignoring this technique in your productions.
Now we want to hear from you!
Are there any gain staging tips we forgot to mention?
Let us know in the comment section below!
Do you want better Serum presets?
Download our free Ultimate Serum Library and improve your sound library today.